Inleiding
iPhone batterijen behouden tot 80% van hun capaciteit tot 500 oplaadcycli, wat ongeveer 18-24 maanden duurt bij de meeste gebruikers. Daarna kan het zijn dat je iPhone veel vaker moet worden opgeladen en dat iOS je zelfs waarschuwt dat je batterijprestaties beïnvloed worden (met andere woorden, dat je telefoon trager wordt). Gebruik deze handleiding om je batterij te vervangen en je iPhone weer optimaal te laten presteren.
Neem de juist voorzorgsmaatregelen als je batterij gezwollen is.
Let op: Het kan zijn dat je iPhone, na de reparatie, een waarschuwing weergeeft over de "echtheid" van de iPhone-batterij, zelfs als je originele Apple-onderdelen gebruikt. Als je iPhone gewoon normaal functioneert, kun je deze waarschuwing negeren.
Kalibreer, voor een optimale performance, je nieuw geplaatste batterij: laad deze op tot 100% en blijf deze opladen voor minstens twee uur langer. Gebruik je telefoon vervolgens totdat de batterij volledig leeg is en je telefoon daarom uitvalt. Laad je telefoon, tot slot, weer helemaal op naar 100%.
Wat je nodig hebt
Video overzicht
-
-
Schakel je iPhone uit voordat je met de demontage begint.
-
Verwijder de twee 6.9 mm lange pentalobe schroeven aan de onderkant van de iPhone.
-
-
-
Plaats op 3 mm van de punt van je plectrum een markering met een stift.
Got to step 2 and realized the fix kit doesn't include an opening pick! Looks like a guitar pick, and I have those lying around. Is that expected? Looks like the pick is used in many steps below. There's a little blue crowbar that isn't mentioned in the instructions. Perhaps that replaces the opening pick?
Hi! I can't see which guide you were using when writing this comment. Can you reply here with which guide and fix kit you used?
I see you posted this in Meta. I hope it's resolved soon! In the meantime, a guitar pick may work well enough for your repair.
what fix kit?
My fix kit didn't include an opening pick either
My AliExpress refurbished screen came with a pick that has a coin-like circle that pops out, so no modification was necessary
-
-
-
Plak een aantal lagen tape op het scherm van de iPhone tot het gehele scherm bedekt is.
-
Als het je in de volgende stappen niet lukt om de zuignap op het scherm te bevestigen, kun je ervoor kiezen om een stuk duct tape in een handvatvorm op het scherm te plakken. Hiermee kun je dan het scherm omhoog tillen om een opening te creëren.
-
-
-
Trek de blauwe hendel naar achteren zodat de anti-klem vrij kan bewegen. (Op deze manier deactiveer je de openingsstand van de anti-klem.)
-
Schuif de armen over de linker- of rechterzijde van je iPhone.
-
Plaats de zuignappen dichtbij de onderkant van de telefoon—één op de voorkant en één aan de achterkant.
-
Druk beide zuignappen aan, om zuigkracht uit te oefenen op de gewenste plek.
-
-
-
Trek het blauwe handvat naar voren om de armen van de anti-klem te vergrendelen.
-
Draai het handvat 360 graden met de klok mee of tot de zuignappen uit beginnen te rekken.
-
Zorg dat de zuignappen op één lijn met elkaar zitten voordat je begint met het openen van het toestel. Als je ziet dat de zuignappen niet meer op één lijn zitten, maak je ze los en breng je ze weer op de juiste positie aan.
-
-
-
Verwarm een iOpener en plaats deze tussen de armen van de anti-klem op je telefoon.
-
Vouw de iOpener zodat deze op de onderkant van de iPhone komt te liggen.
-
Geef de lijm een minuutje de tijd om los te komen zodat de anti-klem een opening kan creëren.
-
Steek een plectrum in de opening onder het scherm en de plastic rand, en niet onder het scherm zelf.
-
Sla de volgende drie stappen over.
-
-
-
Gebruik een föhn of een warmtepistool, of prepareer een iOpener en leg deze op de onderkant van de iPhone gedurende ongeveer een minuut om zo de lijm die eronder zit te verzachten.
-
-
-
Trek de zuignap omhoog met een stevige, constante kracht om zo een kleine opening tussen het voorste paneel en de achterste behuizing te creëren.
-
Steek een openingsplectrum in de opening onder de plastic rand van het scherm, niet onder het scherm.
It seems like I need a third hand to do this. To hold the phone; hold the suction cup; and push the pick in the space.
-
-
-
Open de iPhone door het scherm van links naar rechts open te klappen, alsof je de achterkant van een boek opent.
-
Laat het scherm op een object leunen, zodat je niet te veel spanning op de kabels zet en je nog steeds aan de telefoon kunt werken.
-
-
-
Verwijder de vijf schroeven die het paneel op de logic board-aansluiting bevestigen, met de volgende lengtes:
-
Drie 1.0 mm Y000 schroeven
-
Eén 1.3 mm Y000 schroef
-
Eén 3.7 mm Phillips schroef
FYI: I used a tiny piece of scotch tape to hold those 1mm screws in place while aligning the magnetic screwdriver. Otherwise they are so tiny the magnetic bit pulls them right out the hole.
-
-
-
-
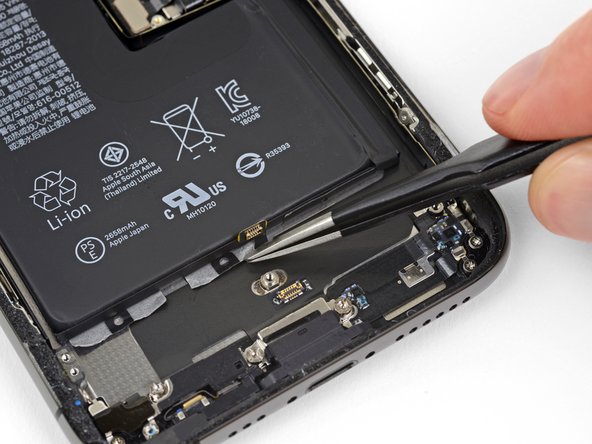
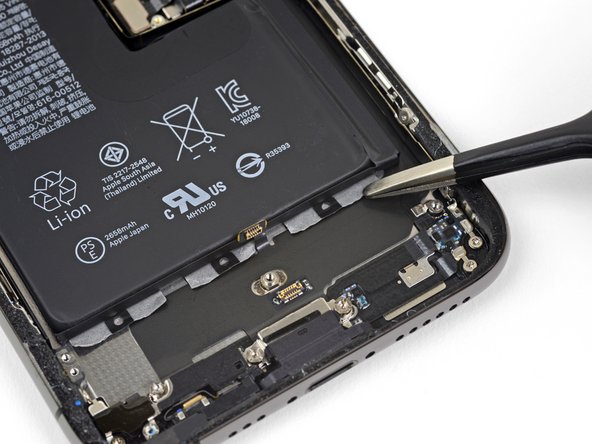
Gebruik een spudger of een schone vingernagel om de batterijaansluiting uit het contact op het logic board omhoog te duwen.
-
Zorg dat je de aansluiting wegbuigt van het logic board om zo te voorkomen dat deze tijdens de reparatie per ongeluk contact maakt met het contact en zo de telefoon mogelijk aanzet.
-
-
-
Gebruik een spudger of een vingernagel om de aansluiting van de sensormodule in het voorste paneel omhoog te duwen en te ontkoppelen.
In my phone the connector made poor contact with the socket resulting in no sound audible through the phone receiver/headset. There was an overhang of insulation close to the socket which I believe may have prevented a good connection. So if you have these kinds of audio problems you might see if this is the problem.
-
-
-
Gebruik een spudger of een vingernagel om de aansluiting van de OLED-schermkabel los te koppelen.
-
-
-
Gebruik een spudger of een vingernagel om de aansluiting van de digitizerkabel uit het contact omhoog te duwen.
Reassembly: reconnecting the press connectors upon reassembly was so hard, even for the ones not seated in a recessed location !! It took me two days to get them reconnected. What helped me was to shine bright lights on all sides of the iPhone and then hold the iPhone vertically like a book and press it in that way. They are now all in, but the touchscreen functionality has disappeared :( so I will need to reconnect that one.
-
-
-
Til de kabel voorzichtig omhoog totdat deze loskomt van de lijm eronder.
Will replacing camera and sensors fix damaged face I'd
No, FaceID will be disabled because the original sensors are paired with the logic board.
-
-
-
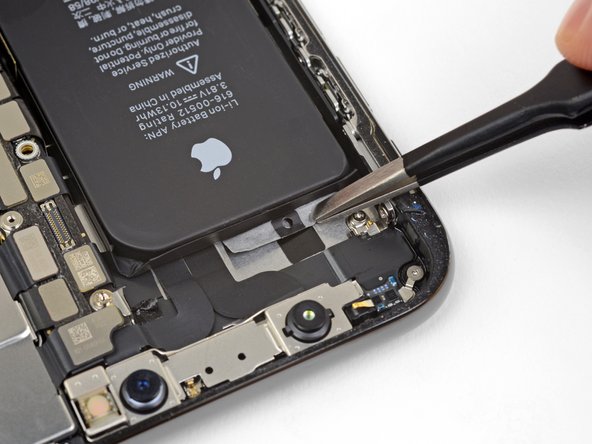
Verwijder de vijf schroeven die de twee plaatjes onder de trilmotor en de hoofdspeaker bevestigen:
-
Eén 1.0 mm tri-point Y000 schroef
-
Twee 1.3 mm Phillips schroeven
-
Eén 1.7 mm Phillips schroef
-
Eén 1.8 mm Phillips schroef
Bonjour,
Plus pratique avec une Y000. Dans mon cas c’était impossible en Y00.
Bonne journée. :)
got stuck on the 1.8 mm screw and had to abort. The Phillips head provided “PH000” didn’t quite fit and stripped the screw.
I ended up skipping this step through 32. It’s not necessary to take the speaker and taptic thing off. I just used the thin black spudger flat edge and pried under the battery on the L-shaped edge and dislodged the adhesive and then did the same on the top edge. You will end up bending the old battery but that’s ok—just don’t poke it. keep poking the flat edge of the spudger in there kind of like a knife to break the adhesive. once you get at least two spots of the adhesive pulled, the rest comes up quite easily when you lift the whole battery.
I agree with R.J. The bracket screws are minute. They are much easier to remove than to put back. Avoid taking them out if you can.
-
-
-
Til ze voorzichtig omhoog om ze los te maken en wees voorzichtig dat je ze hierbij niet buigt.
-
Indien nodig kun je wat warmte toedienen met een föhn of warmtepistool om de lijm te verzachten. (Het gebruik van een iOpener is niet slim, aangezien dit de veercontacten aan de bovenkant kan buigen.)
-
-
-
Verwijder de speaker.
I thought my speaker gasket was also missing, however looking back into the part box I found it tucked under the flap at the other (unopened) side of the box. Glad I took a second (and closer) look. IFIXIT needs to do a better job securing very small parts as it is very easy for these types of parts to get jostled during shipping and then could fall out or stuck in the box unnoticed. I've purchased iFixit products for more than 10 years and am super satisfied their quality in parts and provided instructions. Hopefully they'll make some adjustments to their shipping containers as I'd love to continue using them.
My speaker gasket was stuck to the inside of the box also. Unfortunately it has the back peal removed and has stuck itself to the cardboard box. I tried to remove it but it was firmly attached. Bummer. This is my first iFixIt. Please package it more carefully as the other person said.
I can't find mine in the part box. Is it possible it was excluded?
It might have fallen out. Search in the crevasses of the box. If you still cannot find it contact iFixit.
Update to last comment, I looked again at the listing for the battery with and without the "fix it kit". I ordered without, and apparently, the speaker gasket is part of the kit. Will need to order separately and take the phone apart again and replace the seal and battery adhesive again to install the gasket.
-
-
-
Gebruik een spudger om de flexkabel van de trilmotor los te koppelen door deze in een rechte beweging uit het contact omhoog te duwen.
-
-
-
Iedere kleefstrip heeft een zwarte treklip aan het einde welke lichtjes vastzit aan de zijkant van de batterij.
-
-
-
Herhaal de stap hiervoor om de resterende twee kleefstrips aan de onderkant van de batterij los te maken.
The tabs are stuck on with the same glue that is holding the battery down. It is fairly strong but will come off with some patience and consistent progress.
Despite the photo, I do NOT suggest using the tweezers for this but the black plastic spudger that comes with the kit. I say this after having the tweezers lose grip and slide across the bottom black ribbon attached to the case. If you must use the tweezers because of the strength of the glue, use a downward force into the case bottom, not an outward force. That way, you will not have the same happen to you…
Here is hoping the slight scratch did not damage anything vital…
-
-
-
Om je kans van slagen te vergroten:
-
Zet geen extra druk op de batterij. Zorg dat je de iPhone aan de zijkanten vast hebt.
-
Houd de strips plat en vlak terwijl je trekt.
-
Trek zo langzaam mogelijk, zodat je de strips de tijd geeft om uit te rekken en los te komen. Het duurt ongeveer 15-30 seconden voordat de strips zijn uitgerekt en loskomen.
-
Trek in een zo laag mogelijke hoek aan de lipjes, zodat je zeker weet dat de strips niet scheuren op de zijkant van de batterij.
-
Als één van de strips wel afbreekt terwijl deze nog onder de batterij vastzit en niet kan worden verwijderd, ga je gewoon verder met de andere strips en de hierna volgende stappen.
Pour cette étape, vous pouvez saisir les bandes adhésives avec une pince à bouts ronds (pour éviter de percer la batterie) et l’enrouler petit à petit.
-
-
-
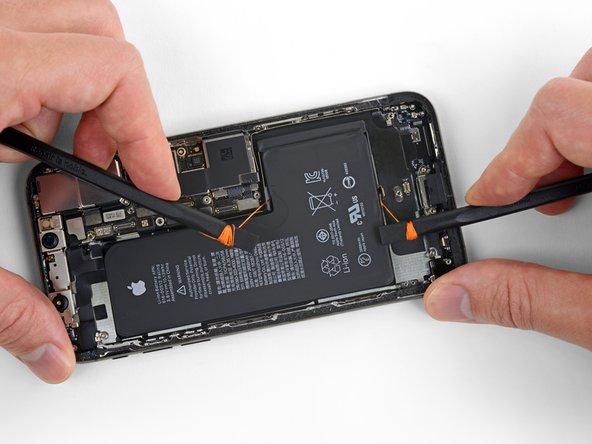
Pak één van de buitenste kleefstrips onder de batterij vast en trek deze langzaam weg van de batterij, in de richting van de onderkant van je iPhone.
-
Trek met een constante kracht zodat er steeds spanning op de strip staat, totdat deze tussen de batterij en de achterkant van het frame wegschiet.
-
-
-
Als een van de kleefstrips onder batterij is afgescheurd en niet meer vast kan worden gepakt, kun je de batterij proberen te verwijderen met behulp van isopropyl alcohol (>90%). Dien wat druppels onder de batterij toe, in de buurt van de afgebroken kleefstrip(s).
-
Til de batterij, na ongeveer een minuut, op voorzichtige wijze omhoog uit de inkeping.
-
-
-
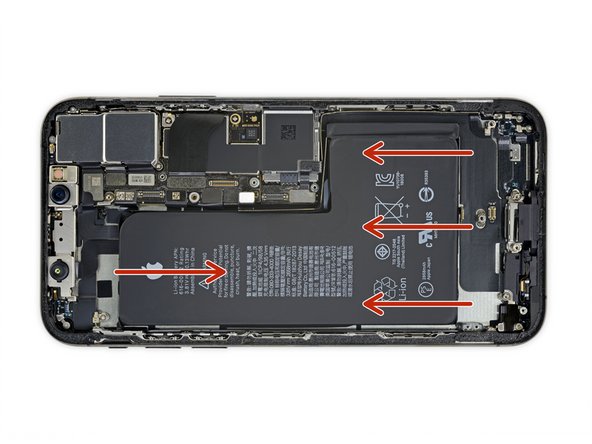
Als één van de kleefstrips is afgebroken en de batterij nog steeds aan de achterkant van het frame vastgeplakt zit, prepareer je een iOpener of gebruik je een föhn om de achterkant, direct achter de batterij, te verwarmen.
-
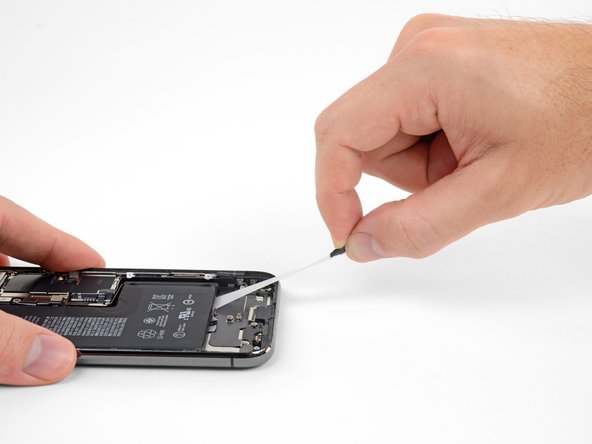
Draai de iPhone weer om en rijg een sterk stuk dun draad (zoals flosdraad of een stuk van een dunne gitaarsnaar) onder de batterij door.
-
Trek het stuk draad van links naar rechts in een zagende beweging om zo de kleefstrip los te krijgen. Dit kan even duren, aangezien de kleefstrip langzaam loskomt, maar met wat geduld moet dit lukken. Zorg dat je de batterij niet vervormt of beschadigt.
-
Begin bij de boven- of onderkant van de batterij en ga richting het midden. Trek het stuk draad echter niet door het middelste een-derde deel van de batterij, aangezien je dan de lintkabels of de draadloze oplaadspoel daaronder kunt beschadigen.
I didn't have any of the alcholol, so came in straight here. Can't over stress the need for patience, but once I put the phone on my microwaved sock of rice (that's how we roll) and started to gently saw away with the floss - it all came good.
-
-
-
Pak de batterij aan de onderkant vast en verwijder deze uit je iPhone.
-
Bevestig de batterij, koppel deze los en ga verder met het weer in elkaar zetten van je toestel.
For those that plan to proceed with the hack that eliminates the “battery is not genuine” message and no battery health information (requires extra tools that most don’t have), be careful not to bend the original battery’s flex cable too much. I found out the hard way that the flex cable doesn’t really “flex” much and ended up snapping in half when trying to hook it up to a programmer. So much for trying to do the hack :(
How do I force restart and calibrate the battery at the same time?
-


Vergelijk je vervangende onderdeel met het originele onderdeel — het kan zijn dat je meerdere onderdelen mee over moet zetten of beschermlagen voor de lijm moet verwijderen voordat je het nieuwe onderdeel kunt installeren.
Om je toestel weer in elkaar te zetten, volg je deze instructies in omgekeerde volgorde.
Breng je e-afval naar een R2 of e-Stewards gecertificeerde recycler.
Ging je reparatie niet zoals gepland? Check dan onze
Antwoordencommunity voor hulp bij het oplossen van je probleem.
Annuleren: ik heb deze handleiding niet afgemaakt.
110 andere personen hebben deze handleiding voltooid.
Met dank aan deze vertalers:
100%

Thomas Keulemans helpt ons de wereld te herstellen! Wil je bijdragen?
Begin met vertalen ›


17 opmerkingen
i don’t know what happened but now my iphone xs will only boot into recovery mode and there is nothing showing up on the display. i have double triple quadruple checked and dont know what my issue is. any feedback on the matter would be greatly appreciated.
My iPhone has been turned off completely for the past few weeks, I have tried to hard restart it but nothing seems to work. It has a black screen and isn’t responding to anything. Nothing has ever been wrong with the phone it just shut down one day and hasn’t restarted since. Do you have a suggestion to get my phone working again?
Anyone have an issue where the phone won’t charge after replacing the battery/
Yes, I cant figure out why. I wonder if because its not the original battery, it wont let the new one charge? Idk.
Nick Lo -
It is possible the you went to deep with the plectrum, knocking of a capacitor from the logic board. I think it’s best you take it to a really good repair shop where the owner has expert solder skills to replace it.
Good luck
I ended up skipping steps 20-32. The kit didn’t come with the right screwdriver top and I realized it’s not necessary to take the speaker and taptic thing off.
I just used the thin black spudger flat edge and pried under the battery on the L-shaped edge and dislodged the adhesive and then did the same on the top edge. You will end up bending the old battery but that’s ok—just don’t poke it. keep poking the flat edge of the spudger in there kind of like a knife to break the adhesive. once you get at least two spots of the adhesive pulled, the rest comes up quite easily when you lift the whole battery.
Hey, after changing the battery the volume and silent buttons stopped working. There is no apparent reason as why they would, what could it be and can it be fixed before I close the phone ??
you've likely damaged the volume flex cable that lies under the battery, it is very thin and easily damaged. unfortunately pull tabs rarely work as intended. alcohol is the best method for loosening adhesive.
I skipped removing the taptic engine and speaker because I knew I was going to break the adhesive strips when pulling as they break very easily. Just dripped some alcohol, waited 10 minutes and with a bit of force the battery came right off without even bending. Makes the process much quicker although that’s not the intended way of removal.
Ive got a metal protection plate of some sort in-between the screen and the battery around the inside perimeter of the phone. it is blocking access to most of the bottom screws. and does look like it pulls out. might be fixed at the bottom or sides.
anyone found one of these plates in their attempts? might have been placed by a repairer at some point
that is the display frame you have damaged it and you will need to replace the display because the display has its own frame and that frame holds it in place.
My phone's touch screen and camera were unresponsive after reassembly. I prised it all apart and checked all the connections 3 times unfortunately ruining the glue around the edge and then after Googling found a Forced Restart cleared the problem. Press and release volume up button then the volume down button then hold and keep holding the on off button on the right until the apple appeared. And hey presto it all worked!!! I'm well chuffed as I'm a 64 year old 'girl' with no experience of this sort of thing but am pretty competant with practical things - I thought 'how difficult can it be?' Not too difficult, except for removing the adhesive from behind the battery (should have read the detailed instructions properly) which I eventually did with some Isopropyl alcohol following the further instructions.
My top tip! I found putting all the screws on a bit of 'blue tac' kept them safe and in order.
Very tricky indeed but thankfully I managed to replace battery and screen and it worked 😊
After the change of battery the lower speaker has stopped to work. The battery it's ok and works fine but i have only speaker working right now.
I have tried to connect and disconnect it, with and without the battery connected but nothing. I don't thing that the speaker is dameged, but maybe the connector? What i can verify?
After replacing battery, I am getting ghost typing and activity on the touchscreen without touching it. And the phone is hot. What did I do wrong? Replaced a battery in my iPhone 6s prior to trying battery replacement on the XS, thought I would have equal success, not! Also noted the warning about the genuineness of the new battery, don't mind that but I also lost the health of the battery status; was that supposed to happen?
Friendly Suggestion: would have purchased the full fix kit had I know I would need to replace the adhesive gasket during reassembly. Having purchased many kits before, I have all the tools. When looking at the photo, it didn't seem to include anything other than the battery, so I just ordered the battery. Missed the tiny adhesive gasket! Might want to highlight items like that so when people order, they don't make a similar mistake.
Der Original Akku ist codiert. Egal, ob man einen zweiten Apple Original Akku oder einen neuen Fremdakku einbaut erscheint bereits in den Einstellungen eine "Wichtige Batterienachricht" mit einem roten Punkt. "Unbekanntes Bauteil" und die "Informationen zum Batteriezustand" sind nicht verfügbar. Diese Nachricht verbleibt immer und nervt auf Dauer immens.
Der Akku muss angelernt werden und dieses können von jetzt an nur authorisierte Apple Servicebetriebe und diesen ist es durch Apple verboten die notwendige Info weiterzugeben.
Dies ist nicht zu verwechseln mit der bereits bekannten Rekalibrierung seit iOS 14.5.
Seit dieser neuen Codierung kostet der Akkutausch bei Apple auch nicht mehr 75 € sondern aktuell 99 € (Stand Novmber 2023 in Deutschland).
Damit sind künftig alle nicht authorisierten Servicebetriebe raus - denn wer will schon dauernd diese Mitteilung auf dem Bildschirm haben?
Überlegt vorher, ob unter diesen Bedingungen ein eigener Akkutausch noch sinnvoll ist .....
Manfred Wachtel - Antwoord
Lieben Dank @manfredwachtel ! Mehr Infos dazu haben wir auch in unserem Blog zusammengefasst: https://de.ifixit.com/News/78890/teileko...
Sandra Hiller -