Deze vertaling geeft mogelijk niet de meest recente updates van de bronhandleiding weer. Help ons met het updaten van de vertaling of bekijk de bronhandleiding.
Inleiding
Deze reparatiehandleiding is geschreven door medewerkers van iFixit en is niet officieel goedgekeurd door Google. Meer informatie over onze reparatiehandleidingen vind je hier.
Gebruik deze handleiding om een gebarsten of gebroken scherm van je Google Pixel 6 Pro te vervangen.
Je nieuwe scherm wordt geleverd met een vooraf geïnstalleerde vingerafdruklezer. Als dit niet het geval is zul je de originele vingerafdruklezer van je oude naar je nieuwe scherm over moeten zetten. Als je enkel de vingerafdruklezer vervangt, zul je de lezer opnieuw moeten kalibreren om de functie te behouden.
Als het frame vervormd is, is het belangrijk dat je het frame vervangt. Als je dit niet doet, riskeer je dat het nieuwe scherm stuk gaat vanwege de oneven druk van het frame.
Neem, als je batterij is opgezwollen, de juiste voorzorgsmaatregelen. Zorg ook dat je de batterij van je toestel tot onder de 25% ontlaadt voordat je het toestel uit elkaar haalt. Dit verkleint het risico op een brandgevaarlijke situatie bij het tijdens de reparatie per ongeluk beschadigen van de batterij.
Let op: De Pixel 6 Pro bevat klasse 1 lasers. Demontage kan leiden tot blootstelling aan onzichtbare infrarode laserstraling.
Let op: Deze handleiding laat alleen zien hoe je het scherm, inclusief het plastic veiligheidsframe, moet vervangen. Sommige nieuwe schermen worden echter geleverd zonder het vooraf geïnstalleerde frame (ook wel chassis genoemd), waaardoor je een andere procedure moet volgen. Zorg ervoor dat je het juiste onderdeel hebt voordat je met deze reparatieprocedure begint.
De waterdichtheid van je toestel zal na de reparatie afhangen van hoe goed je de lijm hebt weten te bevestigen. Ga er echter wel vanuit dat je toestel de originele water- en stofdichtheid verliest.
Zorg dat je een set vervangende kleefmiddelen voor het scherm hebt voordat je met deze procedure begint.
Wat je nodig hebt
-
-
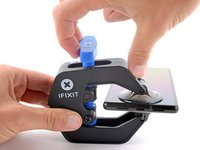
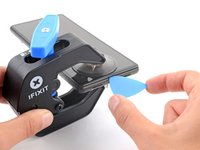
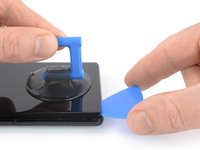
Trek de blauwe hendel van de anti-klem naar achteren om de armen van de anti-klem te ontgrendelen.
-
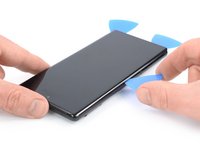
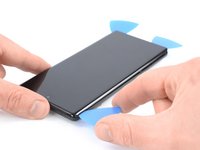
Schuif de armen van de anti-klem over de linker- of rechterzijde van de telefoon.
-
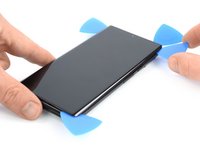
Plaats de zuignappen aan de onderkant van het scherm: één aan de voorkant en één aan de achterkant.
-
Druk de zuignappen aan voor een betere zuiging.
-
-
-
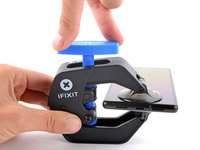
Trek de blauwe hendel naar voren om de armen te vergrendelen.
-
Draai de hendel 360 graden met de klok mee of totdat de zuignappen beginnen uit te rekken.
-
Zorg dat de zuignappen op een lijn blijven zitten ten opzichte van elkaar. Als ze niet meer op een lijn zitten, maak je de zuignappen los, breng je ze weer op een lijn en ga je verder.
-
-
-
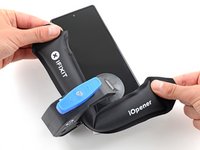
Verwarm een iOpener en leg deze door de armen van de anti-klem heen op het scherm.
-
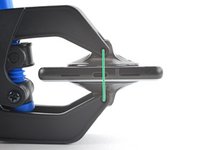
Vouw de iOpener zo dat deze op de onderste rand van de telefoon ligt.
-
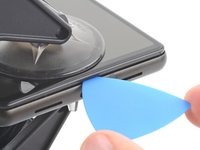
Wacht een minuut zodat de lijm kan loslaten en er een opening ontstaat.
-
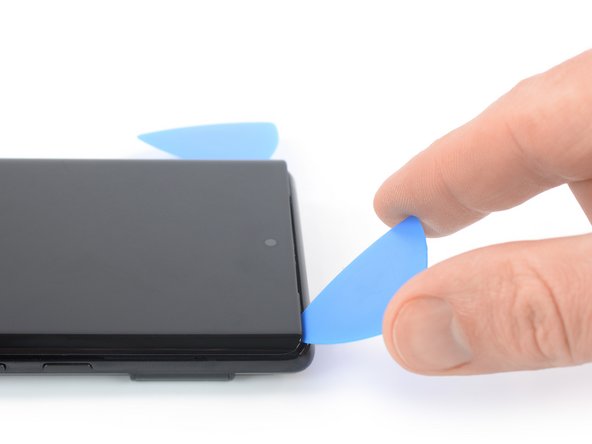
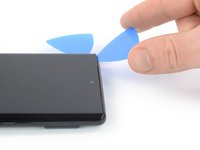
Steek een openingsplectrum in de opening onder het frame zodra de anti-klem een opening heeft gecreëerd die groot genoeg is.
-
Sla de volgende twee stappen over.
-
-
-
Leg een verwarmde iOpener gedurende minimaal drie minuten op het scherm om de lijm eronder te verwarmen.
Do you think that removing the SIM card, also will be a wise step? I'm pretty sure that heating the SIM card is not a good idea.
The SIM is probably no more sensitive than the rest of the phone.
What does "be sure to have replacement adhesives for both the rear glass and the screen." I only had one it didn't mention another one?
I didn't have the replacement adhesive for rear glass nor the 2 sided tape they talk about when putting it back together. It's Sunday, so I don't expect an answer. I decided to go ahead and work up until that point
StlrFan -
-
-
-
-
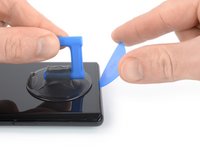
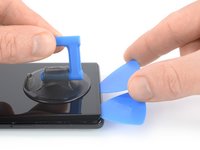
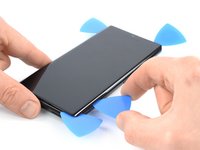
Als het scherm eenmaal warm is, druk je een zuignap op de onderkant van het scherm.
-
Til het scherm, inclusief het veiligheidsframe, met de zuignap omhoog om een kleine opening tussen het scherm en de telefoon te creëren.
-
Steek een openingsplectrum in de opening tussen het frame van het scherm en de telefoonmodule.
-
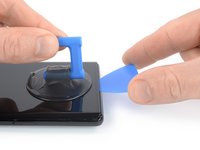
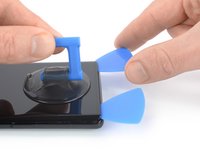
Schuif je openingsplectrum naar de rechter benedenhoek om de lijm onder het scherm door te snijden.
-
Laat je plectrum in de hoek zitten om te voorkomen dat de lijm zich opnieuw aan het toestel hecht.
-
-
-
Plaats een tweede openingsplectrum in de opening aan de onderkant van de telefoon en schuif deze naar de linker benedenhoek om de lijm door te snijden.
-
Laat je plectrum in de hoek zitten om te voorkomen dat de lijm zich opnieuw aan het toestel hecht.
-
-
-
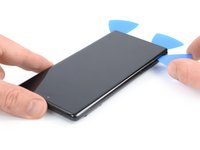
Steek een derde openingsplectrum in de opening bij de linker benedenhoek van het scherm.
-
Schuif je plectrum langs de linkerzijde van het scherm omhoog om de lijm door te snijden.
-
Laat je plectrum in de linker bovenhoek zitten om te voorkomen dat de lijm zich opnieuw aan het toestel hecht.
-
-
-
Plaats een vierde openingsplectrum in de opening bij de linkerbovenhoek van het scherm.
-
Schuif de openingsplectrum langs de bovenkant van de telefoon om de lijm door te snijden.
-
Laat je plectrum in de opening in de rechter bovenhoek zitten om te voorkomen dat de lijm zich opnieuw aan het toestel hecht.
-
-
-
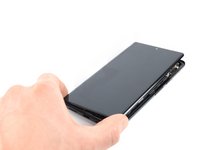
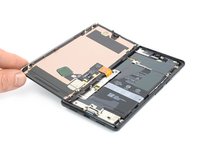
Open de telefoon door de rechterkant van het scherm open te klappen als een boek.
I don't know if it's an earlier or later design, but I am combining 2 phones (1 crushed glass but operational into the casing of one that quit functioning but has good glass) and on both, the ribbon cable for the LCD is a tiny bit too short to fold out flat like this. If you are working on one like mine, extreme care must be taken while holding the LCD up while simultaneously trying to plug the cable back into that very small recessed socket. Almost like you need 3 hands or robot fingers...
I also felt that the cable was too short to fully open like a book, however it is possible that the hinge side of my screen was still pressed in to the adhesive and I did not properly open the screen or I was being overly cautious. Be careful on first approach either way.
-
-
Gereedschap gebruikt in deze stap:Magnetic Project Mat$19.95
-
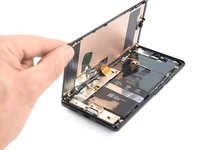
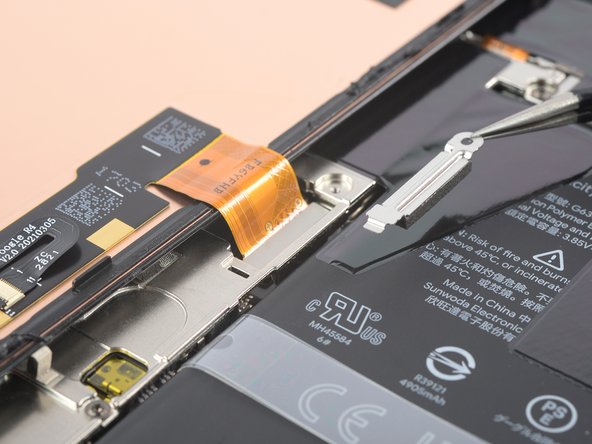
Gebruik een Torx T3 schroevendraaier om de 2 mm lange 3IP Torx Plus-schroef, waarmee de metalen beugel van de schermkabel vastzit, te verwijderen
I don't know if it's an earlier or later design, but I am combining 2 phones (1 crushed glass but operational into the casing of one that quit functioning but has good glass), and on both, the metal holder plate shown here is simply spring connected and that 2mm screw is instead slightly off to the side as part of the aluminum bracket's screws.
Does anyone know the exact dimensions/specifications of this screw? I've misplaced mine and need to find a replacement.
Alternatively, what are the chances the display cable might come loose if I install the display bracket without screwing it in? I would expect there's not too much clearance between the bracket and the display, so it should still mostly hold in place once the display is installed.
I found this -> https://unlockr.ca/products/screw-set-co...
Richard -
-
-
-
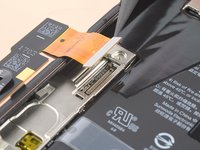
Gebruik een pincet om de metalen beugel, die op de aansluiting van de schermkabel geplaatst is, te verwijderen.
-
-
-
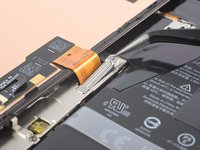
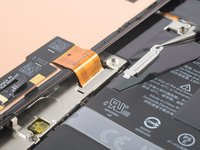
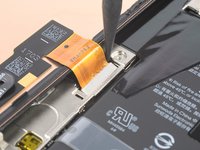
Gebruik een spudger om de aansluiting van het scherm in een rechte beweging uit het contact omhoog te duwen en los te koppelen.
Reconnecting the display port cable was the longest part of my first repair. It helped when I carefully folded the ribbon connector at each end to get the most length out of it and bent it into the proper shape to hover just right over the small port. I lightly bent the cable back at the base and at the connector end.
This connector feels delicate, so it definitely made me take my time and be cautious. The snap is unmistakable, but be careful afterward as you're on a short leash again. I folded the new screen closed like a book and snapped it into place easily.
-
-
-
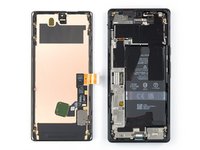
Verwijder het scherm.
-
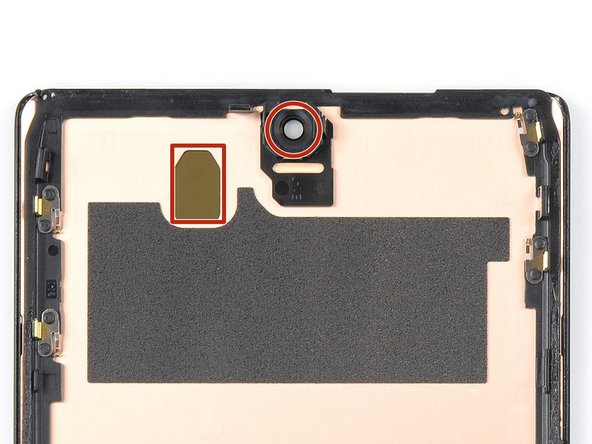
Controleer je in het geval van een nieuw scherm of er folie over het gat van de voorste camera en de uitsnede voor de sensor zit. Verwijder de folie voordat je het scherm plaatst.
-
Sluit je het scherm weer aan en test je alle functies van je telefoon om te zien of alles werkt. Bij het opstartproces zal het scherm gekalibreerd worden. Raak het scherm tijdens dit proces niet aan, aangezien dit tot een foute kalibratie kan leiden. Schakel je telefoon hierna weer uit en ga verder met het in elkaar zetten van je toestel.
-
Gebruik deze handleiding als je op maat gemaakte kleefstrips gebruikt.
-
Gebruik deze handleiding als je een vooraf gesneden kleefstripskaart gebruikt.
-
Als je een nieuw scherm plaatst, kun je deze handleiding gebruiken om de vingerafdruksensor te kalibreren.
Before reassembly, clean around the edge of where the screen was, to remove any debris that may have been captured.
After reassembly, the fingerprint sensor appears to be a common issue with new screens:
* Go to https://pixelrepair.withgoogle.com/udfps on a computer.
* If using Windows, click the help link to install the USB software. After installing, restart the computer and return to https://pixelrepair.withgoogle.com/udfps.
* Follow the steps given to install the fingerprint calibration software.
* Restart the phone.
"Be sure to remove all adhesive liners from your replacement screen. Check the selfie camera recess and make sure you've removed the liner there."
A photo with blue highlight square would've been helpful here...also it's very easy to miss this instruction as you'd be on the adhesive page...
I did take the selfie camera liner this is a bad problem
This is very true. I only realized after turning on my phone the next day that the film blocking the front camera is still there. I had to re-open the screen to remove that black film, which was not obvious at all. I only opened the upper half to remove the film, hopefully the adhesive is not compromised too much...
All went well except for the adhesive. It was simply too small so when Iaid it down it was fine on one side as well as the top and bottom, but the other side required me to pull it over. As it is quite sticky, it bunched up. I cut out part of it and used my own double-sided tape to secure part of it. Otherwise, it was great. Thanks to those who made special note of the cover on the selfie camera window, and the procedure to set up the new fingerprint scanner.
They do not highlight the part that needs to be removed from the new screen, this should be added as the part looks and feels like it is a part of the new screen and removing it could break the new screen. So make sure you remove the selfie screen camera cover even if it looks and feels like there is not one there, it's there.
I ordered Google Pixel 6 pro- fix kit in IFIXIT. I followed the steps mentioned in the repair guide. During repair the finger print symbol is blinking in the screen. I thought it would get set when i do re calibration as mentioned in repair guide but it did not worked. It displays " Can´t use finger print sensor Visit a repair provider or g.co/pixel/fingerprintunlock". Does anyone have same problem??
You have to go to that link and you can re calibrate the new finger print scanner by logging into your account and approving it.
New Finger Print Reader
Boot into fast boot and connect your pixel to your pc
On your PC go to pixelrepair.withgoogle.com/udfps
Follow the PromptsReplacement process went smoothly. I reattached the screen after seating the connector. No sign its working. Just black blank screen. However text and notification sounds still coming through. Even receiving calls. etc on que. I know the phone works, just not the screen.
I figure maybe I didnt seat the connector all the way so I break the adhesive liner (figuring I'll buy another and apply again) and this time I clip in the connector for sure. Still nothing on the screen.
What can I do? Is the screen defective?
If phone is working should I see the display after the connector is seated but the phone still open? Or does the screen need to be seated all the way in the case to turn on? The screen does not display anything in either state by the way...
As an aside, your instructions are so detailed until the point where the screen needs to connect and seat. It would helpful to get more pointers for this final step...It's so frustrating that paper instructions are not included considering I'm about to pull the screen off my phone. It's also very frustrating that I have to load and read multiple sub instructions in the middle of the main instructions, just include all instructions in one booklet and include the booklet in the kit.
-


Zet je toestel, indien mogelijk, aan en test alle functies alvorens je de nieuwe kleefstrips plaatst en je je toestel weer definitief sluit.
Volg bovenstaande instructies in omgekeerde volgorde om je toestel weer in elkaar te zetten.
De beste manier om je nieuwe scherm te bevestigen is door een vel op maat gesneden dubbelzijdige tape aan de achterkant van het scherm aan te brengen.
Lees hier hoe je een diagnostische test uitvoert met behulp van de ingebouwde Pixel Diagnostic Tool.
Breng je e-afval naar een door R2 of e-Stewards gecertificeerd recycle-station.
Ging de reparatie niet helemaal volgens plan? Bezoek dan onze algemene probleemoplossingspagina, of stel je vraag op ons antwoordenforum voor hulp bij het oplossen van je probleem.
Annuleren: ik heb deze handleiding niet afgemaakt.
106 andere personen hebben deze handleiding voltooid.
Met dank aan deze vertalers:
93%

Thomas Keulemans helpt ons de wereld te herstellen! Wil je bijdragen?
Begin met vertalen ›


65Gids Commentaar
The fingerprint scanner doesn't work. I get a message that I need to visit, but the website doesn't exist. Google has a fingerprint repair tool where you connect your phone and boot into rescue mode, but the program says I can't use it as my phone's firmware is newer than the tool's firmware.
Do a google search to see, there are many others with this issue and a few Google support threads where google acknowledged the issue for over two years but doesn't address the issue other than to say it should be fixed in the future firmware update.
So, now I'm stuck without a fingerprint scanner that I used for all security and banking apps.
Did you transfer your existing fingerprint scanner from your original screen to the new one ?
See my note below; I found a solution for this.
These instructions neglect a key point: there is a protective cover over the holepunch camera opening (with the OEM part), and if you don't remove that before installing the screen, you will not be able to take selfies. Some people will consider that a positive, but I'd prefer it not be there.
I was having the same problem that kimsballs mentioned above, but I've solved this for my Pixel 6 Pro, so here's a quick guide... or links to other people's solutions, really.
First, you need to go here, and download the Google USB driver: https://developer.android.com/studio/run...; just get the Zip file and extract it.
CRITICAL: do not use Device Manager to install the file. Locate the .inf file within the extracted folder (mine was titled android_winusb.inf), then right click and select Install. If the Install option is not listed (Win11 doesn't show it at first), click More Options at the bottom of the menu.
Then, go here (MUST use Chrome browser) and follow instructions: https://pixelrepair.withgoogle.com/udfps
I tried your method but the but the finger print repair tool doesn't connect to my phone when i enter fast boot mode. I have the USB driver installed, even downloaded Android Studio to make sure I had it, but still no luck.
I also didn't get the finger print repair tool to connect with my phone in fast boot mode. I followed the trouble shooting guild and ended up at this link. I guess I didn't install the driver correctly.
friends I need help, I bought the original screen that includes the fingerprint reader but when I try to see if it works I get a message saying that: The registration was not completed, the fingerprint sensor cannot be used, consult a repair provider
Diego, I just did this repair. You'll have to download the Android USB driver to a computer https://developer.android.com/studio/run...
CRITICAL: do not use Device Manager to install the file. Locate the .inf file within the extracted folder (mine was titled android_winusb.inf), then right click and select Install. If the Install option is not listed (Win11 doesn't show it at first), click More Options at the bottom of the menu.
Then, go here (MUST use Chrome browser) and follow instructions: https://pixelrepair.withgoogle.com/udfps
I had to reboot my phone twice.
Hope this helps!
(1/2) Hello everyone:
The instructions are great until they stop.
1st hurdle: Applying the adhesive. It is simply a thin ring around the entire device. Not patches. I placed it on the phone (not the screen and then carefully peeled back the plastic using the tweezers and then used the spudger to reapproximate any adhesive that got stretched or moved. I then reattached the screen via the cable and replaced the metal piece and screw, then folded the screen over the phone and ran something firm along the entire edge of the phone. I thought I was messing it up, but it all worked out...
Second hurdle: As discussed the fingerprint reader does not work when you first boot up the phone. However, as others mentioned there is a fix. At first I was worried as I only read about this after purchasing the replacement screen, but it was actually very painless. I am not saying anything new that was not mentioned by Matt Montero and Ted Ostrowski. Just confirming that this works.
(2/2)
Download ZIP: https://developer.android.com/studio/run...
Extract All
locate the android_winusb.inf file
Right click --> Install
Then proceed to https://pixelrepair.withgoogle.com/udfps in chrome.
Follow instructions (very clear and fast).
And you will have to reboot the phone (not computer) twice.
The entire process was ~ 75 minutes.
Seems to be working great!
I also want to add - I think my fingerprint reader is working better than originally. It may be a bias from sub-par operation while living with a very damaged screen for 2 weeks, but my biggest overall complaint with the pixel 6 pro is the fingerprint reader failing. I am not sure if it is the hardware, the calibration, or a combination, but I think it works better than it used to.
Hi Everyone I just wanted to give my experience with the finger print sensor recalibration. I just replaced my screen. I was having zero luck on my windows computer even after installing USB driver and then tried on my old Macbook. Neither detected my phone. I then used the USB-C to USB-C cable (that came with my pixel 6 Pro) and connected to my wife's newer macbook (using Chrome - https://pixelrepair.withgoogle.com/udfps ) and it worked immediately, took like 10 seconds and no fussing with drivers. I spent like an hour before I thought to try using another device. If this is an option for you and you are having issues, i'd definitely recommend using a legit cable and attempting the process on an IOS device (using Chrome).
Best of luck.
This one worked a treat! Thanks for posting :)
alberte -
A quick extra note about the adhesive. The precut adhesive was a bit of a confusing experience for me, i'd personally recommend ordering an extra or a small tube of adhesive in case you need to patch a spot. I found it was best to place the adhesive down on the phone itself before connecting the screen. I had a few spots where the adhesive didn't line up so I used the spudger to push it into place... So far no problems and everything is working fine now. I placed some books on it for about an hour with the phone off just to try to avoid any separation issues in the future. Overall the process was pretty easy and definitely worth the approx. $120 i saved not taking it into a ubreakifix.
Followed these exact instructions with iFixit OEM screen replacement, and the front facing camera no longer works. @mattmontero explained the reason (above):
"These instructions neglect a key point: there is a protective cover over the holepunch camera opening (with the OEM part), and if you don't remove that before installing the screen, you will not be able to take selfies."
It sure would've been nice to have that detail included in the instructions. Now I've got a Pixel 6 Pro with no front-facing camera.
I had the same issue...a photo with blue box highlight would be helpful - I have to order another adhesive and do it over :|
alberte -
Thank you Diego!!! Your instructions saved me hours of frustration. I would have never figured out the below step as I went right into device manager. Appreciate your help!!!
CRITICAL: do not use Device Manager to install the file. Locate the .inf file within the extracted folder (mine was titled android_winusb.inf), then right click and select Install.
I agree the install instructions should be included. If I didn't read the comments from users, I would be tearing the phone down to remove the cover on the selfie camera and would have wasted the cut out adhesive I paid for.
The repair went quite well. Take your time and read the instructions a couple of times before you start AND most importantly the comments. The comments were most helpful in restoring the fingerprint sensor. Thank you @bryanroller
Make sure you take off the protective cover over the front facing camera hole! My kit did have a note on the screen to do that now thankfully.
I used a heat gun to heat up the adhesive. Seemed to work very well. Getting the first opening pick in is a bit tricky - I ended up cracking the screen even further. Once you get that first one started though it goes quite well.
The pre cut adhesive was intimidating at first. It's actually quite easy and forgiving. Set it in place on the phone and use your spudger to move it around and it's all good.
This is the first time I've attempted a repair like this and I must say the kit was well put together and the instructions were pretty good. Someone else mentioned that it would be nice to see the steps on how to put everything back together.
Thanks!
What do you do if the new screen doesn't turn on?
I can fell the phone vibrating when the power button is pressed, but the screen remains blank.
same thing happened to me, and I had to reseat the cable connecting the screen to the phone. The first time, the phone vibrated but the screen stayed black.
The cover and screw went back in even though the cable was not fully seated in the socket, or was possibly off to the side. I was concerned b/c instructions said not to touch screen during first power on, and I thought the screen might turn on when the cable was reconnected, but it did not - maybe the phone turned itself back off since no screen was attached?
Once I reseated the cable the screen turned on when the phone vibrated, then I turned it off and sealed it back up. If you already closed up the phone, you might be able to warm it up, slice the adhesive, and pull the screen back off to get to the cable and reseat it. Not sure if the adhesive would restick, but it is pretty sticky, so worth a shot, or maybe someone can suggest something else besides ordering another OEM adhesive.
I had the same problem. I then disconnected the battery and reconnected and the phone started.
I was able to successfully change my screen, but I would not have been able to complete without reading others' comments.
The ribbon cable bounced out of the socket as soon as I removed the torx screw, so be careful not to lose the screw in the process. Be sure to snap the cable back into the socket securely before screwing the cover back on with the torx screw - I thought I had it in place the first time, and the cover and screw went back together, but the screen did not work until I reseated the cable.
I am sure my phone is no longer water resistant b/c I had issues with the adhesive stretching, sticking off center, the plastic getting underneath it, etc, but I still got enough of it in close enough to the right places to keep the screen on, and it looks fine.
Definitely remove the cover on the inside of the screen over the selfie camera before installing the screen. Install the driver to be able to complete the fingerprint calibration, then restart the phone a couple of times for it to start working.
Thanks everyone for their comments! I've implemented your experiences with the selfie camera cover into the guide.
help i downloaded the google zip file and extracted the usb driver but the android inf file isnt showing up what am i doing wrong
when you have trouble with your fingerprint reader use this https://piunikaweb.com/2022/10/04/pixel-... I spent 3 hours trying to figure this out and it is the only way that I was able to get my fingerprint sensor to work. also, you do not need to reset your phone if you do it this way just restart after installing the software.
Any idea where to get the OEM parts for a reasonable price in EU? The replacemant parts havent been available for a long time here
Ok. So if I were to purchase only the actual screen for my 6 Pro, how do I remove the parts attached to the inner side of the screen? I'm guessing they are one or more of the following... Integrated Fingerprint Reader, Amoled Display, OLED Digitizer, and Display something- looks like I wrote dunes. Because I can buy the screen only, without anything attached to to it, like just a piece of curved glass that is the correct fit, but have zero idea how to remove all that from the old broken piece of glass that is my screen and then reattach all that to a new beautiful uncracked all the heck screen. Thanks!
After failing to do a battery replacement on my samsung s10+ from ifixit I was worried about trying again but I just did the screen from this guide as well as a battery while I was in there and it seems to have worked great! Thanks so much! The fingerprint reader worked by clicking the link in the last step in this article -- just realize that you have to restart the phone a couple times for it to work.
Btw, it sounds like my loadspeaker is malfunctioning after the repair. Has anyone else had this issue? I wonder if it's just some rubbing alcohol that needs to dry up.
I have just fixed my phone! I'm so excited about that! I always thought that phone fixing is extremely difficult and I won't manage this before. Well here I am. I'm just having problems with fingerprint scanner calibrating/ In the fast boot mode my phone is locked. Can it be the issue?
Все вийшло! Набір супер, якість інструментів - топ! ***Step 13***- читайте все що вказано!
Are the displays from ifixit original? I ordered one from another place and was sent an low quality oled instead of amoled screen that lags and stutters everywhere... Just wondered if the display from here are just like the original one..
Thanks to all, everything went well. I repaired a screen on a samsung some years ago, successfully, but when the screen got wet in the rain, the phone died. Obviously, the waterproofing failed, so with this phone, I'm going to buy a waterproof case.
after a while, I found out that the microphone doesn't work. I can't use duolingo, for example, and the phone app works only using speakerphone. There are apparently two microphones, the top one seems OK, I believe it is the bottom one which has the problem. I'm thinking that I may have got some adhesive in the wrong place down on the bottom left, and wondering whether I should reopen it and look, or just leave it alone and live with it.
In principle, I liked everything, everything is easy. But unfortunately the screen is defective, there are spots on it that are inside the screen. I'm disappointed ((But everything changes, and setting up the print is easy.
After rebooting in Fastboot Mode are you supposed to Start the OS or just connect and run the Pixel Repair? I tried several times with a USB-C to USB-C and USB-A to USB-C and no compatible devices are detected from the https://pixelrepair.withgoogle.com/udfps website
I had to install the driver using Windows Device Manager. That was my issue...
Do not forget the protective film on the front camera of the new display. We had to disesebly the phone once again to remove it...
Hello. On some websites i read that some replacement displays have written NO CHIP. what is this referring to? is there a chip to move from the old to the new display? greetings
Hi
I replaced my screen, but the adhesive tape won't hold my screen in place on the left side. I have tried to put new adhesive tape twice now, without any luck is there anything that I'm doing wrong? Or is there anything else i can do beside changing frame? (It does not look like my frame is bend though). Will it work better with glue instead of tape?
Post
Hat wunderbar funktioniert nach der Anleitung, würde mir aber etwas detailliertere Anweisungen für den Zusammenbau wünschen, habe ziemlich herumgefummelt beim Anschließen des flexkabels, das Wiederaufsetzen des Displays könnte auch etwas genauer beschrieben werden (wie Fest soll man es andrücken, eventuell anwärmen?)
Das Kalibrieren des Fingerprintsensors hat funktioniert, aber erst beim dritten Versuch, also nicht verzagen und mehrmals probieren 😉
The installation went perfectly, although there was a lack of info on how to put it back together it's working fine. Now I can't connect my phone to my computer and I think it's a issue with the port not with the tool, so although I'm stuck without a fingerprint sensor and a bit of lag at the login, I'm glad to have my pixel
I replaced the screen of a Pixel 6 Pro using the ifixit part with a new sensor and got the Fingerprint error as well. When I did the https://pixelrepair.withgoogle.com/udfps reset and rebooted the phone, I still received the error when setting up the fingerprint (first reboot). Apparently there's a second reboot that is needed and then the fingerprint sensor was working normally again with the new sensor. Thank you all for the help here :)
The repair was done on this post date.
Me han reemplazado la pantalla y no se ve igual, las imágenes se ven saturadas, es normal o es una pantalla no original ?
How important is it to turn off the phone before repairing? I can't turn off my phone with the buttons and the screen is not working. Letting the battery drain will take days.
Hi Rick! Go ahead with the repair as best you can. Make sure not to use any metal or conductive tools to disconnect the screen to avoid shorting the socket on the board. After you get the new screen connected, go ahead and power off or restart the phone right away to mitigate any possible software issues.
Send to Mexico?
Hello! My Pixel 6 Pro multitouch only supports 2 touches instead of 10. But at the same time, the fingerprint works very well and the screen refresh rate is 120 Hz. What could be the problem? Is my display not original? Or is there a problem with the digitizer? How to check the screen for originality without disassembling the phone?
Most likely the screen was replaced with a screen from a different revision. How can I fix the problem with multitouch? Maybe I need to install a driver or replace the configuration file?
Ramil -
I am shocked - I managed to shear the head off the tiny 2.0 mm-long 3IP Torx Plus screw that holds the screen cable down. I really didn't put much force on it. I could have been more careful, but I'm shocked that it was this easy!!! I will have to take it to a professional now :/
Hmm, now I'm thinking, are there torque specs for screws on these devices?
Ok, a little bit of googling suggests it's somewhere between 30 and 60 inch ounces...
I managed to get the glue stuck perfectly the whole way around the frame of the phone without ANY smudging or adjustment.
ADHESIVE PROCESS
1. Use tweezers to remove all of the old glue
2. Do a DRY alignment of the adhesive strip to SCREEN (not the phone frame) first to ensure you have the adhesive strip the right way around. The cutouts in the blue plastic will align with all of the small silver pins (7-8?) around the perimeter of the screen.
3. Now flip it over and align it to the phone frame.
4. Start peeling the CLEAR plastic away from the little tab that will be near the top of your phone. Only peel about 1 inch of the plastic back so that it is being uniformly pulled down from the top.
5. With only the top edge of the adhesive exposed, slowly align and push the entire width of the top edge into the frame edge at a 45deg angle.
6. Carefully peel the clear plastic and lower to frame sides, slowly working your way to the bottom of phone.
7. Carefully peel blue plastic away - use the tweezers and don't miss any.
Hoping someone can help me. I'm replacing a cracked pixel 6 pro screen. Everything went well until I tried to seat the new screen. It absolutely would not sit right! the old and new screens look virtually identical - back and front, but upon closer inspection, the little seating clips have moved slightly - just enough that that couldn't possibly work.
I haven't been able to find anyone else mentioning it.
Has anyone else seen this change?
Thanks!
Following up. This appears to be a packaging error. The screen was labeled for a Pixel 6 Pro, but it's a Pixel 7 Pro screen. They look very very similar except for the alignment pegs.
I did follow all the steps and when I reboot the phone I got a google screen with weird colors that turn on and off in a endless loop an never reboot. Does anybody know what could be?
I replaced my screen back in October and I think my connector might be loose or something. The other day I set my phone down like I normally do, albeit, maybe a bit harder than I should, and the screen when black. I couldn't get it to come back without a reboot. Didn't think much of it. Today, I did the same thing (again, it's normal for me) and saw a flash on the screen. That worried me a bit, so I've been trying to be more careful. But my habit got the better of me and I did it again, which caused the black screen again. I can tell it is still responsive, because I still feel vibrations from using the fingerprint scanner, but nothing shows up. I fixed it with a reboot again, but I might pick up a new screen adhesive, pull off the screen, ensure a solid connection, and put it back. Any suggestions? Anyone have this happen to them too?
BEST quality Google parts. Very very easy install.
my screen was cracked and the touch and fingerprint was unresponsive. I replaced with new unit, screen worked but touch and finger print sensor remained unresponsive. Any ideas?
Please, how can I turn it off when screen is broken?
Thubbe - Antwoord