Inleiding
Als het scherm van je iPhone 11 gebarsten is, niet meer reageert op aanraking of geen beeld toont wanneer je iPhone aanstaat, kun je deze handleiding gebruiken om je iPhone weer te laten functioneren door midden van een nieuw scherm, a.k.a. schermmodule.
Als de achterkant van je nieuwe scherm al een dunne, metalen LCD-beschermplaat bevat, volg je deze kortere handleiding voor een makkelijkere reparatieprocedure. Als het scherm er echter niet bij zit, blijf lezen—deze handleiding zal je laten zien hoe je je scherm vervangt terwijl je de LCD-beschermplaat laat zitten.
De gecombineerde speaker in het oorstuk + de sensormodule die aan de achterkant van het scherm vastzitten, zijn in de fabriek exclusief aan jouw iPhone gekoppeld—daarom moet je deze handleiding gebruiken om ook deze modules over te zetten naar je nieuwe scherm. Deze module bevat de infraroodschijnwerper, welke onderdeel is van de biometrische Face ID-beveiligingsfeature. Als deze wordt beschadigd of vervangen, zal de Face ID-functie niet langer functioneren. Zorg er daarom voor dat er geen onderdelen beschadigd raken gedurende deze reparatie. Als er wel iets beschadigd raakt, kan alleen Apple de Face ID- functie herstellen.
Note: de True Tone functie zal ook niet langer functioneren na het vervangen van een scherm, zelfs als je een origineel Apple-scherm gebruikt.
Wat je nodig hebt
Video overzicht
-
-
Zet je iPhone uit voordat je begint met het demonteren van de telefoon.
-
Verwijder de twee 6.7 mm lange pentalobe schroeven aan de onderkant van de iPhone.
-
-
-
Plaats op 3 mm van de punt van je plectrum een markering met een stift.
Got to step 2 and realized the fix kit doesn't include an opening pick! Looks like a guitar pick, and I have those lying around. Is that expected? Looks like the pick is used in many steps below. There's a little blue crowbar that isn't mentioned in the instructions. Perhaps that replaces the opening pick?
Hi! I can't see which guide you were using when writing this comment. Can you reply here with which guide and fix kit you used?
I see you posted this in Meta. I hope it's resolved soon! In the meantime, a guitar pick may work well enough for your repair.
what fix kit?
My fix kit didn't include an opening pick either
My AliExpress refurbished screen came with a pick that has a coin-like circle that pops out, so no modification was necessary
-
-
-
Wanneer je iPhone-scherm gebarsten is, kun je verdere schade beperken en lichamelijke schade voorkomen door je scherm af te plakken voorafgaand aan de reparatie.
-
Plak je iPhone-scherm af met overlappende lagen tape totdat het volledige oppervlak is afgedekt.
-
Als het gebroken glas het plaatsen van een zuignap bemoeilijkt, kun je proberen een steviger stuk tape (zoals ducttape) in een van de zuignappen te vouwen om zo het scherm omhoog te tillen.
How to detect my Iphone what screen it is, OLED or LCD?
It’s OLED. You can find the specs here, https://support.apple.com/en-us/HT201296
When you find your phone, at the bottom of the description click on, See the tech specs…
mcr4u2 -
The included suction cups were stiff and worthless. They would not lift the screen. Also, I tried every type of tape on the screen to help the suction cups stick without success. Heavy duty suction cups were for my bathroom also failed. However, I had an old GoPro mount with some preapplied double sided 3M VSB tape and stuck that on the screen near the bottom. Magic! This method had the added bonus of being able to use a GoPro attachment as a handle to lift the screen, and propped up the screen like a kickstand in step 12.
Very cool! Thanks
Antonio -
My screen was pretty stuck… would not budge. Heated, super glued the suction cup, tried gorilla tape. Ended up doing the GoPro mount with 3M VSB tape method mentioned. Worked great. That 3M tape is the bomb.
If you have flat feeler gauges (for adjusting engine valve tappet clearance, ignition points … old school) the .003 thick goes right in. Work your way up until you can get the pick or supplied pry tool in.
where can I buy 3M VSB plis!!
3M VHB tape is at auto stores and other big box stores, or online.
nicO -
I used the tweezers that came with the replacement screen and jammed one of them into the glass and that eventually worked. Heating with a blow dryer is also important. The suction cup was helpful in loosening the adhesive for sure, but just not enough to get the display to come out.
-
-
-
Plak een aantal lagen tape op het scherm van de iPhone tot het gehele scherm bedekt is.
-
Als het je in de volgende stappen niet lukt om de zuignap op het scherm te bevestigen, kun je ervoor kiezen om een stuk duct tape in een handvatvorm op het scherm te plakken. Hiermee kun je dan het scherm omhoog tillen om een opening te creëren.
-
-
-
Trek de blauwe hendel naar achteren zodat de anti-klem vrij kan bewegen. (Op deze manier deactiveer je de openingsstand van de anti-klem.)
-
Schuif de armen over de linker- of rechterzijde van je iPhone.
-
Plaats de zuignappen dichtbij de onderkant van de telefoon—één op de voorkant en één aan de achterkant.
-
Druk beide zuignappen aan, om zuigkracht uit te oefenen op de gewenste plek.
-
-
-
Trek het blauwe handvat naar voren om de armen van de anti-klem te vergrendelen.
-
Draai het handvat 360 graden met de klok mee of tot de zuignappen uit beginnen te rekken.
-
Zorg dat de zuignappen op één lijn met elkaar zitten voordat je begint met het openen van het toestel. Als je ziet dat de zuignappen niet meer op één lijn zitten, maak je ze los en breng je ze weer op de juiste positie aan.
-
-
-
Verwarm een iOpener en plaats deze tussen de armen van de anti-klem op je telefoon.
-
Vouw de iOpener zodat deze op de onderkant van de iPhone komt te liggen.
-
Geef de lijm een minuutje de tijd om los te komen zodat de anti-klem een opening kan creëren.
-
Steek een plectrum in de opening onder het scherm en de plastic rand, en niet onder het scherm zelf.
-
Sla de volgende drie stappen over.
-
-
-
Gebruik een föhn of warmtepistool of prepareer een iOpener en leg deze op de onderkant van de iPhone gedurende een minuut.
-
-
-
Trek met een stevige en constante kracht aan de zuignap om zo een kleine opening te creëren tussen het schermpaneel en de achterste behuizing.
-
Steek een openingsplectrum in de opening onder de plastic rand van het scherm, niet onder het scherm.
This turned out to be the most difficult part for me. My old ifixit suction cup didn't suck hard enough to generate enough force to pry the display from the case. I ended up applying heat at least a dozen times, and I had to pull up on the suction cup forcefully over and over and over while repositioning it several times. I finally had success inserting my pick into the tiny gap after 30 or so rapid tugs on the suction cup.
I have the same question
-
-
-
Schuif je openingsplectrum om de linker onderhoek heen en langs de linkerzijde van de iPhone omhoog en snijd daarmee de lijm door die het scherm vasthoudt.
-
-
-
Steek je plectrum opnieuw in de opening aan de onderkant van de iPhone en schuif deze om de rechter onderhoek heen en langs de rechterzijde omhoog om ook daar de lijm door te snijden.
Instructions are confusing as the last step says not to insert at certain points, while this says to slide all the way up the right side - is it that sliding is ok but inserting isn't (whatever that might mean) or just not more than 3mm?
Just slide slightly and the display will rise without problems on all iPhone models, sometimes if I have long nails I even insert a fingernail and lift the display.
Tonynox -
-
-
-
Trek aan de kleine uitstulping op de zuignap om deze los te maken van het scherm.
-
-
-
-
Open de iPhone door het scherm open te klappen vanaf de linkerzijde, zoals je de achterkant van een boek zou openklappen.
-
Laat het scherm tegen iets stevigs aanleunen.
-
-
-
Om de schroeven, die in de volgende stap worden besproken, te kunnen bereiken, kantel je het scherm door de onderste zijkant lichtjes op te tillen.
-
-
-
Gebruik een Y000 schroevendraaier om de drie 1.1 mm lange schroeven, die het paneel boven de batterijaansluiting bevestigen, te verwijderen.
During reassembly, I had to connect my phone to the charger before it would power up.
Die Schrauben sind wahnsinnig kurz, tatsächlich winzig klein. Nach dem Herausdrehen könnte es im ersten Moment so aussehen, als habe man die Schrauben ausgebohrt anstatt herauszudrehen, sie sind jedoch sehr schnell gelöst und liegen dann entweder im Gehäuse oder sind neben dem Gehäuse herausgefallen. In jedem Fall sollten sie nie auf den Boden fallen, da sie dann kaum mehr auffindbar wären.
-
-
-
Gebruik een spudger of een schone nagel om de batterijaansluiting uit het contact op het logic board te duwen.
-
Buig de aansluiting voorzichtig weg van het logic board om te voorkomen dat deze tijdens de reparatie per ongeluk contact maakt.
-
-
-
Gebruik een Y000 schroevendraaier om de vijf 1.1 mm schroeven die het paneel boven het logic board bevestigen, los te schroeven.
Die Schrauben sind wahnsinnig kurz, tatsächlich winzig klein. Nach dem Herausdrehen könnte es im ersten Moment so aussehen, als habe man die Schrauben ausgebohrt anstatt herauszudrehen, sie sind jedoch sehr schnell gelöst und liegen dann entweder im Gehäuse oder sind neben dem Gehäuse herausgefallen. In jedem Fall sollten sie nie auf den Boden fallen, da sie dann kaum mehr auffindbar wären.
-
-
-
Gebruik een spudger of een nagel om de kabelaansluiting van het LCD-scherm te ontkoppelen.
-
Ontkoppel ook de digitizeraansluiting die ernaast zit.
Be mindful when reconnecting LCD panel connector and digitizer connector. It’s looks very similar. These 2 ribbon connectors a slightly different.
Pay attention.
내 아이폰이 디스플레이 분리 단계를 거친 후, 전원이 들어오지 않습니다. 층전기를 꽂아도 배터리에 미세한 전기 반응이 느껴지지 않고, 탭틱 엔진도 작동하지 않게 되었습니다. cpu 온도는 여전히 뜨껍습니다. 내 마더보드가 디스플레이 분리 후 갑자기 고장난건가요?
Hast Du das Problem gelöst?
커넥터 핀을 빼거나 다시 넣기 위해 구부러졌을 수 있습니다. 핀이 구부러진 경우 돋보기 등으로 살펴보고, 그렇다면 적절한 매장에 가져가세요.
Hampter -
-
-
-
Gebruik de punt van een spudger of een nagel om de aansluiting van de sensormodule van het scherm los te koppelen.
-
-
-
Verwijder de schermmodule.
After this step its probably a good idea to test the new screen (you dont have to plug in the front camera assembly)
Not a technician, so correct me if I'm wrong: I think that it's at this step of reassembly (before you reattach the screen) that you apply waterproof glue, if you have it.
-
-
-
Verwijder de vier schroeven die de speaker/sensormodule bevestigen:
-
Drie 1.6 mm Phillips schroeven
-
Eén 1.3 mm Y000 schroef
Correct me if I am wrong but you no longer need to do this as of IOS 15.2 as apple doesnt disable Face ID on 3rd party repairs
-
-
-
Gebruik de punt van een spudger om de bovenkant van de speaker voorzichtig omhoog te duwen.
-
Draai de speakermodule vervolgens om — richting de onderkant en weg van de bovenkant van het scherm.
-
-
-
Gebruik een föhn of warmtepistool of prepareer een iOpener en leg deze op de voorste bovenkant van het scherm gedurende 1-2 minuten om zo de lijm die de sensors vasthoudt te verzachten.
-
-
-
Schuif voorzichtig de punt van je openingsplectrum onder de flexkabel onder de microfoon.
-
Kantel je plectrum vervolgens lichtjes om de microfoon los te krijgen en zorg daarbij dat je de flexkabel niet afklemt of beschadigt.
-
Gebruik, indien nodig, de punt van een spudger om de microfoon definitief los te krijgen uit de inkeping in het voorste paneel.
This step was a little bit confusing. I thought that the entire ribbon assm should be removed once the speaker was detached. The entire assm doesn’t actually come off until Step 30.
Be careful in the next few steps, as you can easily damage some parts. Make sure that you operate gently, and that you don't pull, twist or apply too much pressure on the components.
-
-
-
Gebruik een pincet om het kleine plaatje dat over de omgevingslichtsensor zit, in een rechte beweging omhoog te liften.
As you remove it, familiarise with its position. It will be hard to put it back into place. If you pay close attention to how it comes out, it will be easier to put it back
-
-
-
Gebruik een pincet om de omgevingslichtsensor los te wiebelen en deze uit z'n inkeping in het scherm te tillen.
-
-
-
Verwijder de oorstukspeaker en de voorste sensormodule.
-
Nabijheidssensor
-
Infraroodschijnwerper
-
De module moet zodanig zijn gepositioneerd dat deze componenten niet in de weg worden gezeten door lijm of andere soorten kleefmiddel.
-
-
-
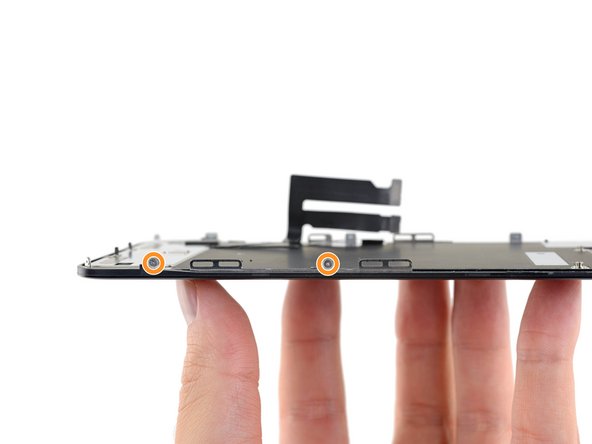
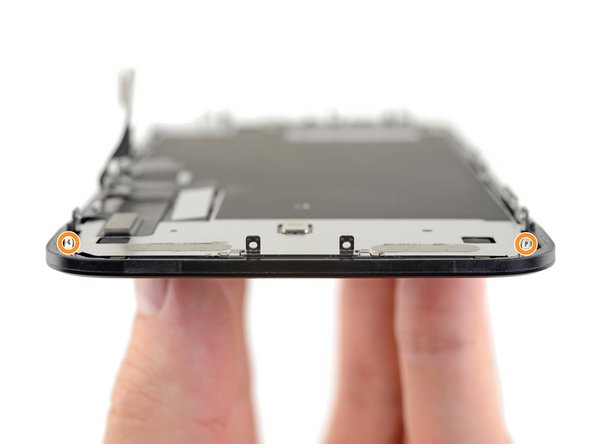
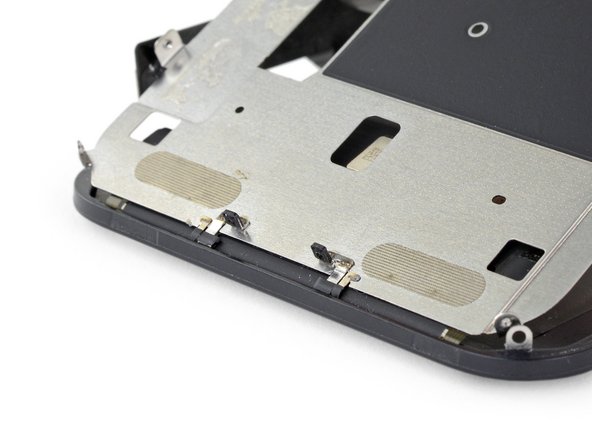
Gebruik een Y000-schroevendraaier om de 1.1 mm schroeven die de LCD-plaat bevestigen, te verwijderen:
-
Drie schroeven die dichtbij de schermkabels zitten
-
Nog twee schroeven aan de andere kant
L’appui sur les vis est réellement important, au risque de foirer celles-ci. N’hésitez donc pas à appuyer, en faisant contre-poids du côté opposé bien évidemment.
This is the bit that was difficult. The tri'point screwdriver y0000 barely fits this tricky size. It could have been the cheap screwdriver that came with the screen replacement kit. Stripped 2 screws, drilled out with an appropriate size drill bit ' frame still intact. I had more success using a size 0.7mm flathead screwdriver.
-
-
-
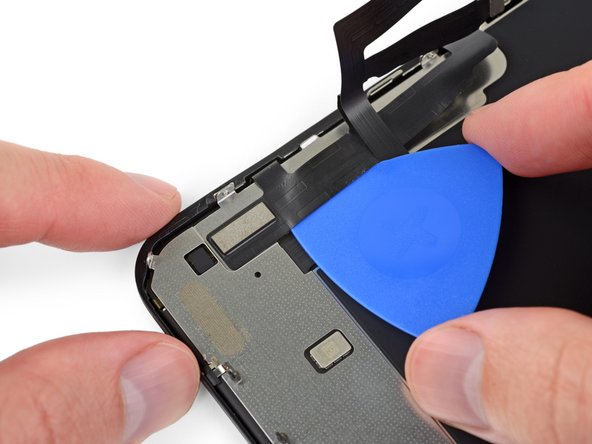
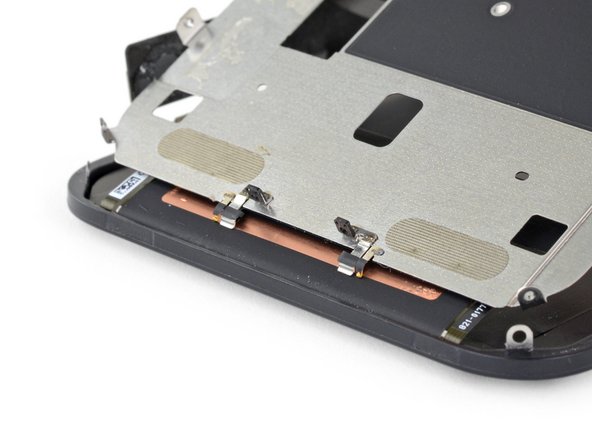
Gebruik wat warmte van een iOpener (of föhn / warmtepistool) aan de achterkant van het scherm om de lijm, die de schermkabels bevestigt aan de LCD-plaat, te verzachten.
-
-
-
Schuif een openingsplectrum tussen de schermkabels en de LCD-plaat.
-
Schuif het in de richting van de onderkant van het scherm om de schermkabels langzaam los te krijgen.
-
Stop als je het einde van de eerste kabel hebt bereikt.
-
-
-
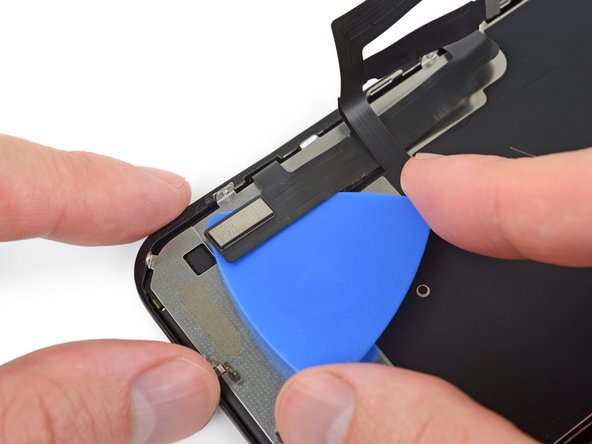
Gebruik opnieuw je openingsplectrum. Schuif 'm deze keer tussen de twee kabels.
-
Schuif de openingsplectrum richting de onderkant van het scherm om de twee kabels van elkaar te scheiden.
-
-
-
Scheid dan voorzichtig de gehele digitizerkabel van de LCD-plaat en vouw het open tot buiten het scherm.
IPhone XS copy phone ka folder
-
-
-
Steek, aan de bovenkant, een openingsplectrum onder de LCD-plaat en draai de plectrum een klein beetje om de plaat van het scherm los te krijgen.
-
-
-
Til de LCD-plaat nog verder omhoog, totdat je de rest van de schermkabel, die aan de achterkant van de plaat vast zit, kunt zien.
-
Schuif een spudger tussen de LCD-plaat en de schermkabel en scheid ze volledig van elkaar.
-
-
-
Bij het verder omhoog liften van de LCD-plaat, kun je de pinnen aan de onderkant zien.
hello whaty if one of the golden contact pins ( i guess it is) to be exact right one has freyed up a bit and looks messy. could it cause harm or it is not very important?
On reassembly leave the adhesive cover on the digitizer cable so that it doesn’t get caught on the LCD shield while working the other cable in place and positioning the shield on the frame. When you are ready to stick the digitizer cable to the shield remove the protective plastic.
-
-
-
De LCD en de digitizer blijven over.
-


Vergelijk je vervangende onderdeel met het originele onderdeel — het kan zijn dat je meerdere onderdelen mee over moet zetten of beschermlagen voor de lijm moet verwijderen voordat je het nieuwe onderdeel kunt installeren.
Om je toestel weer in elkaar te zetten, volg je deze instructies in omgekeerde volgorde.
Breng je e-afval naar een R2 of e-Stewards gecertificeerde recycler.
Ging je reparatie niet zoals gepland? Bezoek dan onze uitgebreide iPhone-probleemoplossingsbibliotheek of de specifieke iPhone 11 gaat niet meer aan-pagina. Je kunt ook onze algemene probleemoplossingspagina raadplegen of je vraag stellen op ons iPhone 11-antwoordenforum voor hulp bij het oplossen van je probleem.
Annuleren: ik heb deze handleiding niet afgemaakt.
172 andere personen hebben deze handleiding voltooid.
Met dank aan deze vertalers:
100%

Deze vertalers helpen ons de wereld te repareren! Wil je bijdragen?
Begin met vertalen ›


23 opmerkingen
I am a repair technician from California, and I use your company’s tools and I gotta say that I love them. Very sleek, and the powerful magnetic bits help me get the job done. I did 5 repairs yesterday and each one finished was a good feeling of satisfaction. In the future, if you guys decide to make some sort of in-depth manual for the newer iPhones, that would be great because diagrams are not only a great way for me to sharpen my own skills, but will help make training new techs a breeze.
Cheers all the way from Fresno!
Hi, I replaced the display independently, not in the Apple service, to my disappointment I found a message in the device that warned me that the part is not original, consequently the FaceID was disabled. Can you tell me about ear? Thank you
Getting a message saying not genuine is known issue. there is no workaround yet. as far as face ID not working, you need to check for tear on the flex as you probably damaged it during transfer. If it’s broken, there is no way to fix.
The Important Display Message can be removed, check here: https://www.youtube.com/watch?v=bLo0_p7O...
Ricky LV -
Great repair guide. My only issues:
1. There are no instructions for removing the metal panel from the back of the old screen (nor how to reinstall it).
2. There are no instructions for removing the old, black adhesive from around the edge of the old case (nor the much needed instructions for reinstalling the new adhesive without damaging it or compromising the purpose of replacing this adhesive). This info is also missing from the adhesive replacement page for the iPhone 11.
I was able to patiently work my way through both of these issues and complete the repair on an iPhone 11. Covering these issues as additional steps of the repair guide would be very helpful for future iFixers.
Anyone have the phone randomly reboot after screen replacement? All aspects work on the phone after replacement. It just randomly goes black and then restarts
Maybe just a bad battery connection or a stained/bent connector
I am a repair tech at a repair shop we do more but thats what we are called and i love you’re tools, they are just perfect for everything and all i can say really is, be super careful with the screen and the prox flex, they can be eaisly ripped and really ruin you’re day because to restore the face id with a new prox requires micro sodering but other then that just be careful
I find the OEM screen looks more yellowish, is it me only?
OEM screens tend to have the colors a little bit off, could also be caused by disabled true tone.
Overall a very useful repair guide, there´s just one issue I came across:
Different display manufactors.
Been looking around, due to some issues and so far I´ve seen some different manufactors for the iPhone 11 (and the XR):
Toshiba (the print on the display starts with C11 or F7C, as seen on the last picture)
LG (DTP or C3F)
Sharp (DKH)
someone else stumbled across this?
Apple doesnt offer new displays, however afaik the original apple product manufacturer foxconn refurbishes original screens. Or you could just get a refurbished screen from somewhere else…
For iphone 11, on the flex if there is a square code QRC is DTP and a rectangle is C11
Didier -
Awesome guide, thank you very much! By the way, after the replacement the true tone function will most likely be disabled, which can as far as i know only be fixed by copying the firmware from the old screen over to the new one with a programmer (for example Qianli iCopy Plus). Also, the phone will notify you that the screen is not genuine after every restart and it will always show a notification in the settings. The only way to get around that is to swap the chip on the display cable with a hot air station and solder paste (not worth the hustle in my opinion, i dont mind the one notification in settings). https://www.youtube.com/watch?v=agq2HPK-...
Cheers!
Hi, since replacing my screen my ear speaker has been very muffed/static. Is there any way I can fix this? Thanks
I’d suggest checking the mesh under the earpiece for dirt and stuff that could be blocking the sound and maybe trying to refit it, maybe it’s not properly seated. Could also be fixed by just reseating the earpiece flex…
completed the guide. thx. my iphone claimed the screen is not original. anyway, seems to work correct
Hello I was wondering if anyone could help me. I recently replaced the screen of an iphone 11. The phone was good for the first couple of days but now the customer is having some issues. His display is something randomly scrolling up, mainly while watching videos and sometimes the screens just starts to act crazy and press random things. I’ve been doing some research and I found that something i could do is reset the phone to factory settings. However i’m unsure if this is like a software or a hardware issue. Any advice is helpful, thanks!
From my experience this sound like a ghost touch issue. Usually caused by a loose/broken/dirty connection or an overly tight screw somewhere. It's unlikely, but if you installed a screen protector afterwards, it may have a fingerprint or dirt between the protector and the phone screen. Same thing happened when we did my sisters phone at our store, a connection was loose and a screw was a little bit tight. Maybe a more experienced tech could offer more in-depth insight.
Teejay R -
Hello, I followed the guide and repairs. My phone will not come on. Unless sitting on the charger and then I only get the Apple logo for a few seconds and it does this repeatedly. Any guess on where I went wrong? Thanks
Hi all, Im still trying to get a better understanding of the different types of "screen repair" that can be done.
From what I understand, it is possible to perform a replacement of ONLY the "front glass/screen" with 3rd party, non-OEM screens that you can purcahse online) OR you can replace BOTH the screen and digitizer.
ALot of 3rd party sellers sell a "screen replacement" but I am not sure exactly what I need to look for.
My front screen is cracked but the damage that is visible is purely physical (II don't see /experience any altered pixels, flashing colors etc, just dealing with a iphone with a cracked front screen). BUT in addition to the physical damage, the right side of my iphone 11 (specifically a small area that covers the "&" sign and letter "i" on my keyboard are non-responsive.
Now, is the item Im commenting on going to fix my touch issue? If not, which Ifixit replacement part(s) will resolve this? if at all.
thanks
The ribbon cables used on this screen are incredibly weak, when compared to the apple ones. Did this whole thing and had the phone fully working. Made sure the cables were in the right spot and started pressing the screen in just for the display cable to split in half from a couple pounds of pressure. Absolutely livid. Waste of money and time. You can really tear these cables apart with the tiniest fold.
the right screws wouldn’t come off
Yusef San Inocencio - Antwoord
ok one came of but my right wont come of either!!!!
Aisa Jawara -
Hello guys, I still haven't found away to power off the iphone without using the screen. Cheers!
danielaguirre93 - Antwoord
You can try this.
Quickly Press and release the volume up button.
then Quickly Press and release the volume down button.
then press and hold the power button and wait until it turns off.
worked for me :D
Benóný Egilson - Antwoord
Where does one get replacement seals? Is this the same as the display assembly adhesive?
Brian Baker - Antwoord
not of the screwdrivers i have seem to be able to turn the screws
Aisa Jawara - Antwoord