Inleiding
Gebruik deze handleiding om Apple's propriëtaire blade SSD (AHCI/PCIe x2) te vervangen.
Deze handleiding is gemaakt voor de iMac Intel 21.5" EMC 2544-modellen met geupgrade specs die zijn uitgerust met een SSD (Fusion Drive of blade SSD-configuraties).
Wat je nodig hebt
-
-
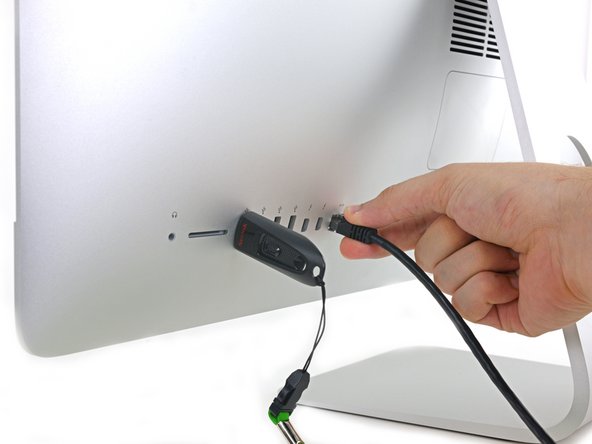
Voordat je begint met de reparatie aan je iMac: Verwijder de stekker van je iMac uit het stopcontact en houd de aan-uitknop gedurende tien seconden ingedrukt om de condensatoren van de stroomvoorziening te ontladen.
-
-
-
Begin aan de linkerkant van het scherm, in de buurt van de aan-uitknop, en steek je iMac-openingstool in de naad tussen het glazen paneel en de achterste behuizing.
Don’t get too worried about starting exactly where the picture says. The glue is stronger in some parts so just start wherever is easier and then work slowly and patiently around in the direction shown.
As this guide doesn’t cover replacing the adhesive strips, I found referring to the following was useful (noting that it’s not for the same model of iMac, so the modification they mention wasn’t necessary): iMac Intel 21.5" EMC 2544 Vervanging van de kleefstrips
This part of the exercise should be done with extreme patience. I took my sweet time with the opening tool, rolling it through the entire panel and enclosure gap over and over again, until I was very sure no parts were sticking together anymore. And when I thought I was I done, I decided to do it over again.
You can "warm up" the adhesive before try to cut it with the tool using a hair dryer. Heat the edges for about a minute, keep moving it so you don't cause stress in the glass. Also the above note.. use the tool and then the cards. Do not use a guitar pick or other objects as the thickness will cause you to break the front glass, which is a bonded part of the display (expensive).
Merci pour ce conseil
-
-
-
Gebruik je tool als een pizzasnijder—rol deze door de opening en het zal de schuimen lijm in het midden doorsnijden.
-
Duw je tool langs de linkerzijde van het scherm omhoog.
If re-opening a screen that was opened and re-attached using iFixit’s adhesive strips, I would strongly recommend heating it first with an iOpener, heat gun or hair dryer. 20 minutes after attaching with the iFixit adhesive I tried to open it again with the pizza slicer to fix something and cracked the screen on the left-hand side.
-
-
-
Ga verder met je tool langs de bovenkant van het scherm.
In this step can I cut along the display without make any damage to the front camera?
Hi! Actually - there is no need to cut the tape around the camera area - there is no tape to cut at all! And so, the way go is easy - just pass 10 mm to the left and to the right from camera and start cutting!
P.S. Just did the whole procedure to replace a RAM and to add SSD on PSIe an hour ago! Seems to be different reading the instructions... you know - 2/10 and so on. But it's really not that hard, trust me. I'll give it 5/10.
P.P.S. By the way there is one trick to pass the difficult steps. Any action which requires pulling smth (motherboard, speaker, power supply unit) from the narrow crack (or should i say - slit?) at the bottom of your Imac is really not so easy.
And the trick is to first remove a thin metal stripe with some kind of insulation on it which held by 5 small (very small!!) screws at the bottom of your Imac. After you done it - it's easy to pull everything! Pay attention to the fact that one of this 5 screws at the center are more shortly than others.
If you're changing cracked EMC 2638 display to new assembly, there's two more steps:
Step 24: Use the tip of a spudger to flip up the metal retaining bracket on the display data cable.
Carefully pull the display data cable from its socket on the display assembly.
Step 25: Use the tip of a spudger to unplug bracket of the thermal sensor small cable near display data cable.
Carefully remove scotch tape covering thermal sensor. Using iSesamo or flat tip of the spudger carefully peel the thermal sensor away.
omg - forgot to switch the termal sensor from the old display...
now fan runs like crazy...
-
-
-
Rol je tool tot slot richting de rechter onderhoek van het scherm.
Yes, do it many times to loosen the adhesive.
Would be good data to show the 3 areas (wifi antennas where the "tape" is larger and covers them. The rest of the "tape" is 1.4" and easy. Also after removing the display, be sure to remove the old "tape" from both the display and the rubber parts of the case. Use the spudger to start an end and it should pull off easily. Careful on the baackside of the display as you can scratch off the black paint/covering.
-
-
-
Steek vervolgens een plastic kaart tussen het scherm en het frame, beginnend in de rechter bovenhoek van de iMac.
this step is extremely important NOT to stick in the cards too far….. doing so, you risk a 600 euro replacement as I experienced………
I drew a 3/8” line on my cards with a marker first.
I’m reading this on the EU store, please change all measurements to cm/mm.
@ifixit The next batch of cards you create should have a line printed on the card 3/8” in from the edges. Would make a nice reference.
Better to remove stand wedge at this point? Can’t see from pics
-
-
-
Draai je plastic kaart om een opening tussen het scherm en het frame te maken.
-
Ga langzaam en voorzichtig te werken en voorkom dat je te veel druk op het glas zet. Je hebt een opening van ruim een halve centimeter nodig.
This part must be done very carefully or you can damage the flat cable from display, despite it was under a iron cover.
-
-
-
Schuif de kaart richting het midden van het scherm om de laatste stukken lijm rondom de rechter bovenhoek van het scherm door te snijden.
-
-
-
Houd het scherm met een hand omhoog en koppel de voedingskabel van het scherm met je andere hand los.
I had a small flight light ready so I could see. Follow the directions - don’t blindly pull.
Head lamp gives you the best hands free view!
bstaud - The display power cable has two squeezable levers on each end of the cable’s width.
Squeeze the left lever with your thumb while you simultaneously squeeze the right lever with your
index finger, and gently pull the cable straight back and out, and the cable comes out very easily.
When reassembling, make sure you get a “click” confirmation that both the levers have locked AND the pins have seated on this connector. I was treated to a black screen upon startup, and had to re-cut my newly installed adhesive strips to get back in to firm up this connection. Better would be power up with the bottom adhesive in place, screen resting in place and held on top with blue painter tape to confirm connections, THEN pull off screen-side adhesive tape covers for final re-bonding.
Can someone post a link to actually purchase these cables?
-
-
-
Gebruik de punt van een spudger om de metalen vergrendeling die de schermdatakabel op z'n plek houdt omhoog te duwen.
-
Trek de schermdatakabel op voorzichtige wijze uit het contact op het logic board.
Sure could use a magnified picture of this connector and socket, especially the first time you go in. And it is the most critical step of the whole operation — bung it up and we’re toast.
Hi bstaud! If you hover over the image you can click on the magnifying glass and get a large image of any guide photo. Hope that helps!
To clarify, the connector pulls out in the plane of the logic card, not perpendicular.
-
-
-
Til het scherm omhoog tot het bijna rechtop staat.
Where can I find a replacement display for my iMac?
iFixit has listings for replacements. Go to the Parts section
-
-
-
-
Pak de kleine lip aan het einde van een van de kleefstrips onderaan het scherm vast en trek de kleefstrip richting de bovenkant van de iMac om deze te verwijderen.
-
Herhaal deze stap om ook de andere kleefstrip te verwijderen.
cutting through the adhesive is unnecessary if it's not been opened before (outside of an apple store) there will be a tab at the end of each VHB strip that you can use to simply pull the vhb strips off.
YES, exactly the same here. more but more simple.
To save a few steps and a bit of time, if you have a helper, they can hold the display at a 90° angle while you unscrew the brackets and remove/replace the hard drive rather than remove the display entirely. Also reduces the likelihood of damaging the display as you remove and handle it.
The proper way to remove the display according to the Macintosh tech manual and videos is as Rory McKenna and Lucio Alves have learned is to pull the tab at the end of each VHB strip until it is off.
This worked great! look for small left over adhesive on either edge of the bottom of the screen and pull each one towards the center. Screen assembly removes after that with no fuss.
-
-
-
Verwijder de vijf kruiskopschroeven die de onderste ondersteuningsbeugel op z'n plek houden:
-
Vier 3.2 mm lange schroeven
-
Eén 1.7 mm lange schroef
-
-
-
Verwijder de onderste ondersteuningsbeugel uit de behuizing van de iMac.
Of all the parts of this entire procedure, replacing this one piece is the hardest part! The screws are tiny and they just don’t seem to want to grab the support piece. Also it seems to perform no function which is also annoying.
I left mine out. LOL
Line up the screw holes and press on the bracket from the back to help the screws grab. If your fingers are too big, press with the flat side of your spudger. As long as there’s no gap between the bracket and the iMac’s frame, the screws should grab easily.
I put it in at a slight angle lining up the right hand side holes, screwed in the two screws and gently pressed my finger behind it on the rest
If you only want to replace the HD and RAM, take a big shortcut and leave the logic board in, as well as all the parts needed to remove it (speaker, power supply etc). Once the display is removed, just take out the fan and the top two logic board screw. There is than sufficient space to gently remove and insert the two ram modules. HD can easily be replaced with an SSD by just removing the HD mounting brackets...
Voces mudaram de modelo iMac, desta foto para proxima, esse modelo desta foto nao tem slot nvme. O da proxima foto sim. Voces me fizeram comprar un nvme por engano...
-
-
-
Gebruik je spudger om de aansluiting van de rechterspeakerkabel uit het contact op het moederbord te verwijderen.
-
Trek de aansluiting naar beneden om deze uit het contact te verwijderen.
-
-
-
Verwijder de vier schroeven waarmee de harde schijfbeugel in de achterste behuizing is bevestigd:
-
Twee 21 mm lange T10 Torx-schroeven in de linkerbeugel;
-
Eén 9 mm lange T10 Torx-schroef;
-
Eén 27 mm lange T10 Torx-schroef.
Pay attention to this photo and where the fan is. It is 180° from where the previous step shows it is oriented to you.
-
-
-
Gebruik de punt van je spudger om beide zijden van de aansluiting van de aan-uitknop om en om uit het contact te duwen.
I would advise that before removing the PSU unit and all other components from the bottom of the case that you remove the 5 screws at the bottom of the display which hold an insulation strip in place.
The guide shows this piece removed, but does not tell you how to remove it.
There will be 5, small J1000 screws. The middle one, which goes over Apple Logo is the shorter one of the 5, all others are the same length. Once this piece is gone removing the components is much easier, and chance of damage lessened.
Added to the guide. Thanks for the tip!
No need to remove power board and logic board and all other components, just remove the fan and it is quite "easily" accessable to change the RAM. Just need to use the tools to remove the old RAM and carefully install the new RAM.
I just did it without removing the logic or power board
could you elaborate a little more, I would love to skip the rest of these steps. How did you accomplish this?
ej P -
Oleksandr Trokhymchuk,
Thank you! You just saved me so much time! I wouldn’t call this “easy” but it saved me a lot of time and effort.
ej P: remove the fan assembly first. Then remove the connector that runs from the iSight camera to the logic board on the left.
the RAM is located right near that cable. It’s tricky to remove but you can pop open the connectors with a black nylon stick and the RAM chip will pop up at 45 degrees. Make a mental note on which way you will need to install the new ram as it’s tough to see. For the Crucial memory I got it was label side facing away you (facing towards rear metal enclosure).
the second chip has a plastic adhesive piece on it that you should probably attach to the new ram.
remove both chips then install the new ram in sequence from the board out.
In the photo for Step 28, the power button cable connector is placed around the power board screw hole on the top left of the power board.
However, on the iMac I upgraded, the power button cable connector was “fed” through the power power screw hole on the top left of the power board. The cable was too short to run around and below the hole.
Hence, I had to ensure the cable was “fed” through the hole during re-assembly and the screw carefully screwed back through the hole.
I guess every iMac is assembly just a bit differently, just to make repairs that much more fun.
This is not correct and may have been assembled incorrectly during a previous repair.
Just replaced the hard drive and RAM with SSD and 16GB respectively and did NOT remove the power supply or logic board. Tricky is a word to describe putting the RAM in without removing the logic board. You work in the dark with little room to get your fingers in between the logic board and the back of the case. I put the first RAM chip in without a problem (the one next to the logic board), but the second to four tries and dropped it behind the logic board three times before finally getting it to position correctly. Just impossible to see and must work but feel. Still it was faster than removing all the components… though did remove the fan (needed cleaning anyway). All in all I can’t say enough about the help the guide was through the upgrade ! Thanks !
I found this connector to be very tight and was afraid of breaking it off. I just kept slowly working on it—it did eventually come out.
I did try to sneak the RAM in without removing the logic board but my fingers were too big. I found it too difficult and just continued on with this guide.
I was not able to install the memory without removing all the components. My fingers are too big and I could barely get in that tight spot to swap out the memory. The hardest part about the power supply is that one connector under the chin next to the Apple logo. Once it is out, you are home free because it is so easy to plug it back in when you are putting it all back together again. Ridiculous that Apple did not put a simple access door behind those memory slots because they are on the backside of the Mac! They did an access door on the PowerBooks and it did not ruin the appearance. They could have designed a cool looking pop out door that only had a thin seam around it so it would still look good. Then you could remove the access door to upgrade the memory easily.
Does anyone know if this is the same situation as in the 2017 model? I just changed RAM in the 2017 version and also skipped taking out the logic board. I just bent a pair of tweezers and put some tape around the tips to make them less scratchy and used them to place the RAM modules into the slots. Worked supereasy and much much quicker than performing the complete tear down of the whole machine.
This step is impossible!
@wizdomonwheels, I don’t see how I can get the RAM shield off of the logic board to access the RAM without removing the logic board. What am I missing?? I’m guessing that those of you that are suggesting this technique are working on older iMac models that don’t have the RAM shield.
Yes, you are correct. It is likely the various steps are a bit different on each model. If I recall I was likely working on a 2015 or older system. If there’s a shield in the way, I can’t think of a way you could get around it without pulling the logic board.
-
-
-
Verwijder de twee 7.2 mm lange T10 Torx-schroeven die de stroomvoorziening in de achterste behuizing bevestigen.
In my case, the left side corner of the PS was caught against the Lower Support Bracket, and I had to remove the LSB in order to get the PS freed and out.
I think the author Walter Galan should put this in the main section of his instructions. I have TWO identical iMac 14,1 / i5 2.7GHz / 21 Inch Late 2013 / Order ME086LL/A. They both required removing the LSB. Thank you very much Walter Galan & others for your contributions.
Those screws were definitely not T10 but T9 on my unit
Those screws were T8 on my unit.
c'est du torx 08
-
-
-
Kantel de stroomvoorziening naar voren.
When replacing the PSU (on the re-build) take care not to trap the power button cable behind it - I did...
-
-
-
Trek de stroomvoorziening een stukje omhoog en trek de plaat uit de achterste behuizing.
-
Draai de stroomvoorziening tegen de klok in en til de rechterkant een paar centimer (2-3 cm) verder omhoog dan de linkerkant.
In my case, the left side corner of the PS was caught against the Lower Support Bracket, and I had to remove the LSB in order to get the PS freed and out.
I think the author Walter Galan should put this in the main section of his instructions. I have TWO identical iMac 14,1 / i5 2.7GHz / 21 Inch Late 2013 / Order ME086LL/A. They both required removing the LSB. Thank you very much Walter Galan & others for your contributions.
-
-
-
Knijp in de klem aan de achterkant van de DC-voedingsaansluiting en trek het in een rechte beweging uit het contact aan de achterkant van het moederbord.
when pulled the cable, even slightly, the actual female piece that connects to the logic board came off. am i screwed?
Repairing sockets that come off the logic board is possible, but very specialised work. Unless you have a magnifying lamp and the necessary desoldering and soldering skills, it will be difficult but not impossible.
I could not disconnect this cable without fear of breaking something (as previous posters did). I found that I could skip this and the next step by wrapping the power supply in a couple layers of a small towel (to prevent shorting with any other metal surfaces), and laying the power supply on the aluminum face of the iMac near the Apple logo. This got it out of the way enough to do what I needed on the logic board (changing PRAM battery) after completing removal of the other items in this guide.
-
-
-
Gebruik het platte einde van je spudger om de klem aan de kant van de AC-voedingskabel naar binnen te drukken.
-
Pak de AC-voedingskabel vast terwijl je de klem naar binnen drukt en trek de aansluiting in een rechte beweging uit het contact.
I didn't disconnect the input cable to the power supply. Because I had the machine lying on its back throughout, I placed it on to the metal bit at the bottom of the machine instead (with a cloth to stop the metal getting scratched). The AC inlet cable was pretty tricky to get un-locked, and the PSU sat on the case fine. It didn't hinder anything else throughout the guide.
I thought from Dave’s comment that I could leave the power supply completely in place, but I was mistaken. In order to remove the hard drive assembly after you remove the center screw in it, you’ll need to at least unscrew it and the HD assembly will slip out. Like Dave said, you don’t need to unplug the AC or PSU, which I left hanging.
Getting power supply to the logic board unplugged is also tricky without unscrewing the two bottom screws. They didn’t make this part easy.
I would like to thanks Dave Hallett for his tip of not removing the AC inlet connector of the power supply. I simply wrapped the board in bubble wrap and taped to the iMac case, out of the way, thus giving access to the remaining disconnection procedures and preventing the board from scratching to the iMac case. It also made reassembly much simpler.
Yeah, that AC inlet plug was a nasty one to unplug, mainly because I was trying not to bump the solder joints on the PSU. After a few wiggles and pulls while manipulating the spudger tool to release the clip, it finally unplugged. Made it easier by removing the PSU completely so you don’t have to worry about it. Don’t worry, plugging it back in is a breeze!
With the right tool this plug comes out very easily. Forget about your tiny computer tools, go to the garage and grab a regular old needle nose pliers. Grab the clip and the plug at the same time. The plug will come right out.
Carin Ann— The most helpful comment on this procedure. After reading what you wrote I maneuvered the board, grabbed the clip with my left hand (a little awkward because of the cooling enclosure), squeezed the front of the plug, and got it out.
-
-
-
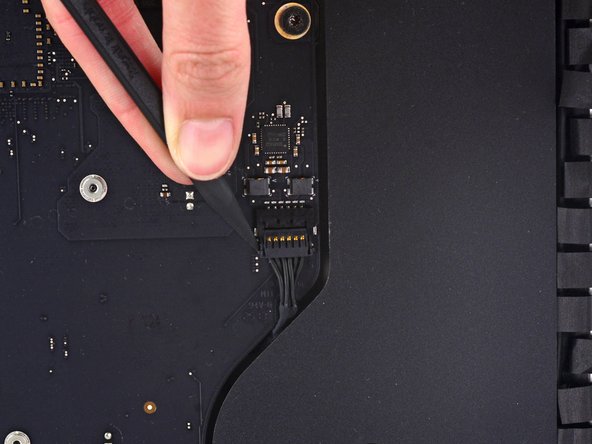
Trek de ventilatoraansluiting met beleid in een rechte beweging uit het contact op het moederbord weg.
-
-
-
Til de harde schijf van de kant die het dichtst bij het moederbord ligt omhoog en trek het een beetje uit de uitsparing in de behuizing.
The newer drives have rubber ends and an adhesive side, be careful removing them if replacing the drive and be sure they are securely pushed back into the holder
-
-
-
Gebruik een spudger om de enkele SATA-kabel los te koppelen door de aansluiting met een spudger uit de harde schijf te wrikken.
When reconnecting the SATA cable, there is nothing to make the connector hold still, and it is hard to reach, so it took several tries. I ended up taking off the rubber baby buggy bumpers to get more room, and then jamming them back on after getting the SATA connector snugged up.
If by rubber baby buggy bumper, you mean left speaker, then yes, I agree. Reinstall the hard drive before the left speaker.
Kudo to @jerrid_foiles! I was going crazy trying to attach the SATA cable until I took the two screws out of the left speaker and slid the top end of it aside by about 3/4 inch. Make the whole process SO MUCH easier!!
We solved this by removing the hard drive tray screw, then inserting the cable into the SATA hard drive. Then hold the hard drive a bit out of the way to insert the 7.3mm hard drive tray screw.
Agree with this method, found it an impossible task to reconnect the SATA connector until removed the tray screw, then it was relatively easy to reconnect and then replace the tray screw.
Also agree with this method!
-
-
-
Verwijder de harde schijfmodule uit de iMac.
When reassembling, I found it easier to loosen the HD tray screw from Step 48 and pull the tray outwards from the left side in order to plug the SATA cable in more easily.
Thanks! I, too, had a hard time reconnecting the SATA cable.
I found this helpful too!
Anwar -
I did loosen the speaker so I could get a tool behind the SATA cable to push it on to the SSD drive. Otherwise hard to align cable.
I found the easiest way to connect the SATA cable was to not screw the plastic hard drive tray down until you plug the drive in. That way you can easily push the connector in and due to the cable you’ve got some wiggle room. You can position the tray then just lift one end of the drive up and secure the screw. Then just push the drive down.
This was the step that I had the most trouble with. I’m used to replacing a hard drive in a MacBook Pro, where the “plug” that you plug the drive into is a rigid thing that you can firmly press the hard drive into.
With the iMac, the plug is situated on the end of a non-rigid cord, so the plug moves back when you try to snap a drive into it. Also, those two rubber gasket things that you adhere to the side of the drive really make it difficult to maneuver the now-overly-chubby drive towards the plug.
After must frustration/concern, what I ended up doing was temporarily removing the rubber gasket things, using the “spudger” as kind of a lever behind the “plug on a cord” so that it didn’t move as much, and then pushed the gasket-less SSD into the plug.
Once I got it connected, I put the rubber gaskets back on the sides of the SSD and kind of coaxed it down into place, using the pointy end of the spudger to get the chubby corner pieces to “sit” correctly in the rigid plastic tray that the SSD kind of rests in.
From another comment elsewhere on this repair, I *highly* recommend removing the two screws holding the left speaker in place, then sliding it just a tad out of the way to be able to easily attach the SATA cable. You don’t have to move it much to make the whole process so much easier!
-
-
-
Verwijder de 7.2 mm lange T10-schroef die de harde schijfhouder in de achterste behuizing bevestigt.
-
-
-
Gebruik de punt van je spudger om beide zijden van de linkerspeakeraansluiting om en om uit het contact te duwen en zo als het ware uit het contact te 'lopen'.
A step is entirely missing here – removing the right speaker cable connection from the logic board and also removing the right speaker casing (all the pictures below show it already having been removed). You actually don't need to entirely remove the right speaker to get the logic board out but you will need to remove its screws and lift it slightly. And you will need to remove its plug from the motherboard but that's not hard and it looks identical to the left speaker plug/socket.
This does need adding to the guide if anyone from ifixit sees this!
-
-
-
Gebruik indien nodig een pincet om de tape die de linkerspeakerkabel aan de SATA-data- en -voedingskabel bevestigt te verwijderen.
Actually i didn't get why should i unstick the tape which gum up left speaker cable to the SATA data/power cable. It's gonna be hard to bond the tape again cause it looses the clue ability. I can definetely claim that there is no need to touch the tape.
I too can say that there was no reason to remove the tape.
Agreed. I completed the repair without removing the tape.
phil -
-
-
-
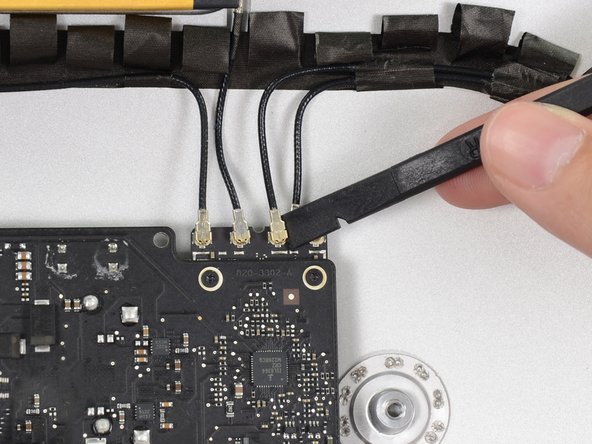
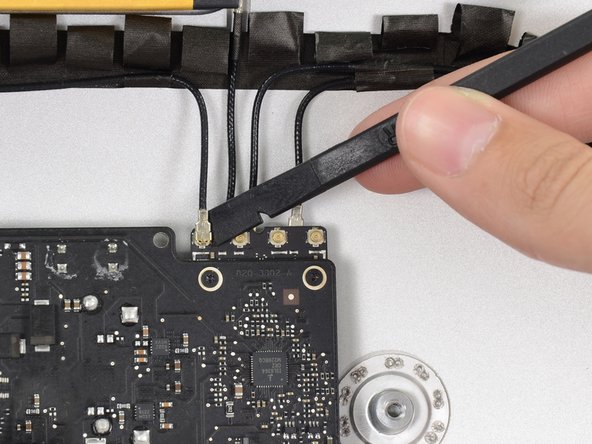
Gebruik het platte einde van je spudger om de vier antenne-aansluitingen van de AirPort-Bluetooth-printplaat los te koppelen.
i found it helpful to use the flat end of the spudger under the cable near the connector and gently wiggle the spudger until the cable was disconnected.
Agreed, I broke one connector. The airport seems to work anyway. But what to do to fix it? Change the airport card or try to weld it again?
I mark each cable tip with a different colored sharpie and then take a Pic. This gives me the order and the angle of orientation in order to reconnect these pesky connectors.
OK, so when did you remove the RIGHT speaker? Suddenly it is not in the photos. I s there anything besides it's plug to remove?
-
-
-
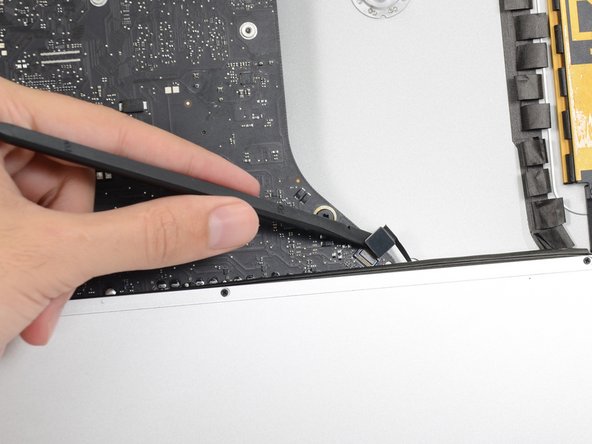
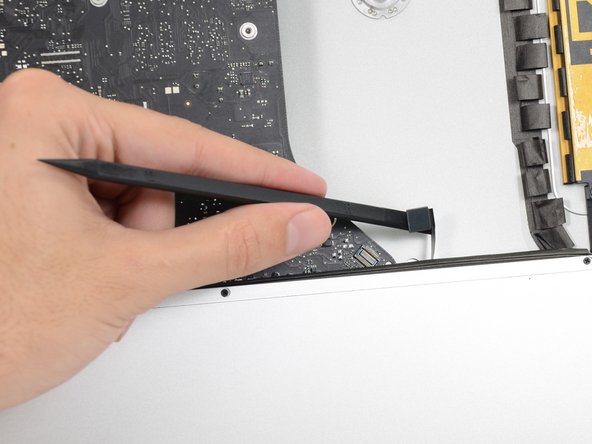
Gebruik het platte einde van je spudger om de aansluiting van de audiojackingang uit het contact op het moederbord omhoog te duwen.
The photo in Step 51 shows the right speaker missing, however there is no step prior for removing the right speaker.
Hence, refer to this other guide to remove the right speaker *before* Step 51.
Its there! Step 28 & 29 is the removal, the left one doesn’t need to be removed.
Dan -
-
-
-
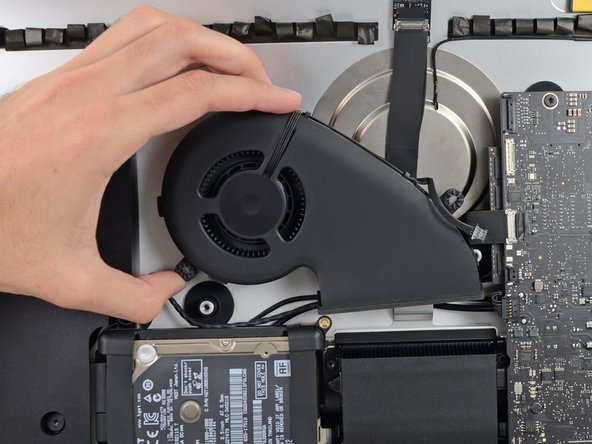
Verwijder de schroeven die de ventilatieopening in de achterste behuizing bevestigen:
-
Twee 6.3 mm lange T8-schroeven
-
Twee 4.7 mm lange T8-schroeven
A T9 bit fits and grips the screws tight enough to make it easier to work with the deep 4.7mm screw.
-
-
-
Verwijder de vier 7.2 mm lange T10-schroeven die het moederbord in de achterste behuizing bevestigen.
So a major problem for me here — my iMac (purchased 2018 ) has a solid circular fastener where the lower left T10 screw should be. So I think I’m dead in the water as far as getting the logic board off to put the new RAM in. I can’t see how people can insert the ram from behind without seeing it or being able to get two fingers to the tabs. I’m so frustrated with the design of this computer.
That’s a new one on us! We’d love to see a photo. Any chance it’s a tamper-proof sticker hiding the head? You may also be able to turn it with a set of pliers if you can get a decent grip, just be careful not to bump any board components!
It’s a tamper proof sticker. I started to peel it up, but it was just easier to press the screwdriver bit in.
as an update, these are now T8 screws
cwaldrip -
-
-
-
Til de bovenkant van het moederbord van de achterste behuizing weg.
-
Til het moederbord vervolgens in een rechte beweging omhoog en uit de iMac.
This is the trickiest part of the whole operation. It took me a solid half hour to get the logic board out. I’m sure it would be easier a second time, because there’s not many delicate components around the USB/Internet sockets, so you can be a little more assertive with it than I felt comfortable doing.
i found the logic board kept snagging on the USB connectors poking through the exterior case. Wiggle the logic gently to extract..
Take out the two screws that hold down the right speaker, and push it up a little, before removing the logic board. It makes things a lot easier.
Also: there’s a cable on the right side of the logic board that isn’t called out. Nor are the two HDD cables that plug into the underside of the logic board.
-
-
-
Verwijder de Torx-schroef die de SSD op het moederbord bevestigt.
My wife’s iMac Late 2013 21.5” did not originally have a blade SSD installed, so there was no existing Torx T8 screw available to use on the Aura 6G I was installing. Had to use one of the 4 T8 screws from the Exhaust Duct to get the job done.
Was the iMac have a fusion drive? I´ve just read that 21,5" iMacs without Fusion Drive or SSD don´t have the PCI-e slot activated. Could you confirm please?
@danielcalde2053 - A HDD only system won’t have the connector or added circuitry to support the Blade SSD. With that said people have altered systems! Taking out the wimpy Fusion Drive cache SSD as they often fail. So you might find a HDD system with a working slot!
Dan -
Read somewhere that a certain type of adapter is needed to use a "Samsung 970 EVO Plus NVMe M.2" in either a 21.5" or 27" 2017 iMac. Does anyone (most likely @danj ) know if it will work?
Long term goal...have both sizes of 2017 iMacs. Plan is to install a faster i7 cpu in 27" and migrate 3.4 GHz i5 to 21.5" to replace 3.0 GHz i5 in 21.5". While inside 27", will replace fusion drive with the EVO plus and perhaps had a larger 7200 rpm HD or perhaps a 2.5" SSD.
While inside 21.5", i plan to upsize SSD from 500 Gb to 1 or 2 Tb. Not sure which ssd form factor is currently inside but i believe it is a 2.5". Does anyone know if there is a drive cavity in a 2017 21.5" iMac to fit a full size HD (to possibly use a stacked pair of notebook size SSDs?
Thanks to all in advance!
I really don’t recommend using M.2 SSDs in iMacs as they are a bear to open up to get to the SSD socket and many adapters/SSD sets are flaky!
If this is a system which has important work I would stick with either an Apple or OWC bade SSD. Yes, I know! You want something with more performance. Sometimes it doesn’t pay 😖I had wished Apple would have gone with the standards based M.2 SSD’s their greed set the course! The rub is Apple has other lines in their SSD’s these adapters and M.2 SSD’s don’t offer which will bite you when your drive gets full as the wear-leveling and housekeep functions use these lines.
As far as Samsung 970 EVO Plus drives you will need to update its firmware as they did have a few interoperability issues with macOS when used in MacBook Pro’s
Dan -
@danj I did get this blade SSD from OWC and it is working fine. My wife only uses this for non mission critical work now since she has a 16" MBP, but it sure beats the pants off of the old HD that shipped with the system. :-)
Sorry I grabbed the wrong text to reply. Even still you wouldn’t want to loose your stuff 😢
Dan -
-


Volg bovenstaande instructies in omgekeerde volgorde om je toestel weer in elkaar te zetten.
Volg bovenstaande instructies in omgekeerde volgorde om je toestel weer in elkaar te zetten.
Annuleren: ik heb deze handleiding niet afgemaakt.
49 andere personen hebben deze handleiding voltooid.
Met dank aan deze vertalers:
100%

Thomas Keulemans helpt ons de wereld te herstellen! Wil je bijdragen?
Begin met vertalen ›

40 opmerkingen
This question never been asked: what's the diameter and a length of this screw holding the PSIe SSD on motherboard? Is it there if there no SSD in the config?
There is no screw in the motherboard if it did not come configured with a fusion drive.
Hello , I have this model iMac 14,1. I bought the factory with hdd 1TB but without ssd . can I install a ssd and what model?
Hi,
I’d like to do the same… did you upgrade your iMac? could you confirm that there is a SSD connector?
Ruggero -
I have replaced 1 21.5 originally w/o a ssd with a 2015 MacBook ssd. It was a base model i5 2.7.
im about to upgrade a i7. No ssd originally. I’m pretty sure results will be the same.
HDD only systems won’t have the needed parts on the logic board to support the blade SSD. Only Fusion Drive’d and SSD models have the blade connector.
Dan -
Wrong, Dan. I just finished upgrading my parent’s late 2013 21.5” that most decidedly did NOT come with a Fusion drive and indeed the connector was right there on the back of the logic board where it should be. As to the original poster’s question: I used a SanDisk SD6PQ4M-256G-1021 I got off eBay for 60 bucks including shipping. Running OSX and Applications off that and replaced glacially slow HDD with a midrange 512GB SSD for media storage like photos, music and videos. Also bumped RAM up to 16GB and did a fresh install of latest Catalina build. Thing boots just as fast as my 2018 MBP now should be good enough for my folks for another 6 years. The only thing lacking is the non-UHD display, but my folks are in their 70’s and don’t care about that. Total investment including adhesive strips and opener tool: about 200 bucks. My folks were ready to plunk down another 1200 bucks for a new model. Sorry, Apple. THANK YOU, iFixit!
Hi
Is it posible to installe a Samsung 850 pro 512gb sad into an iMac 2013 (late) EMC:2638
or will it cause problems, with there thermal sensor?
They make an inline cable adapter with a thermal sensor to attach to the outside
Dan -
External thermal sensor for an ssd upgrade is not needed for this model. Only for the mid 2012 models and earlier, so you'll be fine
My 2013 21.5" iMac has a 1TB standard hard drive. I am going to increase the memory soon from 8 to 16 and want to see about installing an the SSD to go along with the 1TB. Do I have the ports on the board to be able to install this?
Thanks
Hi,
I’d like to do the same… did you upgrade your iMac? could you confirm that there is a SSD connector? thanks!
Ruggero -
Yes you do. I just finished this exact upgrade and it was very easy. The only hitch was finding a screw to secure the SSD blade to the logic board as none was included (obviously) I ended up pulling a housing screw from the HDD I replaced with a 2.5” Samsung SSD, which was the perfect diameter but screw head itself was a little small for a snug fit so I added a washer just to be sure.
Can somebody confirm if there is a SSD connector exist in this model of imac if is bought without SSD?
I want to buy and upgrade SSD, but i don't want open my mac first and than wait till my ordered SSD come to me.
I found that connector exist but i need someone to confirm.
http://www.everymac.com/systems/apple/im...
*This model has a Serial ATA (6 Gb/s) connector for a 2.5" hard drive as well as a proprietary PCIe connector for an SSD. As reported by site sponsor OWC, if the SSD is not installed at the time of purchase, the connector still is present and later professional or self-installation is possible.
Thanks in advance
Hi,
did you upgrade your iMac? could you confirm that there is a SSD connector?
Ruggero -
I can confirm all models in this line include the connector, as the one I upgraded was the very base model and it was indeed right there on the back of the logic board. A screw to secure the SSD blade was not included, however, so you will need to source your own if you want to protect it from becoming dislodged if you ever bump or move your iMac around.
No, the Samsung 960 SSD is a M.2 drive. Apple uses a custom blade drive which is physically different.
Dan -
You are correct Dan, but there are now adapters you can purchase as a workaround for this issue. I almost went this route before deciding on a used MBP SSD instead out of cost considerations. A simple google search will give you a list of prices and configurations.
all great info. i have a 1tb version. i think i am going to just replace it with a 850 evo for now. but it would be cool to add a pcie ssd for the OS and keep the 1tb for storage. too bad there is no step by step guide to do this. even if there was, it looks like there are just a few too many steps to make it a reasonable upgrade…. typing this out, makes me think just replacing the 1tb with a 2.5 ssd is most practical.
great explanation ! I have iMac 21.5” late 2013 (EMC 2638 - Model A1418) and I want upgrade with SSD using the slot PCIe and delete the mechanical original hard disk Seagate of 1 TB
I noted that the slot PCIe is not M.2 ? is it correct ?
So we need buy an adaptor in order to install a Samsung 970 EVO Plus NVMe M.2. Is it correct ?
Which is the correct adaptor ? Is it available on your website ?
Otherwise the PCIe port available on motherboard working with a transfer rate of 3 GB/sec or 6 GB/sec
Last question: the hard drive original using a SATA2 tranfer rate or SATA3 transfer rate
Many thanks in advance
Gian from Italy
I used a Sintech NGFF M.2 nVME SSD Adapter from Amazon. If you use 970 EVO Plus you have to do a firmware update on the SSD. I used the 970 EVO which does not required firmware update to work. Look at Sintech instruction on Amazon product info.
Wo finde ich die Blade für den 2638 late 2013?
Rezension The Ultimate Guide to Apple’s Proprietary SSDs. Sie möchten ein Samsung SSPOLARIS mit der proprietären Apple PCIe 3.0 x4-Schnittstelle.
Review The Ultimate Guide to Apple’s Proprietary SSDs. You want a Samsung SSPOLARIS which has the proprietary Apple PCIe 3.0 x4 interface.
Dan -
Hey guys, I bought this Samsung SSD 860 EVO MZ-76E500B/EU 500GB and want to replace it with the fusion drive.
I have read all the posts above, but could not find out, if I can take the other harddiscs (HDD &SSD) out and replace them with this model. And, do I need an adapter here? I appreciate your help!!
Your system only has two I/O ports a SATA connection and a PCIe connection. A Fusion drive uses both ports the SATA with a HDD and the PCIe with a small SSD for a cache drive.
You’ll need to break the Fusion Drive set and just forget about the PCIe SSD. You’ll just remove the HDD and slide in your Samsung EVO SSD in its place following this guide iMac Intel 21.5" EMC 2638 Vervanging van de harde schijf
Dan -
hey, guys i just install and original apple PCIe SSD 256 GB on my iMac 21.5 late 2013 that drive was from my MacBook pro mid-2014
but doesn't work at full speed is only do 295 MB read and write but on my MacBook pro was 790 MB read and write someone can help to fix this issue
thanks
Sounds like you had a four lane SSD which is now in a two lane system!
Review this great guide! The Ultimate Guide to Apple’s Proprietary SSDs to get a deeper understanding.
Dan -
Thank you for all the helpful answers!
I’ve got a Late 2013 21.5” iMac (2638 14,1) that I have already upgraded the HDD to a Samsung 850 EVO a couple of years ago.. it’s running like a top ever since. BUT, I need more space.. and after reading that this unit has the PCIe slot for an NVMe drive.. I think I’ll just open it up and add the NVMe drive since it’ll be faster than swapping out my current SSD.
Question: Would you run the Samsung 850 EVO SSD as the Boot or Data drive? Why?
The NVMe drives I’m looking at are:
Addlink 1TB SSD NVMe PCIe 3x4 M.2 2280 Internal Solid State Drive S70 https://www.amazon.com/dp/B07K7LRB2T
OR
SK hynix Gold P31 PCIe NVMe Gen3 M.2 2280 Internal SSD https://www.amazon.com/dp/B08DKB5LWY
''Using the Adapter from Sintech https://www.amazon.com/Sintech-Compatibl...
Any suggestions before I open it up and make the upgrades?
Man, I really wish this had a faster PCIe slot.. like a 4x !!
First make sure yours has the connector! Only the systems sold as a SSD or Fusion Drive have the custom Apple SSD connector. It sounds like yours doesn’t have it.
As far as drives I really don’t recommend using M.2 SSD’s in Mac’s. I had wished Apple would had embraced the M.2 standard, they didn’t! While it is possible to install via an adapter an M.2 SSD Apple has a few extra lines which they use for sleep and garbage collection functions which is where the M.2 SSD’s fail. I’ve pulled out quite a few putting in either the Apple or OWC SSD’s as being the better solution from the start.
As far as which port drive would I use the PCIe/NVMe interface is a lot fosters such it would be better as the Boot drive (OS & Apps). This allows cache and virtual RAM to use the faster drive and lastly if you are using Windows Paging. Depending on the apps you are working with some use a scratch space which by default will be on the boot drive.
You do want a drive thats big enough to hold your OS & apps and still leave at least 1/4 of the drive unused! If you are doing big projects then more.
So the SATA drive is only used for holding the bulk data
Dan -
Thanks for the reply Dan.
If I’ve been reading correctly - All of the Late 2013 21.5” iMacs (2638) came with the PCIe port, regardless of configuration - as confirmed by several teardown videos and lots of research. Including the article you linked to above: https://beetstech.com/blog/apple-proprie... Is this incorrect?? Guess I can always open it up and find out the hard way LOL
OWC Aura Pro X2 SSD iFixIt also shows it is compatible
Anyway, it looks like going with a card made for the Apple pin type would be best.. and running the PCIe as the boot drive..
really appreciate the advice!
People often confuse the systems! The early 2013 don’t have the connector the late models do!
Dan -
I just want to point out that all late 2013 iMacs have the slot for the Blade SSD. iFixit if you could please correct your literature it may encourage people to install the blade SSD instead of only the 2.5" SATA. to be sure I pulled apart 3 21.15" iMacs today which DID NOT ship with blade SSD drives or Fusion drives. I'd be happy to share any model info etc. So everyone feel free to upgrade to the Blade SSD as it is superior to the 2.5"
Sorry, it’s a 500 gigabyte blade, not tb
J'ai repris le tutoriel de façon à ce que l'étape de démontage du support inférieur apparaisse avant le démontage du haut-parleur droit. Ces deux étapes sont désormais les 24 et 25, indispensables pour démonter le haut-parleur droit.
Ce qui est surprenant c'est que le prérequis existait dans le tuto original français, mais n'apparaissait pas dans la traduction du tuto en ligne.
J'ai fait deux trois modifs (précision de SSD PCIe notamment dans les titres et le texte) et après enregistrement les étapes de démontage du support inférieur apparaissent désormais.
Translation of pichel’s comment: I resumed the tutorial so that the disassembly step of the lower bracket appears before the disassembly of the right speaker. These two steps are now 24 and 25, essential to disassemble the right speaker.
What is surprising is that the prerequisite existed in the original French tutorial, but did not appear in the translation of the online tutorial.
I made two or three modifications (precision of PCIe SSD especially in the titles and text) and after recording the dismantling steps of the lower support now appear.
The wedge is an extremely tight fit for this model. I was worried that the amount of force needed to use it as shown might damage the stand, so I used it with the long side down instead. It worked fine that way and didn’t need anywhere near as much force to insert.
roberttrevellyan - Antwoord
Here’s a good YouTube vid on upgrading the RAM: Can a Normal Person Upgrade the RAM in the 2017 21.5" iMac?
Dan - Antwoord
Here are a couple tips from me:
1) Expose the adhesive to extreme temperatures. I did this by transporting my iMac in my car, screen-down on a piece of cardboard on a cold February morning (in Chicago). When I went to pick up the iMac, the screen practically fell off the chassis. I would have been distraught by this if I hadn’t already planned this replacement. So it was a happy accident.
2) Remember to expell the residual power from the power supply by pushing the power button while the iMac is unplugged. This does NOT guarantee it’s safe to touch, but when I accidentally brushed the solder and exposed capacitors, I didn’t get shocked.
jerrid_foiles - Antwoord
Instead of using the wedge, I placed the iMac faced up with the top side (web cam) facing me while I ran the pizza roller around. It worked out great!
Sam Fung - Antwoord
“All iMacs also come with a traditional hard drive” mine doesn’t!! it’s HDD bay is completely empty, no SATA cable or anything. I guess I’ll have to upgrade the PCIe SSD instead.
Chris Hughes - Antwoord
There is no replacement glass for this model, it is part of the LCD and impossible to remove or replace- the entire LCD has to be replaced unfortunately if the glass is cracked or damaged. You will have to Google search for a replacement. Also be careful with some of the lock tight tork screws as I broke one of my screw mounts taking one out.
Phil Tesone - Antwoord
I used this service wedge but also found it a very tight fit. The same stabilization can be achieved by using a big rolled up towel.
Ernst - Antwoord
While this is a good instruction guide, I recommend to also look at OWC’s instruction video about drive installation, before starting the exercise. Those install videos are very detailed and useful.
Ernst - Antwoord
Main advice: TAKE YOUR TIME with the pizza roller.
Make several passes, until you really feel like there's no more sticker in the way. Stay away from the camera though (approx. 1inch / 2.5cm on both sides). This will reduce the work left with the plastic card. Adhesive is really on the edge of the screen so there is absolutely no need to go any further than the recommended 1cm / 3/8inch depth.
Where are the sensitive parts?
Facing your iMac, imagine you're looking at a watch. There are antennas on 1, 2 and 4 o'clock. Do not insert any metal piece there (nor anywhere else, btw). Other than that AND the screen cables underneath the camera, not much danger.
Froggy Manny - Antwoord