
Motorola Droid Turbo 2 Battery Replacement

Inleiding
Ga naar stap 1Follow this guide to replace a worn out battery for the Motorola Droid Turbo 2. If your battery is swollen, take appropriate precautions.
For your safety, discharge your existing battery below 25% before disassembling your phone. This reduces the risk of a dangerous thermal event if the battery is accidentally damaged during the repair.
Wat je nodig hebt
Reparatieset
Deze set bevat alle onderdelen en tools om deze handleiding te voltooien.

Onderdelen


Gereedschap


Toon meer…
-
-
Insert a SIM eject tool, SIM eject bit, or a straightened paperclip into the small hole in the SIM card tray.
-
Press to eject the tray.
-
Remove the SIM card tray assembly from the phone.
-
-
-
Heat an iOpener and apply it to the top edge of the phone for a minute.
After you heat the Iopener, lay the shiny side on the phone. With all the warnings of how hot it could get, I handled it with oven mitts. It wasn’t until I struggled for some time trying to get the back of that I grabbed the Iopener with my bare hand and found the the shiny side was still hot, but the textured side was quite cool. Apparently it has some insulating properties.
-
-
-
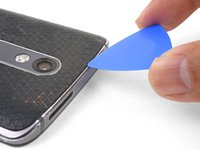
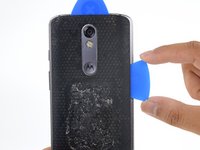
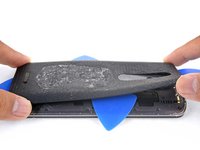
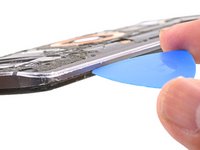
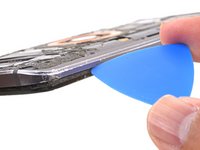
Angle an opening pick and firmly press so that it slips under the back cover.
Use a heat gun to loosen adhesive prior top using spudger
-
-
-
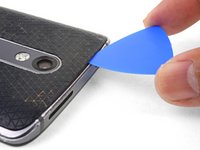
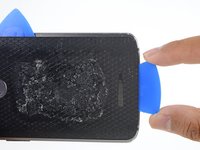
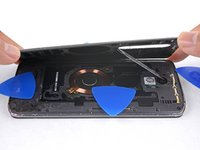
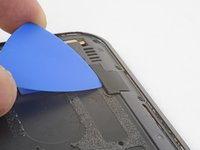
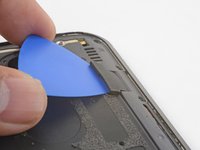
Slide the opening pick along the top edge of the phone to break up the adhesive.
-
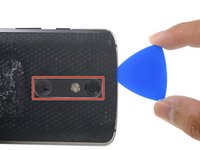
Use the pick to release the deeper areas but avoid slicing through the camera bezel area.
It took me over an hour to pry the back cover off the phone. Don't give up – it can be done! It takes some time, heat, and persistence to wedge the blue picks under the back. And not knowing what is under there can cause stress! Bottom line - don't be afraid to apply pressure to the pick to break the seal between the back and the metal edge, and then you can slide the pick in under the back cover without breaking any electronics. I did not notice the blue plastic prying tool until after I wrestled the back off – I think that would have helped with the final peeling off stage.
-
-
-
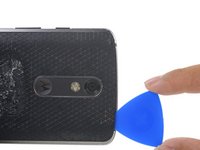
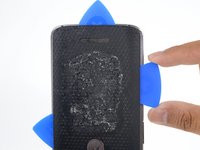
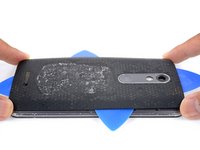
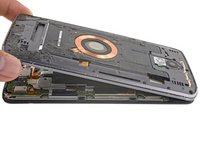
Once you have cut through the adhesive, slowly peel the back cover away from the frame.
-
Remove the back cover.
Getting this back cover off with 4 little picks is nothing less than Fake News. The picks (and a halberd spudger) were good for cutting through adhesive on the outer edges, but a fair amount of heat and several plastic “playing cards” were needed to get to the adhesive holding down the cover on the middle of the device. Be VERY CAREFUL as you near the charging coil…2 little connectors near the bottom right could be easily severed. Take your time, use heat and patience.
-
-
-
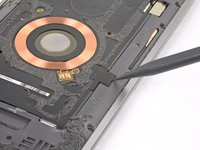
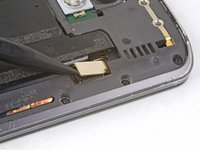
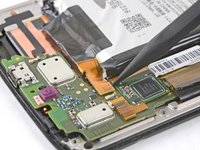
Insert an opening pick under the flash connector rubber cover and pry forward to remove it.
The two plastic covers do not fit snugly in place, so after putting them back in place, use small bits of electrical tape to secure them before installing a new adhesive back cover. I tested my phone thoroughly before the last step, so that I would not have to buy a new cover if something didn't work.
-
-
-
-
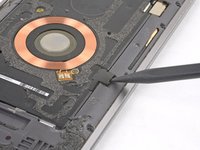
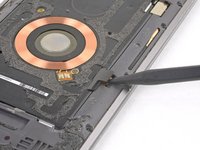
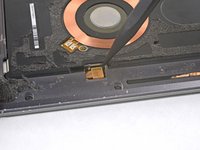
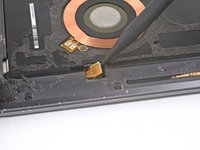
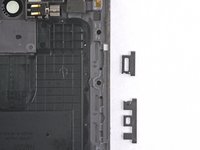
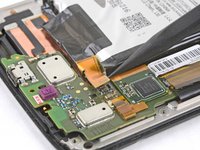
Use the point of a spudger to pry up and remove the coil connector rubber cover.
-
To reinstall the cover, align the cover and use your finger to push it forward into place.
Careful! The cover popped off and flew 8 feet! (Over 2 meters!)
Absolutely true. Mine popped off and shot across the room. I was lucky to be able to find it.
-
-
-
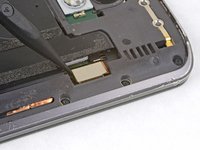
Remove the following T3 screws securing the midframe:
-
Thirteen 3.1 mm black screws
-
Four 4.3 mm silver screws
My phone (purchased 12/2015) has only 2 silver screws top and bottom (4 total), and they're also T3, not Philips.
With a Torx screw this tiny, it pays to take time to make sure that the driver is well seated before turning it. This will eliminate stripped screws. Also, I loosened each screw first, and then removed them. Breaking them free before turning them also helps prevent stripping.
eitherway its a T4 torx in my phone. Double checked my bit. T-4 same for all these screws
T4 in mine as well. Stripped out a T3 bit figuring this out.
They were all T3’s in the one I am repairing. Must be different depending on where it is manufactured.
I recommend placing your phone down on a flat surface and then you can put good pressure straight down to remove the screws.
One of the small screws was stripped. I used a 1/8” drill to eliminate the head - very . The mid-plane came off, and I finished removing the screw with a small pair of needle-nose pliers.
the phone I opened used a T4 bit as well
At first I thought my toolkit only came with a T5, which was too large. Then I found the T3 bit in a ziplock back with an alcohol swab. It worked, but it had some slack, so my screws may have been T4, but I didn’t have that option.
The device I’m fixing now is T4. Stripped 2 heads and had to drill them out. Wish this walkthrough had a note that some are different so I would have double checked before I stripped them out.
Hi Matt,
Thanks for your feedback! So many people are having an issue with this—I’ve added a note to the step as you suggested.
-
-
-
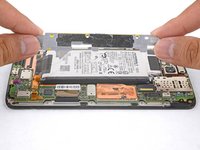
Remove the midframe from the phone.
The buttons will NOT "fall in" when reassembling, so it's important to remember to put them back. I found that putting them in the frame before replacing it is the only way. Check to see how they fit on the phone first, then drop them into their slots outside-in. The power button will fit only one way; the volume buttons should go in oriented as they fit best on the phone. Be sure to test them to make sure they click freely often! It's easier to readjust them before all those screws are back in.
I have not done this yet but, try using a small bit of electrical tape to secure them to the mid-frame before removal
Yes, a small strip of tape on the mid frame to hold the buttons in place works great. Thanks for the idea. I simply put a piece over the buttons and onto the whole frame, then cut it carefully along the edge between the glass an mid frame when I separated the two piece. This held the buttons nicely in place and ready for reinstalling.
Be careful putting the mid-plane back on. The volume control innards were bent and straightening it back out took a lot of time - on phone #2.
My contact wires got bent the first time I took a phone apart. I am pretty sure I bent them when I was prying the phone open (not while I was putting back together). Now I'm extra careful prying the phone open on the volume button side and it hasn't happened again.
Beth -
It sounds like people like the tape idea and it’s a helpful step, so I’ve added it into the guide step. Thanks for the comments!
I tried taping the side buttons on but they slipped out anyway. Observe the photo to replace them in the proper orientation. It’s actually quite easy, and I’m not certain how effective taping them would ultimately be as it’s important to seat the slots over the tabs inside the body. You need to be an extraordinary taper to stick them in place such that they “presto!” drop in place when reinstalling the mainframe
I found that it helped a lot to put a screw in around the down volume button, when reassembling, to prevent the buttons from falling out. That is after you had popped the mid frame and the phone together. I also agree with using the electrical tape to prevent the buttons from falling out.
-
-
-
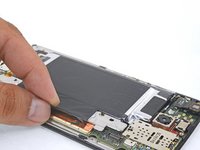
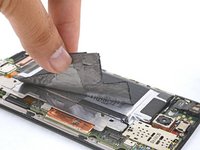
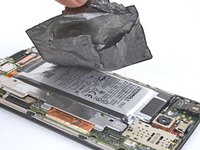
Carefully peel the black graphite layer from the phone.
I found that the black tape was like a bag--as I pulled it off, it filled with air, and the air did not escape when I put it back. I used the knife to make a small hole to let the trapped air escape.
I’m pretty OCD and wanted to reuse the plastic bag, but when I pulled if off it got all twisted up, so I just tossed it. The instructions are correct that it is not necessary for normal operation - my phone worked just fine without it.
I found that pulling the bag off from the battery bottom corner worked best and didnt rip the bag
What exactly is the graphite for?
Hi Felix,
Graphite layers like these are excellent heat conductors and are often part of the phone’s cooling solution. Without it, your phone may run warmer, but should be OK.
Pulling from the bottom corner worked perfectly. Layer came off intact and I was able to re-use.
I think a new graphite layer should have been included in the kit. Virtually impossible to remove intact.
If you go slow, and keep you fingers as close to the phone as possible, it comes off easily. Don’t just work a corner loose and keep pulling from there. If you do the more you get pulled loose, the more it can stretch. Pull up a quarter inch or so an slide your fingers down and do it again. When you done the plastic won’t be stretched and it still has enough sticky to reuse it.
-
-
-
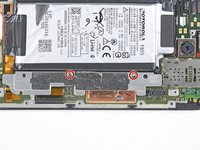
Remove the two 4.2 mm T3 screws securing the metal bracket adjacent to the battery.
-
Remove the metal bracket.
Mine were T3’s on the metal bracket. It’s gotta be a manufacturing thing. So weird
-
-
-
Use the point of a spudger to pry up and disconnect the battery pack connector.
If you're going to use metallic tweezers, make sure not to touch any part of the connector when removing. I momentarily shorted a connection (sparks).
Also when installing new battery, note battery does not fill up entire space so there is some discretion on positioning. In reference to above photo, make sure new battery is shifted slightly to right (towards top of phone) so as to not lay on top of circuit board below (left in photo). After reassembling mine the phone speaker would not work, so I took it apart again and figured out the battery connector harness was partially on top of the circuit board and interfering with needed electrical contact between the mid-frame and the circuit board. Easily fixed by adjusting battery position. Fortunately I had tested phone operation BEFORE reattaching back cover so this was an easy fix.
-
-
-
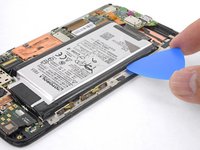
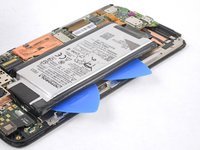
Angle and insert an opening pick under the long edge of the battery away from the motherboard side.
-
Insert a second opening pick along the same battery edge next to the first pick.
This may seem silly, but I’d suggest inking an X on the old battery and setting it aside a good distance from your project when you remove it so you don’t get it mixed up with the new battery!
-
-
-
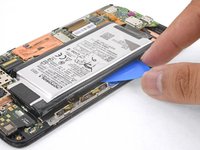
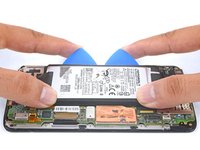
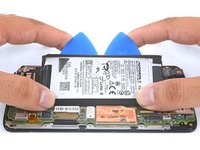
Apply firm, constant prying pressure to the picks to release the battery from the frame.
-
As the battery loosens from the frame, move the picks inward and continue to pry upwards.
My replacement battery came with the ribbon cable facing the wrong direction. I had to fold the black part over so the connector was oriented properly.
They did that on purpose as reports of ripped battery ribbon cables were coming in, folding the "excess" solves that torsion!
This step was one of the most difficult. The adhesive beneath the battery required extremely careful prying to slowly loosen it up. Lithium batteries are spooky enough as it is, without bending them for removal. Tread carefully on this step.
If its glued down like iphones are then use a length of dental floss or 2 to make it stronger. Loop it behind the battery then use it to saw through the glue.
That's really smart.
The poly bag will stretch out if you go too hard too fast, I actually punctured the outer bag and caught a whiff of super strong solvent, shat myself, and finished removing the bag over the concrete of my empty garage. No fire tho, thankfully. Use a credit cardto seperate the glue from the bag without having to pull it up so far.
I used Isopropyl Alcohol (99%) and small bottle with needle to get under the edges of battery. Once I did the battery came off without any problems.
Thanks for the dental floss and loyalty card tips. I slid a pick under to slightly lift then battery then used the loyalty card for the majority of the adhesive separation. Dental floss was the final step to move around the corners closest to the circuit board and wires.
-
-
Gereedschap gebruikt in deze stap:Tesa 61395 Tape$5.99
-
Remove the battery.
-
To help with alignment, connect the battery temporarily to the motherboard before adhering it in place. Disconnect the battery before you continue with re-assembly.
question for all yours guys after replacing your battery, is your phone charging fast like suppose to be?
After replacing the battery, I charged my phone to 100% on an original Motorola charger (powered off, slow charge, overnight). I ran the battery all the way down (it lasted all day with heavy use), then charged it overnight again (powered off, original charger). After that, I tried to charge it with my fast charger and it will not recognize it at all. I also noticed when plugging it into the original charger, while powered on, it says it's charging by USB - that's trickle charging. I'm going to try wiping the cache to see if that helps.
https://forum.xda-developers.com/droid-t...
I have a Droid Turbo that I fast-charged for years without compromising the battery (I'm using it as a backup now and the battery is still fine).
Beth -
@Antoine Perez: I have never fast-charged any of my lithium-powered devices, as it tends to shorten battery life. All I can tell you is that the genuine LG Chem battery that I used as a replacement seems to be behaving exactly like the original. Source:
replaced battery, while doing initial recharge the phone buzzes and the battery icon comes on then goes back to the charge meter, Is this normal on a new battery?….
I think this normally happens when your phone is charging but turned off.
-


To reassemble your device, follow these instructions in reverse order.
Take your e-waste to an R2 or e-Stewards certified recycler.
Repair didn’t go as planned? Check out our Motorola Moto Droid Turbo 2 Answers community for troubleshooting help.
To reassemble your device, follow these instructions in reverse order.
Take your e-waste to an R2 or e-Stewards certified recycler.
Repair didn’t go as planned? Check out our Motorola Moto Droid Turbo 2 Answers community for troubleshooting help.
Annuleren: ik heb deze handleiding niet afgemaakt.
78 andere personen hebben deze handleiding voltooid.


30Gids Commentaar
Despite being careful, I lost one screw that seemingly disappeared as I tried to place it back. Even a rare earth magnet didn't find it. It would be nice to have spare screws.
From whom would get those?
Your neighbors Turbo 2…it would've up to you whether or not to tell the neighbors that you got them, lol. Everyone seems to have a junk phone around, open it up and find the closest matching one….. I be yet to find anyone that sells spare phone
Replaced the battery, but now the display is pixelated on the right side. Any ideas? Need help ASAP.
The only thing that got me hung up on this was the volume button reassembly. I can't seem to get the volume button to work properly again.
Guide worked perfectly to replace the battery, but now my external speaker is not functioning. Opened it back up to test all connections and tested speaker also. Everything tests fine, but no external audio. Happy to have my battery life back, but very frustrated to lose audio.
I have the same problem with speakers not working. Did you find a fix?
james -
Same result. Any fix for speaker not working?
james -
Had the same problem. Found some of the tape from the new battery was keeping the loudspeaker from connecting to the motherboard. Ended up reinstalling the new battery higher in the battery compartment. After the battery was reinstalled, I removed the battery from the midframe and pushed it against the connector with the power on and music playing to test if I was getting sound. Once I was sure sound was playing, I reinstalled the midframe while pushing hard on the area with the speaker, and installed the screws closest to the speaker first. Works now.
dedkight -
I had to use a T3 driver for my screws. Re. the volume and power buttons, I placed mine into their slots and had them sticking out approx what they’d be with the phone assembled. Note: each button has a tiny notch on one end, the flat end that fits into the phone. The notches in each button should be placed so the notches face each other. Before installing the screws, test the buttons to see if they feel right. I bought from Harbor Freight a set of jewelers eye pieces with a variety of powers. I found the 10x power to be very helpful when re-seating the connections properly. Turn on the phone to be sure you have power and sound before finishing up with the back cover. I purchased a new back OEM back cover with adhesive on it. I cleaned all the old adhesive off the phone parts. Then wiped with alcohol just prior to installing the cover. I warmed up the inside of the phone and the new back cover with a hair dryer just a bit before placing it back onto the phone.
I bought 3 android turbo 2 phones. one for myself, my wife and my son. The battery failed for my son first after 18 months, then my wife after 24 months and then for me after about 26 months. I don’t believe this is just coincidence. Just like VW corporation was dishonest about emissions and Apple was dishonest about their batteries, I believe Motorola has been dishonest and a class action suit should be filed against them also. I have a Tablet that I have owned for close to 8 years now. I have never replaced the battery in it and It still holds a charge for a whole day. My android Turbo 2 phone can stay on the charger all night, show a 100% charge, I can bring it up stairs, set it down for 5 minutes and then go back to use and the screen will go black on it the moment that I try to use it. Please contact me if you would also like to start a class action suit against Motorola. The corporations need to be honest. My e-mail is gjchapman1526@gmail.com
Hi we also had 3 turbo 2s. My first one had to be replaced within 6 mo. Now my 2nd ones port went bad & have to charge on a pad. But it won't do anything but go to dead battery screen. Both my husband & daughter's have been replaced but I have no warrenty left on mine. These are junk. I'm so mad . It showed a charge, but now goes from menu to dead battery. If you get around to a class action suit count me in. Chris thanks
Chris
gallionz53@gmail.com
cgallion -
not thrilled to do this, but my phone is slow, and super slow when turbo charging….AND, when I get down to like 35% battery and try to open an app or something else that’s strenuous, screen goes blank and dies. I plug it in, and it says charging at 35% (or whatever it died at).
I think some of these posters aren’t being very careful when prying off the plastic backing. It is very common to easily damage this stuff if you aren’t using a some sort of hot plate, or a pro with a heat gun. There are also small heat bags that your able to toss in the microwave.
Mine too. Shuts down at 29%. Start day at 100%. I'm at 60% in 3 hours, 55% in 4.5 hours, and then shut down at 6.25 hours. Older phones were so much easier to change battery yourself.
The guide has been revised! Sorry for all the confusion!
My phone quite definitely uses T3 Torx screws. Either Motorola switched to different screws in different production runs or others are using the wrong drivers.
Thank you sooooooo much, it worked like a charm for me. I’m feeling so happy!
Success! All T3 screws.
The power button felt as though it would not depress as I reassembled. I pulled the mid-frame apart once more and found that the power button had interfered with its flex cable upon assembly and pushed it out of position. What seemed to work best for me was to have the power button protruding out of the case slightly more than it would be normally. Then carefully install the mid-frame button side first, the power button should draw itself in as you snap the mid-frame into place, and ensure proper operation before closing up the device.
For those that lost external audio. I experienced this as well and found a solution to my problem. With the mid-frame removed, there are two very small gold connectors for the external speaker. Look at the mid-frame speaker contacts and find where they make contact with the board. These gold pins may not be making solid contact. Carefully bend them upward VERY slightly. Re-test, bend a bit more if needed, and ensure it works before completing assembly.
I had a lot of trouble with the pre-cut adhesive for the back cover. When I tried to peel the lining off of one side, it came off of both sides and tangled. Is there a trick to applying it?
Hey Kenneth,
Sorry to hear that! I’ll update the guide soon to include some adhesive application steps.
Here is a guide to properly apply the pre-cut adhesive.
Tried to unscrew a T3 with a T4 screwdriver before I knew what I was doing…. Kit came with a T4 and T5 screw bit, no T3. Screw is stripped, and now I can’t even use an actual T3 screwdriver. Is there a way to remedy this?
Hey Zachary,
I’m really sorry to hear that! I’ve forwarded your comment to customer service. Meanwhile, you can try some stripped screw removal methods shown here:
Hoe verwijder je een doorgedraaide schroef?
Which screw did you strip? If it is a frame one in Step 11, you can as last resort carefully cut around it. The remaining working screws should hold the frame in place.
Amazingly, this project went just fine. After heating up the iopener twice to get it really hot, I was able to get the back off, and everything else went swimmingly. Almost couldn’t believe it when everything worked when I was done. And now instead of losing 10% battery every 15 minutes, I am on track to get more than a day from a single charge.
Worked great, thank you. I used the cardboard parts trays to hold and organise the screws while performing the work. Testing the phone before gluing the back cover on is helpful if troubleshooting is required. I used extra alcohol wipes to help clean off old adhesive. I would recommend having extra available before starting the work. A head mounted magnifier is not required but a really good idea for old guys like myself who cant see the small stuff as well as we once did. Work in a realy well lit space. I do these tiny things on an old cutting board in the kitchen. The sunlight is much better than my workbench lighting. Overall, I found the quality of the parts, bundled tool kit and instructions provided a better experience than almost any professional ‘engineering change order’ of repair kit that I have encountered. Thank you!
Mine will not turn on at all
I have no complaints here, the guide had ever necessary step, good photos and very concise explanations. The toolkit had every necessary tool and then some. I definitely took my time with this, I couldn’t afford to ruin this phone. I took about 30 minutes just taking the back off, but once that was done, everything else was just follow the steps.
I would offer one suggestion to the guide: the kit comes with a big piece of double sided tape with a lot of cut outs in it, meant to be what “glues” the back cover back on as your last step. I stupidly took both sides off the tape first, and then tried to put it on. It ended up a giant wad of useless tape sticking to itself.
Strip the protective plastic off *one side* of the tape first and stick it onto the phone, THEN peel off the other side.
Other than that everything went well. Screen is fine, sound still works, cameras work, buttons (pain in the butt to put back in) work. I have a usable phone again :D
I can’t stress this enough: TAKE YOUR TIME and you’ll be aight.
For what it’s worth, you’re better off just buying another phone, preferably one that doesn’t come with a defective battery.