Deze vertaling geeft mogelijk niet de meest recente updates van de bronhandleiding weer. Help ons met het updaten van de vertaling of bekijk de bronhandleiding.
Inleiding
Is het scherm van je Pixel gebarsten of beschadigd? Volg deze handleiding om 'm te vervangen!
'"Het schermpaneel van de Pixel 3a is vrij fragiel"'. Als je het scherm opnieuw wilt gebruiken, pas dan goed op de waarschuwingen bij het openen van het toestel.
Wat je nodig hebt
-
-
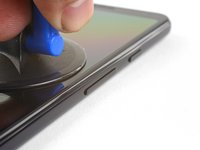
Let op de twee naden in het toestel:
-
Schermnaad: Deze naad scheidt het scherm van de rest van het toestel, hier moet je gaan wrikken.
-
Framenaad: Dit is waar het plastic frame met de achterkant verbonden is. Deze wordt bij elkaar gehouden met schroeven. Ga hier niet wrikken.
-
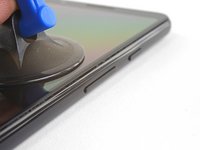
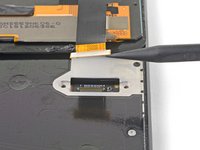
Bekijk, voordat je begint met wrikken, de derde foto om al kennis te maken met de verschillende gebieden van het scherm:
-
Schermflexkabel: Wrik hier niet dieper dan aangegeven wordt, aangezien je anders schade aan de kabel riskeert.
-
Plakrand: Als je voorbij deze rand gaat wrikken zonder je plectrum in een hoek in het toestel te steken, zul je het schermpaneel beschadigen.
-
-
-
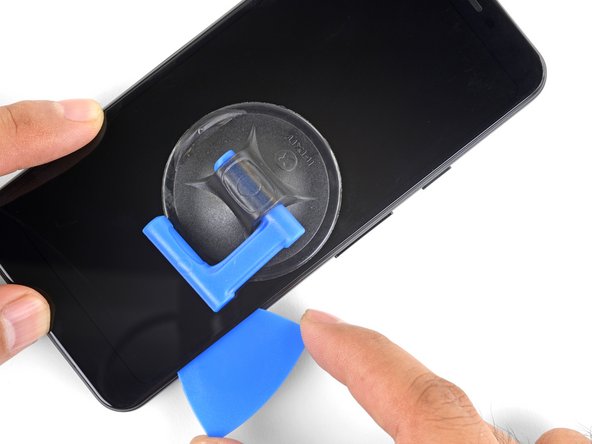
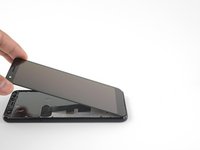
Verwarm een iOpener en leg deze gedurende ongeveer een minuut op de rechterzijde van het scherm.
My screen was cracked diagonally. Heating with iOpener helped at the top and bottom edges to weaken the adhesive.
-
-
-
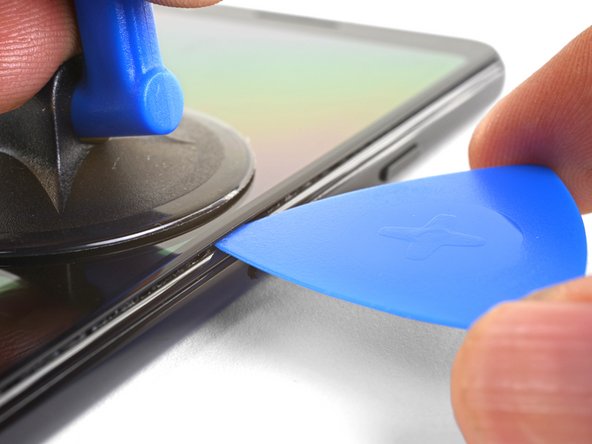
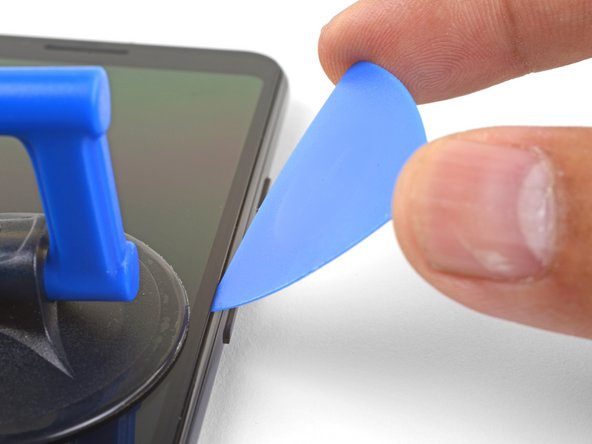
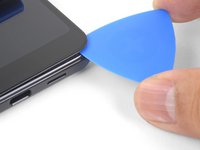
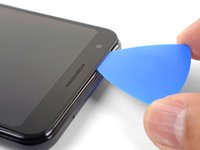
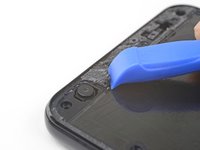
Duw je plectrum, nadat je deze ongeveer 1 mm in de opening hebt gestoken, omhoog totdat een hoek van ongeveer 45 graden beschrijft ten opzichte van het scherm.
-
Op dit punt duw je je plectrum iets verder, ongeveer 6 mm (1/4"), in de opening. Je plectrum zou dan onder het OLED-scherm moeten schuiven.
-
-
-
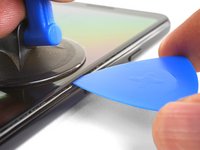
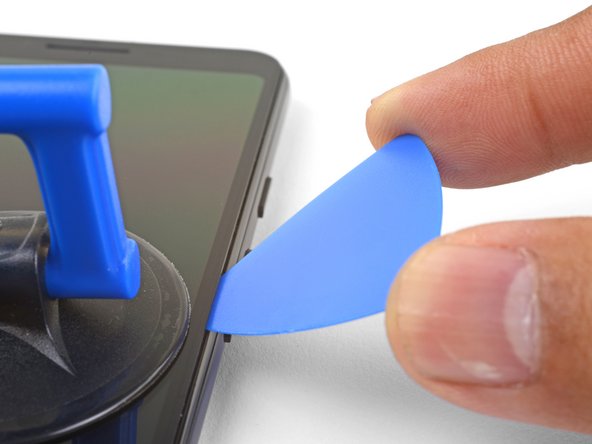
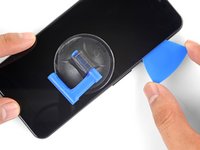
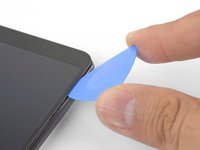
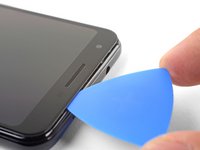
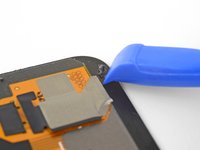
Schuif je plectrum langs de rechterzijde van het toestel om de lijm door te snijden.
-
Laat je plectrum op z'n plek zitten om te voorkomen dat de lijm zich weer gaat hechten.
Don’t make my mistake and read ahead. 6mm may be too close for comfort! 8mm is definitely too far and caused me to damage. Also be sure to read the right manual! I have an XL and it notes 5mm.
Fortunately my old screen was beyond repair, But be super careful around the bottom I managed to sever the ribbon cable to the digitizer.
I broke my screen here. The adhesive in my case was quite strong on the top and bottom.
This is by far the hardest part of the entire replacement. I ruined my screen doing this, you might as well buy a new screen at the same time as you buy your battery. I just barely rubbed the edges of my screen and it turned the edge of my screen purple. This eventually migrated to the entire screen causing the whole thing to be purple/black.
I've repaired many iPhones, and never had any issues. The screens always remained intact. But with the Pixel, I completely destroyed the screen. The only thing it showed after booting up was a purple line... The adhesive is very strong and it's nearly impossible to separate the screen without damaging it. You should order a new screen before you attempt to change the battery, just in case.
-
-
-
-
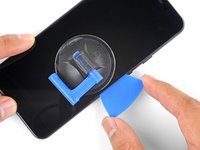
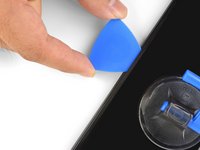
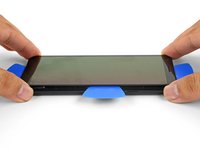
Schuif je plectrum langs de hoek rechtsonderin het toestel om de lijm door te snijden.
-
Schuif je plectrum verder langs de onderkant van de telefoon en rondom de hoek linksonderin het toestel.
My screen was already cracked diagonally, so going around the corners was especially hard. Starting from each side was not so risky as I first thought because side adhesive is really thin. However top and bottom needed some more lifting force from the pick. More heating helped at the top and bottom edges.
-
-
-
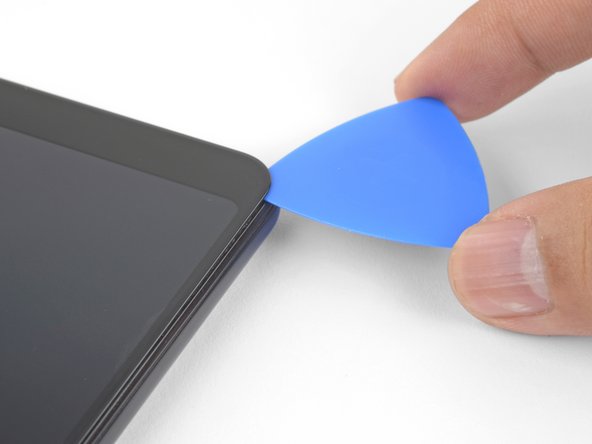
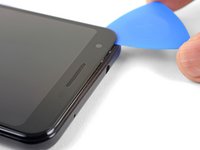
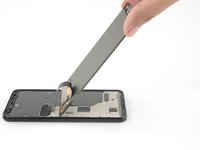
Schuif je plectrum langs de linkerrand van het toestel omhoog. Zorg wederom dat je je plectrum in een hoek in hebt gebracht, zodat je weet dat deze onder het OLED-scherm zit. Let er ook op dat je hem niet verder dan 6 mm (1/4") in het toestel steekt.
-
Om je plectrum onder het OLED-scherm te krijgen, steekt je de punt van je plectrum niet verder dan 1 mm in de opening, breng je je plectrum in een hoek van ongeveer 45 graden ten opzichte van het scherm om je plectrum vervolgens langzaam maar zeker tot 6 mm in het toestel te steken.
-
-
-
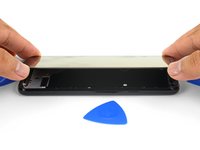
Schuif je plectrum langs de bovenkant van de telefoon en zorg dat je je plectrum niet dieper dan 8 mm (5/16") in het toestel steekt.
There is a LOT more adhesive at the top than anywhere else on the phone! It’s like there’s 2 lines of adhesive, one along the edge of the case and one along the edge of the screen, and it’s filled in between them wherever the speaker camera aren’t. I needed to heat and pry several times to get the top loose. Fortunately, there’s little risk of hitting a cable near the top (look ahead to the step where you lift the screen off to see where all the cables go!)
I found that applying the iOpener across the top edge of the glass for about 30 seconds at this step helped soften the adhesive significantly. My front camera was replaced only a few months ago by uBreakiFix and the display adhesive subsequently let go on the entire right edge, bottom, and part of the left side shortly after the new front camera failed. Only the top was still securely stuck.
-
-
-
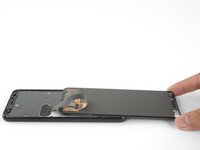
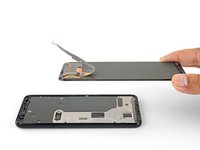
Als je alle lijm hebt doorgesneden, klap je het schermglas om en laat je het glas ondersteboven op de telefoon rusten. Zorg dat de flexkabel niet onder spanning staat.
Hi, could you help me with one clarification?
What does the small “metal patch” in the middle of the display ribbon do?
Does it prevent the phone from starting while disconnected?
Thank you for your time!
Hi Oliver,
I think the patch you’re referring to helps with either EM shielding or heat dissipation. It should not prevent the phone from starting.
-
-
-
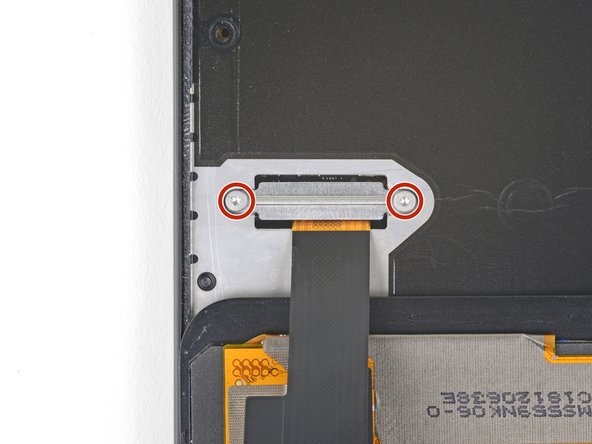
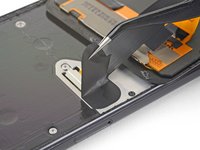
Trek de zwarte tape die de beugel van de schermaansluiting bedekt op voorzichtige wijze los.
-
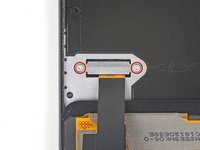
Verwijder de twee 4.4 mm lange T3-schroeven waarmee de beugel van de schermaansluiting is bevestigd.
-
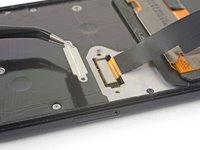
Verwijder de beugel van de schermaansluiting.
This may be a silly question but how are you able to tell whether the tape is in good condition? Is it based off of how sticky it is after you remove it?
That is a fair question! If the tape is in one piece and is relatively sticky, it can probably be used again.
Oops! I forgot to put any tape back. Does this tape have a critical purpose, in other words should I go to the trouble to pry the screen back off and tape it?
The tape does not serve a critical purpose. If you have already re-sealed your phone, I wouldn’t worry about it.
Les vis sont des T4 et non des T3
Bonjour Gaëtan ! Merci pour la remarque. En fait, il y a toujours une certaine tolérance entre le tournevis et la tête de vis. Donc il se peut que la taille supérieure ou inférieure soit plus “confortable” au cas par cas. Bonne réparation !
Bonjour,
Pouvez-vous me conseiller un bon kit de réparation pour mon Google Pixel 3A?
J'ai peur de me faire arnaquer en achetant un mauvais écran de basse qualité .
Do you sell the 2 4.4mm t3 screws and the screen connector bracket. Or know where I can get it thanks
-
-
-
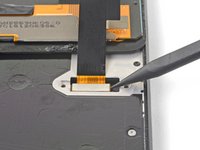
Gebruik de punt van een spudger om de flexkabel van het scherm omhoog te wrikken en los te koppelen.
I had accidentally pressed the power button and the phone was on when connecting the new screen and that broke the board! So make sure the phone is off.
hey man think I've just done the same thing :(
how did you fix it? did it need a new motherboard?
is it okay if I forgot to add the black tape on the connector area???
When reassembling, before reattaching the connector for the screen flex cable is the time to align the screen cover adhesive sheet onto the perimeter of the plastic mid-frame. Even if one is using the Tesa tape, I suspect aligning it along the edge of the mid-frame would be simpler without the screen and its flex cable obstructing your efforts.
-
-
-
Verwijder het scherm.
-
Vergelijk je vervangende scherm zorgvuldig met het originele onderdeel. Mogelijk zul je extra componenten (zoals het luidsprekergaasje) naar het nieuwe onderdeel over moeten zetten.
-
Volg je deze handleiding als je op maat gesneden kleefstrips gebruikt.
-
En volg je deze handleiding als je dubbelzijdige tape, zoals Tesa-tape, gebruikt.
There is a blue plastic tape covering the digitizer and when I try to take it off it rips out something more than just the tape I think it’s pulling the magnet too
i had a little plastic piece around the camera (seems to just be a spacer) that i moved to the new screen. had to pry it up with a pick cuz it was stuck down good.
actually to clarify- i didn’t move the little camera spacer to the new screen- i placed it around the camera on the phone, where there was a little indent for it, and stuck it down with a bit of tesa strip, then applied more tesa strips around the edge of the phone before finally reconnecting and replacing the screen. the little plastic bit i encountered needs to be precisely placed around the camera so would not be a good idea to just stick it to the screen when reinstalling!
elyze -
Thanks team! I was able to replace my broken screen with no issues!
Instead of cutout adhesives or tesa tape, I used B-7000. Painless.
Appreciate the screen and instructions!
Bonjour,
Pouvez-vous me conseiller un bon kit de réparation pour mon Google Pixel 3A?
J'ai peur de me faire arnaquer en achetant un mauvais écran de basse qualité .
Hello . Can you advice me a site where i Can buy a quality screen replacement pack for my Google Pixel 3A?
There's a lot of rip off on internet and id like to get a good pack and a quality screen .
Hello! We currently sell a replacement screen. However, I’m not sure if it is available yet internationally.
I have a quick question, so I haven’t done anything yet because I only just ordered my repair kit, but is it possible to replace the battery without having to replace the display ?
Hi Braeden!
Yes, it is definitely possible to replace the battery without replacing the display. With that said, the initial entry steps can be pretty tricky. Before you begin, look very closely over the display to see if you can see any micro-fractures. If you see any, you will most likely crack the screen when you try to remove it. Take your time and apply a heated iOpener often. Good luck!
I forgot to order the tape when getting my replacement USB port, so I ended up putting the screen back on without any tape and using regular clear tape on the outside of the phone to keep the screen from falling off. It’s less waterproof, but it’ll do the job until the right part arrives.
Speaker mesh appeared to already be in place on my replacement screen, so I did not transfer this over from my old screen. That was a huge mistake, sounds were garbled above about 30% volume. Make sure you do this part!
I tried the replacement after watching this and many other videos. I purchased a working Pixel 3a and removed it to put onto my old Pixel 3a. The screen is not turning on on either devices now, old or new. The device is turning on because I can feel vibrations. What do you think the problem is?
-


'"Als je Pixel niet aangaat na het vervangen van het scherm is er een kans dat de telefoon stilletjes aan is gegaan nadat de batterij opnieuw verbonden is. Hou de aan-/uitknop een paar seconden ingedrukt tot de telefoon zich uitschakelt. Verbind het scherm vervolgens opnieuw, en probeer het dan nog een keer'''
Om het toestel weer in elkaar te zetten, volg je deze instructies in omgekeerde volgorde.
Breng je e-afval naar een gecertificeerde recycler, zoals https://www.wecycle.nl/consumenten of je lokale milieustraat.
Is je reparatie niet volgens plan gelopen? Check dan het Google Pixel 3a Antwoordenforum voor het oplossen van je probleem.
Annuleren: ik heb deze handleiding niet afgemaakt.
81 andere personen hebben deze handleiding voltooid.
Met dank aan deze vertalers:
82%

Deze vertalers helpen ons de wereld te repareren! Wil je bijdragen?
Begin met vertalen ›


49 opmerkingen
Any word on the replacement screens?
We should have replacement screens in stock in the next month or two! Thanks for your patience.
I’ve cracked not only my LCD screen, but also the frame seam (shown with orange line in step 1 above). Will you be posting a guide to replace this also, or could you incorporate into this guide? Also interested if this will be available as a spare? Thanks.
Hi Mark,
I’m sorry to hear that! The frame seam is part of the plastic midframe—you would need to replace the midframe to replace the cracked seam. Instructions on how to do so can be found in this guide.
Because the Pixel 3a is a relatively new phone, replacement parts are harder to find for it. You can always buy a broken phone and transfer the part over, or use some adhesive to hold the cracked frame seam in place.
Can the digitizer be separated from the screen easily? It’d be a lot cheaper for me to replace the scratched glass screen and reuse digitizer. Anyone try this? Thanks!
The OLED display is fused to the front glass, so it will be very difficult to separate the digitizer without killing the fragile OLED panel. If it was a LCD panel, you would have a better chance de-laminating the digitizer.
Two comments: when I bought the replacement digitizer on EBay, since the seller was packing in tools (which actually weren’t the right size) I assumed that the glue would be included, as well as speaker mesh; thankfully I didn’t trash the old speaker mesh, and the instructions pointed out that I may have to reuse it (thanks Alex and Arthur!), but on glue I got screwed big time, since I removed the old glue as the instructions suggested, before realizing I don’t have any replacement. So now my phone is sitting open on a desk while I’m waiting for the glue to arrive who knows when. You mention the “Tesa” adhesive tape, but don’t really specify which particular width did you use (which width, how much of it, when and where to apply it, etc.) which would be useful.
My second comment is that this particular guide seems to assume that the screen that’s being removed is in one piece; I imagine most people trying to do this actually have a smashed glass and could use some guidance how to deal with *that*…
Also, some guidance what to do with the adhesive tape would be useful (apply to the frame first, or apply to the digitizer first, etc.; the more specific, the better)…
Hi Bob,
Your eBay experience is definitely not an exception! eBay kits usually contain inferior or incorrect tools. Be careful not to strip any screws!
It looks like our custom adhesive for this phone is temporarily out of stock. The Tesa adhesive card is a great alternative, as it has many widths for different applications. You can find instructions for the adhesive card here.
If you are working with custom cut adhesives, the general rule of thumb is to peel the clear backing first. Figure out which component the exposed adhesive sticks onto, and apply it there. Next, peel the colored liner to expose the remaining adhesive.
Thanks, this worked a charm! The only problems I had were cleaning all the glue off everything and reattaching the screen connector - it’s a bit tricky because the cable has to bend to fit into the recessed area which makes it hard to align the connector.
Also, I couldn’t wait for a pre-made adhesive to arrive so I went to Officeworks and bought some 3mm double-sided tape called X-Press It (the high-tack version). This seems to have worked very well (but time will tell!)
Replaced screen with one on there website. Screen is kinda late on response. Also sometimes gets stuck where I can’t click on anything and have to restart the phone. Is this a problem with the screen or the phone?
Hi Joshua,
That may be a screen/digitizer issue. I would suggest carefully re-seating the display connector and checking to see if there’s any debris. Otherwise, please contact our customer service and we’ll get things sorted out for you!
Buongiorno, ho sostituito lo schermo del mio pixel 3a ed i colori non mi convincono, sembrano diversi. Lo schermo è stato acquistato qui sul sito, devo presumere che si sia stortato qualche pin del connettore o è proprio lo schermo che ha una tonalità dei colori diversa?
Ciao!
Ci dispiace che il telefono non funzioni come prima. Magari puoi provare di spegnere e riaccendere il telefono e/o di fare un reset.
Se questo non risolve il problema, rivolgiti a nostro servizio di assistenza: support@ifixit.com (in caso di un acquisto sul sito americano) indicando il tuo numero di ordine. Sarà un piacere aiutarti!
Cordiali saluti,
Claire
can I confirm that this screen replacement is also an LCD replacement? I dropped my phone and cracked the glass but also the LCD is now not working (all black). Will this replacement fix both of those problems?
Hi James!
Yes, the part listed in the “parts required” section is a screen replacement, which includes the top glass and the OLED panel underneath it. The Pixel 3a uses an OLED panel instead of a LCD. If nothing else broke on your phone, then doing this repair should fix your display issues.
While the repair is not as difficult as some of the other Pixel phones, you should read through the guide to get a sense of the overall procedure.
Good luck on your repairs!
excellent guide, thank you arthur! this was so much easier than my pixel 3 and dare i say.. just plain easy!! love the 3a for repairability!!
i came back to say- as easy as this guide and repair are to follow, i feel like i may have a bad part?
the screen stopped working at first and seemed to have something to do with the fit of the screen. it was coming up a bit on the top right and not seated fully. so i pried it up again, reseated the cable, and resealed the edges more carefully. since then it works better but seems like it stops responding correctly frequently. rebooting generally helps. but after working fine for a while.. the touch function will suddenly and quickly deteriorate until it just doesn’t work altogether, and then i have to reboot.
each time i connected the digitizer cable i tested the device before sealing it with adhesive. i don’t really understand what could cause the issue because it works perfectly for a while before randomly petering out.
elyze -
That is a strange occurrence that shouldn’t be happening. If you bought the part from iFixit, please contact our customer support!
I’m curious if it’s possible to remove only the top glass from the OLED? My crack seems to be superficial, the digitizer works in/around/through the cracks (dragging/clicking items), and I can see under the cracks that the display is fine.
They sell replacement kits for just the front glass, but I’ve also heard that they’re difficult to take apart. Any advice?
Hi Alex,
Replacing the glass only is doable, but involved and requires specialty tools. The fragile OLED panel is bonded to the glass. You need a jig to hold the phone in place while you thread a thin wire between the glass and the OLED panel to slice through the LOCA. Once you separated the glass, you’d need to clean off the OLED panel and apply new LOCA.
The front glass only parts are usually sold to refurbishers, who are well-practiced in doing this kind of repair. It is definitely a skill you can learn and be good at with practice!
Hi,
My screen stays entirely black, after falling down (but it didnt hit anything, i was wearing earphones). It had however cracks from a previous fall. Do you think replacing the screen will be the sollution or is there another problem?
with kind regards
laurence trachez
Hi Laurence,
This is hard to say. If you try to power on your phone, does it vibrate? If it does, then a replacement screen will probably fix the problem.
The explanation to replace the screen are well done. The screen itself flashes everytime I turn on the phone. The biggest problem is when I call someone. The screen goes black and I can’t hang up or do a selection. This is a problem.
Mine have the same “flash” problem. Any solution?
Gin Mor -
I have complete the repair and everything boots up, display looks great but I have no digitzier/touch input. Faulty replacement screen? I have verified the screen connection and tried reboots and reconnects with no success. Any tips?
Hi, I have cracked only the glass, not the screen. I have seen numerous comments like this one: “A screen on its own is impossible to use on a Pixel 3a since the original screen is permanently attached to the LCD. Simply put, the only way to replace a screen on a Pixel 3a is to purchase a replacement screen/LCD combo.”
So can I order just the glass and replace the glass, and not glass and lcd combo?
Hi Kristian,
Without specialty tools, it would be very difficult to replace the glass without damaging the fragile display panel. The OLED display panel is bonded to the top glass with optically clear adhesive, so you’d need to slice through that without marring the panel. Refurbishment/repair companies use special jigs to accomplish this task.
Some devices use LCD panels that are not bonded to the top glass. In that case, it is easy to replace the glass by itself.
My Pixel 3a screen has developed a “washed out” look with a green tint - everything else works fine. Is it possibly just a loose cable that can be fixed by opening per your instructions and firming up the connections? Thx!
Hi Rob,
The display cable may be loose, but it could be something else. Opening up Pixel phones always poses a risk of further damaging the fragile display. Has the phone been water damaged/immersed before?
Never wet or immersed, just the normal banging around of everyday use.
Hmm…considering that the display connector is secured by a bracket, I think it’s unlikely that a loose connector is the issue. It may be a broken passive component somewhere in the display driver circuitry.
Sounds like you're suggesting a screen replacement. Do I have that right? Ifixit parts and directions were spot on last time I replaced a screen! Thx
Hello. Do you ship to the Philippines?
Hi Lloyd,
We currently do not ship to the Philippines, but that may change in the future. Please check this page occasionally for updated shipping locations!
Bonjour, je souhaite changer l’écran de mon Google PIXEL 3A et j’hésite sur la pièce à commander : commander une vitre avant est-il suffisant ou faut-il le bloc complet LCD ? Ce n’est pas les mêmes prix. Ci-dessous le lien vers la pièce que je pensais commander, qu’en pensez-vous ? Merci ! https://www.cdiscount.com/telephonie/acc...
Hello!
The Pixel 3a uses an OLED display instead of a LCD. The OLED is very fragile and is glued onto the front glass (which is the part you linked). You need special equipment in order to separate the front glass without damaging the OLED display. If you are repairing the phone yourself, you should buy the complete screen assembly.
Le Pixel 3a utilise un écran OLED au lieu d'un écran LCD. L'OLED est très fragile et est collée sur la vitre avant (qui est la partie que vous avez liée). Vous avez besoin d'un équipement spécial afin de séparer la vitre avant sans endommager l'écran OLED. Si vous réparez le téléphone vous-même, vous devez acheter l'ensemble écran complet.
Any news regarding replacement screens? I heard that ifixit should soon have most replacement parts for Google Pixel phones.
Success! Two small problems:
1) Was hard to align screen connector pins. any advice for doing so next time to avoid possible damage?
2) When applying adhesive strip, I managed to misapply and have segments of adhesive stretch, and thus not fit correctly. Needed to use scissors to snip, and reapply. Any advice for applying the glue next time to avoid this problem?
Thanks for supporting my Right to Repair and keeping a phone out of the trash!
Any suggestions what to do if screw head strips?I'm getting no purchase on one of the screen connector bracket screws...other one came out ok...now I'm stuck..
answering my own query, yes, you can get stripped screws out - solution is to put a small drop of superglue on tip of torx screwdriver, and hold it on to screw head til it sets, then you get traction - just done and it worked really nicely - some people advise using epoxy instead of superglue but then you have to set it up to hold screwdriver in place for a day for epoxy to cure. an accelerator is to add a bit of baking soda to the superglue (do. this away from the phone!!!) - also put masking tape around the screw head to make sure no glue gets into phone....
Screen removal was easy. Glue removal was fine, but is tedious. Applying the glue template was confusing. The iFixit video for a iphone 6 was helpful but really this is something iFixit needs a good video on.
The end result was a a working phone that LOOKS FACTORY new!!! The Pixel 3a is a gem of a phone.
Andrew..
This is the second time I've made this replacement and it's not working. First time went great. This time the screen isn't working. Phone still works (the alarm goes off) and vibrates when I plug it in, but no response in the screen. Suggestions?
Power is off, but does the battery need to be disconnect to safely do this replacement?
mplishka - Antwoord
Da ich keinen iopener ( dachte das wäre alles dabei wie auf der bstellvorschau!!!) habe ich eine Wärmflasche auf das Handy gelegt ..behutsam und nicht zu heiß. Besonders an Kopf und fußende war das Display ziemlich fest...befolgt man die Anweisungen genau ist es eigentlich kein Problem das Display vom Rahmen zu lösen, jedoch bin ich der Meinung, dass hier schon ein gewisses Maß an motorischer Vertrautheit mit der Materie bestehen sollte, da wie gesagt oben und unten doch ein tieferes eingreifen in den Rahmen unter das Display nötig ist...
Ralph S. aus Neumünster
Ralph S - Antwoord
You definitely want to use the iOpener on all sides as you make your way around the screen. The adhesive on my device was quite strong!
My screen was cracked in the corner and it was a real pain in the neck to get the little bits and pieces out of the corner. I don't know if this step is easier with an intact screen, but it was definitely the most difficult step on the repair for me.
Simon Stone - Antwoord