Ga door naar hoofdinhoud

iPhone 8 Plus LCD and Digitizer Replacement

Wat je nodig hebt

  1. iPhone 8 Plus LCD and Digitizer Replacement, Pentalobe Screws: stap 1, afbeelding 1 van 1
    • Before you begin, discharge your iPhone battery below 25%. A charged lithium-ion battery can catch fire and/or explode if accidentally punctured.

    • Power off your iPhone before beginning disassembly.

    • Remove the two 3.5 mm pentalobe screws from the bottom edge of the iPhone.

    • Opening the iPhone's display will compromise its waterproof seals. Have replacement seals ready before you proceed past this step, or take care to avoid liquid exposure if you reassemble your iPhone without replacing the seals.

  2. iPhone 8 Plus LCD and Digitizer Replacement, Mark your opening picks: stap 2, afbeelding 1 van 3 iPhone 8 Plus LCD and Digitizer Replacement, Mark your opening picks: stap 2, afbeelding 2 van 3 iPhone 8 Plus LCD and Digitizer Replacement, Mark your opening picks: stap 2, afbeelding 3 van 3
    • If inserted too far, an opening pick can damage your device. Follow this step to mark your pick and prevent damage.

    • Measure 3 mm from the tip and mark the opening pick with a permanent marker.

    • You can also mark the other corners of the pick with different measurements.

    • Alternatively, tape a coin to a pick 3 mm from the tip.

  3. iPhone 8 Plus LCD and Digitizer Replacement, Taping Over The Display: stap 3, afbeelding 1 van 3 iPhone 8 Plus LCD and Digitizer Replacement, Taping Over The Display: stap 3, afbeelding 2 van 3 iPhone 8 Plus LCD and Digitizer Replacement, Taping Over The Display: stap 3, afbeelding 3 van 3
    • If your display glass is cracked, keep further breakage contained and prevent bodily harm during your repair by taping over the glass.

    • Lay overlapping strips of clear packing tape over the iPhone's display until the whole face is covered.

    • This will keep glass shards contained and provide structural integrity when prying and lifting the display.

    • Wear safety glasses to protect your eyes from any glass shaken free during the repair.

    • If the broken glass makes it difficult to get a suction cup to stick in the next few steps, try folding a strong piece of tape (such as duct tape) into a handle and lifting the display with that instead.

  4. iPhone 8 Plus LCD and Digitizer Replacement, Tape over any cracks: stap 4, afbeelding 1 van 3 iPhone 8 Plus LCD and Digitizer Replacement, Tape over any cracks: stap 4, afbeelding 2 van 3 iPhone 8 Plus LCD and Digitizer Replacement, Tape over any cracks: stap 4, afbeelding 3 van 3
    • If your iPhone has a cracked screen, keep further breakage contained and prevent bodily harm during your repair by taping over the glass.

    • Lay overlapping strips of clear packing tape over the iPhone's screen until the whole face is covered.

    • Wear safety glasses to protect your eyes from any glass shaken free during the repair.

    • If you can't get the suction cup to stick in the next few steps, fold a strong piece of tape (such as duct tape) into a handle and lift the screen with that instead.

    • If all else fails, you can superglue the suction cup to the screen.

  5. iPhone 8 Plus LCD and Digitizer Replacement, Anti-Clamp instructions: stap 5, afbeelding 1 van 3 iPhone 8 Plus LCD and Digitizer Replacement, Anti-Clamp instructions: stap 5, afbeelding 2 van 3 iPhone 8 Plus LCD and Digitizer Replacement, Anti-Clamp instructions: stap 5, afbeelding 3 van 3
    Gereedschap gebruikt in deze stap:
    Anti-Clamp
    $24.95
    Koop
    • The next three steps demonstrate the Anti-Clamp, a tool we designed to make the opening procedure easier. If you aren't using the Anti-Clamp, skip down three steps for an alternate method.

    • For complete instructions on how to use the Anti-Clamp, check out this guide.

    • Pull the blue handle backwards to unlock the Anti-Clamp's arms.

    • Slide the arms over either the left or right edge of your iPhone.

    • Position the suction cups near the bottom edge of the iPhone just above the home button—one on the front, and one on the back.

    • Squeeze the cups together to apply suction to the desired area.

    • If you find that the surface of your iPhone is too slippery for the Anti-Clamp to hold onto, you can use tape to create a grippier surface.

  6. iPhone 8 Plus LCD and Digitizer Replacement: stap 6, afbeelding 1 van 3 iPhone 8 Plus LCD and Digitizer Replacement: stap 6, afbeelding 2 van 3 iPhone 8 Plus LCD and Digitizer Replacement: stap 6, afbeelding 3 van 3
    • Pull the blue handle forwards to lock the arms.

    • Turn the handle clockwise 360 degrees or until the cups start to stretch.

    • Make sure the suction cups remain aligned with each other. If they begin to slip out of alignment, loosen the suction cups slightly and realign the arms.

  7. iPhone 8 Plus LCD and Digitizer Replacement: stap 7, afbeelding 1 van 2 iPhone 8 Plus LCD and Digitizer Replacement: stap 7, afbeelding 2 van 2
    • Heat an iOpener and thread it through the arms of the Anti-Clamp.

    • You can also use a hair dryer, heat gun, or hot plate—but extreme heat can damage the display and/or internal battery, so proceed with care.

    • Fold the iOpener so it lays on the bottom edge of the iPhone.

    • Wait one minute to give the adhesive a chance to release and present an opening gap.

    • Insert an opening pick under the screen when the Anti-Clamp creates a large enough gap.

    • If the Anti-Clamp doesn't create a sufficient gap, apply more heat to the area and rotate the handle a quarter turn.

    • Don't crank more than a quarter turn at a time, and wait one minute between turns. Let the Anti-Clamp and time do the work for you.

    • Skip the next three steps.

  8. iPhone 8 Plus LCD and Digitizer Replacement: stap 8, afbeelding 1 van 1
    • The next three steps show how to separate the screen using a suction cup.

    • Heating the lower edge of the iPhone will help soften the adhesive securing the display, making it easier to open.

    • Use a hairdryer or prepare an iOpener and apply it to the lower edge of the iPhone for about 90 seconds in order to soften up the adhesive underneath.

  9. iPhone 8 Plus LCD and Digitizer Replacement: stap 9, afbeelding 1 van 2 iPhone 8 Plus LCD and Digitizer Replacement: stap 9, afbeelding 2 van 2
    • Apply a suction cup to the lower half of the front panel, just above the home button.

    • Be sure the suction cup does not overlap with the home button, as this will prevent a seal from forming between the suction cup and front glass.

  10. iPhone 8 Plus LCD and Digitizer Replacement: stap 10, afbeelding 1 van 3 iPhone 8 Plus LCD and Digitizer Replacement: stap 10, afbeelding 2 van 3 iPhone 8 Plus LCD and Digitizer Replacement: stap 10, afbeelding 3 van 3
    • Pull up on the suction cup with firm, constant pressure to create a slight gap between the front panel and rear case.

    • Insert an opening pick or other thin pry tool a few millimeters into the gap.

    • The watertight adhesive holding the display in place is very strong; creating this initial gap takes a significant amount of force. If you're having a hard time opening a gap, apply more heat, and gently rock the screen up and down to weaken the adhesive until you create enough of a gap to insert your tool.

  11. iPhone 8 Plus LCD and Digitizer Replacement: stap 11, afbeelding 1 van 3 iPhone 8 Plus LCD and Digitizer Replacement: stap 11, afbeelding 2 van 3 iPhone 8 Plus LCD and Digitizer Replacement: stap 11, afbeelding 3 van 3
    • Slide your pick around the corner and up the left edge of the phone, moving towards the volume control buttons and silent switch, breaking up the adhesive holding the display in place.

    • Stop near the top left corner of the display.

  12. iPhone 8 Plus LCD and Digitizer Replacement, Screen information: stap 12, afbeelding 1 van 1
    • There's a delicate cable along the right edge of your iPhone. Don't insert your pick here, as you may damage the cable.

  13. iPhone 8 Plus LCD and Digitizer Replacement: stap 13, afbeelding 1 van 3 iPhone 8 Plus LCD and Digitizer Replacement: stap 13, afbeelding 2 van 3 iPhone 8 Plus LCD and Digitizer Replacement: stap 13, afbeelding 3 van 3
    • Re-insert your tool at the lower right corner of the iPhone, and slide it around the corner and up the right side of the phone to separate the adhesive.

    • Don't insert your pick more than 3 mm, as you may damage the display cables.

  14. iPhone 8 Plus LCD and Digitizer Replacement: stap 14, afbeelding 1 van 1
    • Gently pull up on the suction cup to lift up the bottom edge of the display.

    • Do not raise the display more than 15º or you'll risk straining or tearing the ribbon cables connecting the display.

  15. iPhone 8 Plus LCD and Digitizer Replacement: stap 15, afbeelding 1 van 1
    • Pull on the small nub on the suction cup to remove it from the front panel.

  16. iPhone 8 Plus LCD and Digitizer Replacement: stap 16, afbeelding 1 van 3 iPhone 8 Plus LCD and Digitizer Replacement: stap 16, afbeelding 2 van 3 iPhone 8 Plus LCD and Digitizer Replacement: stap 16, afbeelding 3 van 3
    • Slide an opening pick underneath the display along the top edge of the phone to loosen the last of the adhesive.

  17. iPhone 8 Plus LCD and Digitizer Replacement: stap 17, afbeelding 1 van 2 iPhone 8 Plus LCD and Digitizer Replacement: stap 17, afbeelding 2 van 2
    • Slide the display assembly slightly down (away from the top edge of the phone) to disengage the clips holding it to the rear case.

  18. iPhone 8 Plus LCD and Digitizer Replacement: stap 18, afbeelding 1 van 3 iPhone 8 Plus LCD and Digitizer Replacement: stap 18, afbeelding 2 van 3 iPhone 8 Plus LCD and Digitizer Replacement: stap 18, afbeelding 3 van 3
    • Open the iPhone by swinging the display up from the left side, like the back cover of a book.

    • Don't try to fully separate the display yet, as several fragile ribbon cables still connect it to the iPhone's logic board.

    • Lean the display against something to keep it propped up while you're working on the phone.

  19. iPhone 8 Plus LCD and Digitizer Replacement, Battery Disconnection: stap 19, afbeelding 1 van 2 iPhone 8 Plus LCD and Digitizer Replacement, Battery Disconnection: stap 19, afbeelding 2 van 2
    Gereedschap gebruikt in deze stap:
    Magnetic Project Mat
    $19.95
    Koop
    • Remove four Phillips (JIS) screws securing the lower display cable bracket to the logic board, of the following lengths:

    • Two 1.3 mm screws

    • One 1.4 mm screw

    • One 2.7 mm screw

    • Throughout this guide, keep careful track of your screws so that each one goes back where it came from during reassembly. Installing a screw in the wrong place can cause permanent damage.

  20. iPhone 8 Plus LCD and Digitizer Replacement: stap 20, afbeelding 1 van 1
    • Remove the lower display cable bracket.

  21. iPhone 8 Plus LCD and Digitizer Replacement: stap 21, afbeelding 1 van 2 iPhone 8 Plus LCD and Digitizer Replacement: stap 21, afbeelding 2 van 2
    • Use the point of a spudger to pry the battery connector up from its socket on the logic board.

    • Bend the connector cable up slightly to prevent it from accidentally making contact with the socket and providing power to the phone during your repair.

  22. iPhone 8 Plus LCD and Digitizer Replacement, Display Assembly: stap 22, afbeelding 1 van 2 iPhone 8 Plus LCD and Digitizer Replacement, Display Assembly: stap 22, afbeelding 2 van 2
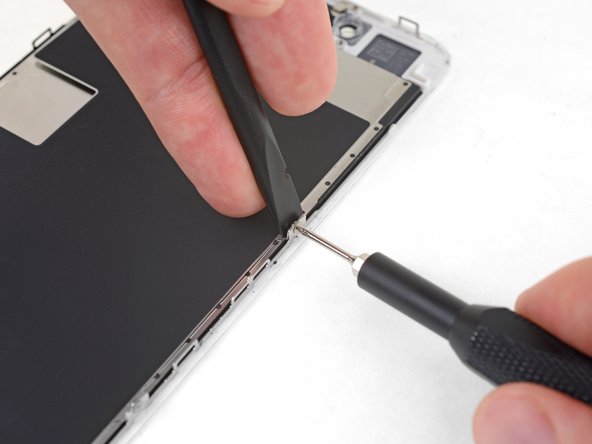
    • Use the tip of a spudger or a fingernail to disconnect the large lower display connector by prying it straight up from its socket.

    • To re-attach press connectors like this one, press down on one side until it clicks into place, then repeat on the other side. Do not press down on the middle. If the connector is even slightly misaligned, the connector can bend, causing permanent damage.

  23. iPhone 8 Plus LCD and Digitizer Replacement: stap 23, afbeelding 1 van 2 iPhone 8 Plus LCD and Digitizer Replacement: stap 23, afbeelding 2 van 2
    • Disconnect the second lower display cable connector, directly behind the one you disconnected in the previous step.

  24. iPhone 8 Plus LCD and Digitizer Replacement: stap 24, afbeelding 1 van 2 iPhone 8 Plus LCD and Digitizer Replacement: stap 24, afbeelding 2 van 2
    • Remove the two tri-point Y000 screws securing the bracket over the front panel sensor assembly connector:

    • One 1.0 mm screw

    • One 1.2 mm screw

  25. iPhone 8 Plus LCD and Digitizer Replacement: stap 25, afbeelding 1 van 1
    • Remove the bracket covering the front panel sensor assembly connector.

  26. iPhone 8 Plus LCD and Digitizer Replacement: stap 26, afbeelding 1 van 2 iPhone 8 Plus LCD and Digitizer Replacement: stap 26, afbeelding 2 van 2
    • Use the tip of a spudger or a fingernail to disconnect the front panel sensor assembly connector from its socket.

  27. iPhone 8 Plus LCD and Digitizer Replacement: stap 27, afbeelding 1 van 1
  28. iPhone 8 Plus LCD and Digitizer Replacement, Earpiece Speaker: stap 28, afbeelding 1 van 1
    • Remove the five Phillips screws securing the earpiece speaker bracket:

    • Two 1.8 mm screws

    • One 2.3 mm screw

    • One 2.4 mm screw

    • One 2.8 mm screw

  29. iPhone 8 Plus LCD and Digitizer Replacement: stap 29, afbeelding 1 van 1
    • Remove the earpiece speaker bracket.

  30. iPhone 8 Plus LCD and Digitizer Replacement: stap 30, afbeelding 1 van 3 iPhone 8 Plus LCD and Digitizer Replacement: stap 30, afbeelding 2 van 3 iPhone 8 Plus LCD and Digitizer Replacement: stap 30, afbeelding 3 van 3
    • Use the flat end of a spudger to lift the front-facing camera from its housing.

    • Gently bend the camera ribbon cable to the side to clear the way to the earpiece speaker underneath.

  31. iPhone 8 Plus LCD and Digitizer Replacement: stap 31, afbeelding 1 van 1
    • Remove the earpiece speaker.

  32. iPhone 8 Plus LCD and Digitizer Replacement, Front Camera and Sensor Cable: stap 32, afbeelding 1 van 2 iPhone 8 Plus LCD and Digitizer Replacement, Front Camera and Sensor Cable: stap 32, afbeelding 2 van 2
    • Gently fold the camera and attached ribbon cable toward the bottom of the iPhone to allow access to the components underneath.

  33. iPhone 8 Plus LCD and Digitizer Replacement: stap 33, afbeelding 1 van 1
    • Use a hairdryer or heat gun or prepare an iOpener and apply it to the top front of the display for about a minute, in order to soften the adhesive securing the sensors.

    • The sensors in the following steps are fragile. To increase your chances of removing them without damage, repeatedly add more heat as needed. Alternatively, add a drop or two of isopropyl alcohol and let it penetrate under the sensors before you pry them up.

  34. iPhone 8 Plus LCD and Digitizer Replacement: stap 34, afbeelding 1 van 2 iPhone 8 Plus LCD and Digitizer Replacement: stap 34, afbeelding 2 van 2
    • Slide a spudger under the ambient light sensor flex cable, and lift the sensor out of its housing.

  35. iPhone 8 Plus LCD and Digitizer Replacement: stap 35, afbeelding 1 van 3 iPhone 8 Plus LCD and Digitizer Replacement: stap 35, afbeelding 2 van 3 iPhone 8 Plus LCD and Digitizer Replacement: stap 35, afbeelding 3 van 3
    • Slide the tip of a spudger underneath the proximity sensor flex cable, and lift the sensor out of its housing.

  36. iPhone 8 Plus LCD and Digitizer Replacement: stap 36, afbeelding 1 van 3 iPhone 8 Plus LCD and Digitizer Replacement: stap 36, afbeelding 2 van 3 iPhone 8 Plus LCD and Digitizer Replacement: stap 36, afbeelding 3 van 3
    • Insert the sharp edge of an iFixit opening tool underneath the camera assembly's flex cable, on the opposite side from the front-facing camera.

    • Use an iOpener or hair dryer as needed to heat the top portion of the display and soften the adhesive securing the flex cable.

    • Pry up to separate the edge of the flex cable from the back of the display.

  37. iPhone 8 Plus LCD and Digitizer Replacement: stap 37, afbeelding 1 van 3 iPhone 8 Plus LCD and Digitizer Replacement: stap 37, afbeelding 2 van 3 iPhone 8 Plus LCD and Digitizer Replacement: stap 37, afbeelding 3 van 3
    • Insert the point of a spudger underneath the same portion of the flex cable that you separated in the previous step.

    • Continue separating the remainder of the flex cable, pushing the spudger underneath the row of circular gold earpiece speaker contacts.

  38. iPhone 8 Plus LCD and Digitizer Replacement: stap 38, afbeelding 1 van 3 iPhone 8 Plus LCD and Digitizer Replacement: stap 38, afbeelding 2 van 3 iPhone 8 Plus LCD and Digitizer Replacement: stap 38, afbeelding 3 van 3
    • Remove the front camera and sensor cable assembly.

    • A piece of black double-sided insulating tape lies between the display and three rows of copper contacts on the back of the camera/sensor cable. It may remain stuck to the display, or it may come off with the cable.

    • When reassembling, verify the tape is in place, or else cover the contacts on the back of the cable with an appropriate tape, such as Kapton tape.

  39. iPhone 8 Plus LCD and Digitizer Replacement, Home/Touch ID Sensor: stap 39, afbeelding 1 van 2 iPhone 8 Plus LCD and Digitizer Replacement, Home/Touch ID Sensor: stap 39, afbeelding 2 van 2
    • Remove the four Y000 screws securing the bracket over the home/Touch ID sensor:

    • One 1.2 mm screw

    • Three 1.3 mm screws

    • During reassembly, be careful not to overtighten these screws, or your home button may not work.

  40. iPhone 8 Plus LCD and Digitizer Replacement: stap 40, afbeelding 1 van 1
    • Remove the bracket that secures the home/Touch ID sensor.

  41. iPhone 8 Plus LCD and Digitizer Replacement: stap 41, afbeelding 1 van 3 iPhone 8 Plus LCD and Digitizer Replacement: stap 41, afbeelding 2 van 3 iPhone 8 Plus LCD and Digitizer Replacement: stap 41, afbeelding 3 van 3
    • Pry under the left edge of the home button cable connector to disconnect it from its socket.

    • If the entire connector begins to flip up without separating, press down on the cable at the top edge of the connector with the flat of your spudger, while simultaneously prying up the left edge of the connector. Be very careful not to damage the cable or connector, or you will permanently disable the sensor.

  42. iPhone 8 Plus LCD and Digitizer Replacement: stap 42, afbeelding 1 van 1
    • Heating the area around the home/Touch ID sensor will help soften the adhesive holding its delicate cable in place, making it easier to remove safely.

    • Flip the display assembly over. Use a hairdryer or prepare an iOpener and apply it to the lower edge of the display for about 90 seconds in order to soften up the adhesive underneath.

    • Don't overheat the display. It should be slightly too hot to touch comfortably.

  43. iPhone 8 Plus LCD and Digitizer Replacement: stap 43, afbeelding 1 van 3 iPhone 8 Plus LCD and Digitizer Replacement: stap 43, afbeelding 2 van 3 iPhone 8 Plus LCD and Digitizer Replacement: stap 43, afbeelding 3 van 3
    • Use an opening pick to gently separate the adhesive holding the home/Touch ID sensor cable to the back side of the display panel.

  44. iPhone 8 Plus LCD and Digitizer Replacement: stap 44, afbeelding 1 van 1
    • Remove the home/Touch ID sensor assembly by lifting it through the front side of the display.

    • To reinstall, first feed the cable through the hole in the front of the display as shown.

    • Your replacement part may come with extra Y000 screws already installed near the Home Button. Remove the unnecessary screws so that you can reinstall the home button bracket.

  45. iPhone 8 Plus LCD and Digitizer Replacement, LCD and Digitizer: stap 45, afbeelding 1 van 3 iPhone 8 Plus LCD and Digitizer Replacement, LCD and Digitizer: stap 45, afbeelding 2 van 3 iPhone 8 Plus LCD and Digitizer Replacement, LCD and Digitizer: stap 45, afbeelding 3 van 3
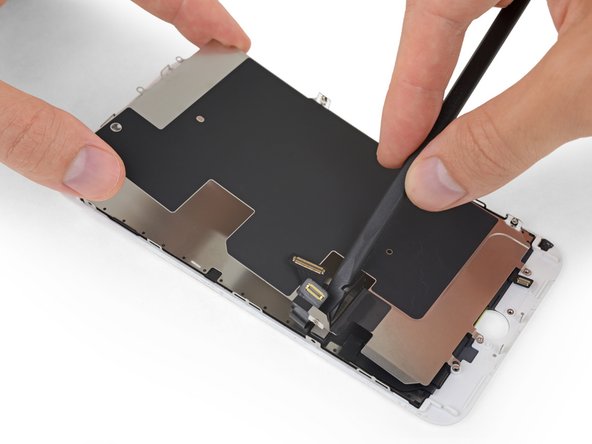
    • Peel back the upper, rectangular portion of the LCD shield plate sticker to separate it from the flex cable underneath.

    • You don't need to remove the sticker completely unless you intend to replace it.

  46. iPhone 8 Plus LCD and Digitizer Replacement: stap 46, afbeelding 1 van 2 iPhone 8 Plus LCD and Digitizer Replacement: stap 46, afbeelding 2 van 2
    • Use a Y000 driver to remove three 1.2 mm screws from one side of the display EMI shield.

    • If you have trouble loosening these screws, press the driver harder onto the screw as you turn it. If necessary, use the flat edge of your spudger to brace each display clip from behind so you can apply more pressure to the screws, without bending the clips.

  47. iPhone 8 Plus LCD and Digitizer Replacement: stap 47, afbeelding 1 van 1
    • Use a Y000 driver to remove two more 1.2 mm screws from the other side of the EMI shield.

  48. iPhone 8 Plus LCD and Digitizer Replacement: stap 48, afbeelding 1 van 1
    • Remove the 1.8 mm Phillips screw securing the EMI shield near the bottom of the display.

  49. iPhone 8 Plus LCD and Digitizer Replacement: stap 49, afbeelding 1 van 2 iPhone 8 Plus LCD and Digitizer Replacement: stap 49, afbeelding 2 van 2
    • Lift the LCD shield plate while pressing down on the flex cable it surrounds.

    • Feed the flex cable through the cutout in the LCD shield plate, being careful not to snag it.

  50. iPhone 8 Plus LCD and Digitizer Replacement: stap 50, afbeelding 1 van 1
    • Remove the LCD shield plate.

  51. iPhone 8 Plus LCD and Digitizer Replacement: stap 51, afbeelding 1 van 1
    • Only the LCD and digitizer remains.

Conclusie

Compare your new replacement part to the original part—you may need to transfer remaining components or remove adhesive backings from the new part before installing.

To reassemble your device, follow the above steps in reverse order.

Take your e-waste to an R2 or e-Stewards certified recycler.

Repair didn’t go as planned? Check out our Answers community for troubleshooting help.

86 andere personen hebben deze handleiding voltooid.

Jeff Suovanen

Lid sinds: 08/06/13

426.551 Reputatie

259 handleidingen geschreven

Team

iFixit Lid van iFixit

Staff

135 Leden

16.476 handleidingen geschreven

8 opmerkingen

Bonjour,

Savez-vous si le problème de la fonction True Tone est résolu sous iOS 12.3.1 ?

Merci pour votre tutoriel : )

Merci pour votre réponse.

Cancan - Antwoord

Truetone - Has anybody used the eprom programmer devices to transfer the id from the previous screen to the new one to rectify the truetone absence?

hardijs - Antwoord

I got hold of a iPhone 8 Plus with cracked screen that I am planning to fix.

Already got all new part that I think I need.

Here is my problem:

When I tried to take out the screen from my phone, (step 15-18) I was curious about the new screen, so I tried to connect it. It was completely dead! Then I tried the old cracked one, and suddenly that was dead to! This is a phone that some fool has been inside earlier and changed battery, but I suspect he has done some more really stupid things. The Taptic Engine is living its own life and vibrating every time I slightly touch the home button. (I have a new Taptic Engine) The phone is also full of dust and small particles that does not belong there. One tri-point Y000 screw (step 18) is even missing! Now the biggest problem is that both screens are pitch black! I know the phone is on, because I hear voice command speak when I turn on the power. What could this be? The screen worked before I tried to change it?!…

smikalsen - Antwoord

Hi smikalsen,

Did you disconnect the battery when you swapped the screens? If not, there is a chance that the screen backlight circuits are damaged as a result of disconnecting/reconnecting to a powered phone. With a screen connected and the phone powered on, shine a bright light directly at the screen. If you can faintly see the screen, it means that the LCD is working but the backlight is broken.

Arthur Shi -

Thank you Jeff for these very clear instructions, and for the warnings on cautions to take in the delicate steps. This guide was helpful in replacing my broken screen on an iPhone 8 Plus. Every step was successfully accomplished, and now my iPhone is back to life. Of course, as a caution I did a backup before starting all the procedures. Thanks again. Saul

Saul - Antwoord

Voeg opmerking toe

Weergavestatistieken:

Afgelopen 24 uren: 16

Afgelopen 7 dagen: 106

Afgelopen 30 dagen: 532

Altijd: 80,080