Deze vertaling geeft mogelijk niet de meest recente updates van de bronhandleiding weer. Help ons met het updaten van de vertaling of bekijk de bronhandleiding.
Inleiding
Gebruik deze handleiding om het scherm van een MacBook Air uit 2019 te vervangen.
Wat je nodig hebt
-
-
Gebruik P5-schroevendraaier om de volgende schroeven te verwijderen:
-
Twee 7.9 mm lange schroeven
-
Twee 7.1 mm lange schroeven
-
Zes 2.6 mm lange schroeven
-
-
-
Duw je vingers tussen het scherm en de onderste behuizing en trek deze omhoog om de onderste behuizing van de MacBook Air los te maken.
-
Verwijder de onderste behuizing.
Are there any suggestions to removing the pressure fasteners more easily?
-
-
-
Trek de tape die over de batterijaansluiting heen zit ver genoeg los om de batterijaansluiting bloot te leggen.
-
-
-
Gebruik een spudger om de batterijaansluiting uit het contact op het logic board te schuiven. Zorg dat je de aansluiting parallel aan het logic board uit het contact trekt.
Before the battery can be fully disconnected, the battery disconnect button needs to be held down. There is a gold button just above the battery socket, along with a small LED much like the 12” machines. Once this has been held down and the LED has switched off it is safe to remove the battery.
This seems like an important step?
Also, seems like this should be done after the battery is disconnected, not before? Otherwise, wouldn’t the battery re-charge it?
What if the white LED dosent light up after pressing the yellow button again?
Iron05 -
I just performed this repair on my late 2018 mac air. I did click the gold button but saw no LED illuminated or otherwise. Question- after reassembly does the button get pressed again to connect the battery? Please clarify if this button is to be pressed and if it needs pressing again after the repair.
All said - I pressed again after the battery connector clicked, assembled the back and all worked perfectly. The original issue was one dead port (no charge, no communication). The battery charge lightening bold icon was acting funny too. Genuis bar guy in Naperville said it was likely a logic board too. But it was not. The port was apparently confusing the logic board with regards to the charge function. Thanks Adam for saving me $440 and sending my computer back to Apple. I am 71 yrs young - who says an old dog can’t learn new tricks with good training!!
I didn't see Aaron's comment before completing the battery replacement. Afterwards, the computer would not turn on despite multiple SMC reset procedures. Upon double-checking the comments I see the importance of pressing the gold button. I pressed the gold button before disconnecting the new battery, then pressed it again after reconnecting for good measure. Computer booted!
It would be good of iFixit to add this important step as most people probably don't open up every single comment on (seemingly) simple steps.
Seconding Corey's comment. If paid more attention to the comment section, I would have avoided 15-30 minutes of panic. (BTW I did not notice any LED, but the golden button was easy to find).
Where is the gold button? I replaced my battery and my laptop will not start
-
-
-
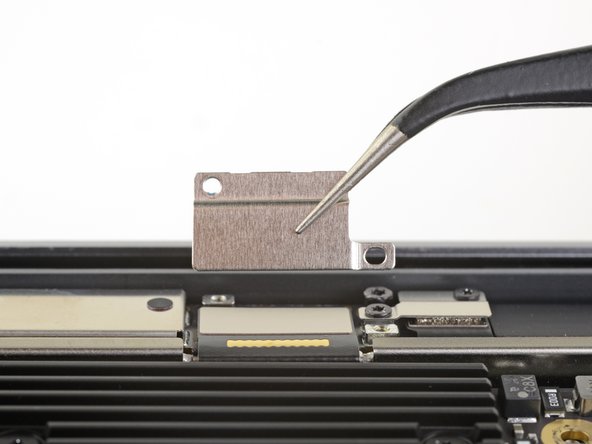
Gebruik een T3 Torx-schroevendraaier om de twee 1.4 mm lange schroeven die de beugel over de antennekabel bevestigen te verwijderen.
-
Verwijder de beugel over de antennekabel.
-
-
-
-
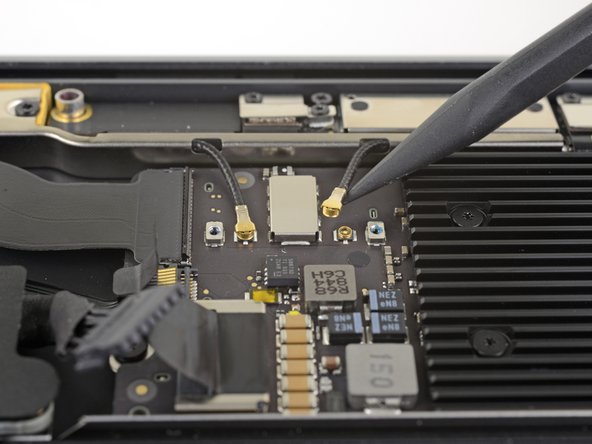
Steek de punt van een spudger onder een van de antennekabels en plaats deze zo dicht mogelijk bij de aansluiting.
-
Duw je spudger vervolgens omhoog om de kabel los te koppelen.
-
Herhaal dit bij de andere antennekabel.
As you are putting everything back together, it is a bit wonky trying to reconnect these antenna. Patience is necessary and it helps if you reshape the cables so that the cables are like the picture.
-
-
-
Gebruik een T5 Torx-schroevendraaier om de volgende schroeven te verwijderen:
-
Vier 7.4 mm lange schroeven
-
Twee 4.5 mm lange schroeven
-
-
-
Til de antennebalk in een rechte beweging omhoog en uit de behuizing. Wees voorzichtig dat je de antennekabel hierbij niet breekt op nog vastzittende kabels of aansluitingen.
-
Verwijder de antennebalk.
Tip: keep the six big lid anchor screws in place until after you remove the antenna bar. You may have to use your plastics spudger to wedge underneath the vents and get leverage off the underside of the lid along the hinge area. I also had to remove the Logicboard so I could get the plastic spudger underneath the antenna bar and lift it up. It felt like it was going to break. Did not want to have to remove the logic board, but seemed that was the only way I could get underneath and pry the antenna out.
Felt like I was going to break it! It will come out but it requires patience and light touch
Go to 12:02 on this Video:
Subscribe to this dude’s channel! I donated because he has taught me a lot with his videos!
Lamar's suggestion to view the video is excellent. Though I saw it only in arrears, it was quite valuable. I found a spudge, used to GENTLY pry both side first, then begin lifting on your right side (with back of laptop facing you) while gently twisting slightly inward to do the trick.
Probably the worst moment in this repair.
DLC
-
-
-
Gebruik een T9 Torx-schroevendraaier om de zes 4.9 mm lange schroeven die de schermscharnieren aan de bovenste behuizing bevestigen te verwijderen.
This was a T8 Torx driver for me
It’s easier to leave 1 on each side in place open the MacBook fully and the remove them. This will help not damaging the bottom screen rim
Torx T8 for me too on a MacBook Air 2020
T8 for me as well on a 2019 MacBook Air
-
-
-
Til de MacBook omhoog en kantel het scherm open totdat deze een hoek van 90 graden beschrijft ten opzichte van de bovenste behuizing.
-
Beweeg het scherm, terwijl je deze in een hoek van 90 graden ten opzichte van de behuizing houdt, vervolgens recht naar beneden terwijl je de behuizing vasthoudt, zodat de scharnieren uit de onderkant van de behuizing komen.
Can i skip antenna screw and battery to reallign the screen lid ? My screen lid is misalligned with the body about half milimeters
Yes. You can loosen the screen lid screws to re-align the top lid.
(quote)
"Keeping the display at a 90 degree angle with the case, move the display straight down while holding the case still, so that the hinges slide out the bottom of the case."
(end quote)
If you're moving the display straight down, how does it "slide out"? I do ge the point, but this instruction could stand a tad amount of re-wording.
Also, on installing the new screen, the hinges on the new screen are very tight. It is easier to the install if you use some needle-nose or some tweezers to open the hinges to 90 degrees before trying to slot the new screen.
-


Vergelijk je vervangende onderdeel met het originele onderdeel — het kan zijn dat je meerdere onderdelen mee over moet zetten of beschermlagen voor de lijm moet verwijderen voordat je het nieuwe onderdeel kunt installeren.
Om je toestel weer in elkaar te zetten, volg je deze instructies in omgekeerde volgorde.
Breng je e-afval naar een door R2 of e-Stewards gecertificeerde recycler.
Ging je reparatie niet zoals gepland? Check dan ons Antwoordenforum voor hulp bij het oplossen van je probleem.
Annuleren: ik heb deze handleiding niet afgemaakt.
15 andere personen hebben deze handleiding voltooid.
Met dank aan deze vertalers:
87%

Thomas Keulemans helpt ons de wereld te herstellen! Wil je bijdragen?
Begin met vertalen ›

12 opmerkingen
Thanks a lot for the useful guide! I have found some difficulties removing the antenna bar with this description, since there is no information to remove the 4 screws holding the antenna assembly in place. Additionally the force to remove the antenna is very high and may damage the complete antenna. I have used some angled tweezers to remove it and they came right our without any force.
Another question I have for the display replacement on a 2019 MacBook Air is how to get the true tone function and keyboard backlight working again. I have found no infos for the 2019 Air but some people had the same issue with 2018 and up MacBook Pros. Any suggestions on how I could fix this up? (Already made a SMC and PRAM reset)
Thanks in advance!
Thanks for the comments! We’ll fix the missing steps right up!
Those are good questions. I would like to know also.
Hi Alan, we sell replacement screens in our store.
This repair guide was on point!! One thing I will point out is that once you install new screen and are ready to reconnect the battery cable, make sure it is in correctly. It should not be able to slide out without some pressure. I made this mistake and it caused several problems, the laptop was extremely slow and the fan kept running. Once it seated the battery cable correctly it worked perfectly.
Is the early macbook air 2020 display (A2179) compatible with this model of MacBook? (A1932)
What can happen if I do not turn off the auto power on setting before screen replacement?
I have seen other sellers mention that True Tone and keyboard backlight will not work on 2019 MacBook Air version. They requested that I buy a different screen for a 2019 MacBook Air screen diy, can anyone confirm if they have experienced a similar scenario and if so what the turn out was.
Just completed and the guide was spot on and very helpful. I had T8 screws for the screen hinges, but otherwise everything was just as pictured and described. Thank you for this!
Thanks for this guide. I replaced a broken screen for my sister with a used one, and at first everything seemed fine. However, after a few days of use, she reported that some glass had chipped off the screen around the left hinge, and upon inspection I saw that are also cracks in the glass around the right hinge (the screen still works fine however). What could have caused this to happen? Did I overtighten the hinge screws, or leave them too loose? Could the replacement screen have actually been from a 2018 model despite being advertised as a 2019 truetone screen?
If the first thing you do is disconnect the battery, is it really an issue if you don’t (or can’t) disable auto-boot?
maccentric - Antwoord
I agree, why disable Auto-Boot when the lid is closed and the battery is disconnected immediately? – I've never had an issue since 2016 when the feature was introduced.
stevebsiegel - Antwoord
On my machine, the longest two screws were in the corners, while the other two long screws were in the middle. Perhaps previous service in the past had them replaced into the wrong place? In any case, the longest screws do seem to fit in either place. I guess 0.8mm is not very much of a difference. Seems like poor design if they could have used one size of screw.
johann beda - Antwoord
Just did one, and it also had longest screws in the corners.
maccentric -
Just did another, and the long ones were in the middle. Definitely poor design and quality control.
maccentric -