Ga door naar hoofdinhoud
Lenovo ThinkPad X1 Carbon 9th Gen SSD Replacement

Lenovo ThinkPad X1 Carbon 9th Gen SSD Replacement

Clay Eickemeyer

Clay Eickemeyer en 2 andere bijdragers

Voor het laatst geüpdatet op April 5, 2023

15 - 30 minuten
Eenvoudig

Use this guide to remove and replace the Solid State Drive (SSD) in your Lenovo ThinkPad X1.

Before you perform this repair, back up your existing SSD if possible. If you’re replacing the SSD where your operating system is installed, familiarize yourself with a disk cloning utility so you’ll be ready to migrate your data to the new SSD.

Wat je nodig hebt

Reparatiesets

Deze sets bevatten alle onderdelen en tools om deze handleiding te voltooien.

Onderdelen

Gereedschap

Toon meer…

  1. Lenovo ThinkPad X1 Carbon 9th Gen SSD Replacement, Unfasten the back cover: stap 1, afbeelding 1 van 2 Lenovo ThinkPad X1 Carbon 9th Gen SSD Replacement, Unfasten the back cover: stap 1, afbeelding 2 van 2
    • For your safety, discharge the battery below 25% and power down your device before disassembly.

    • Use a Phillips #1 screwdriver to loosen the five captive screws holding the back cover.

  2. Lenovo ThinkPad X1 Carbon 9th Gen SSD Replacement, Release the corner clips: stap 2, afbeelding 1 van 2 Lenovo ThinkPad X1 Carbon 9th Gen SSD Replacement, Release the corner clips: stap 2, afbeelding 2 van 2
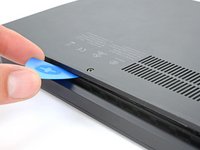
    • Insert an opening pick between a corner of the back cover and the chassis, near a hinge.

    • Pry upward to release the retaining clips.

    • Listen for a click sound when clips release.

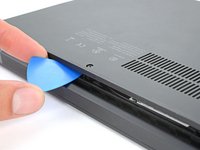
    • Repeat this process for the opposite corner.

  3. Lenovo ThinkPad X1 Carbon 9th Gen SSD Replacement, Release the edge clips: stap 3, afbeelding 1 van 2 Lenovo ThinkPad X1 Carbon 9th Gen SSD Replacement, Release the edge clips: stap 3, afbeelding 2 van 2
    • Insert the opening pick between the cover and the body.

    • Pry upward and release all of the retaining clips.

  4. Lenovo ThinkPad X1 Carbon 9th Gen SSD Replacement, Remove the back cover: stap 4, afbeelding 1 van 2 Lenovo ThinkPad X1 Carbon 9th Gen SSD Replacement, Remove the back cover: stap 4, afbeelding 2 van 2
    • Lift the back cover off the chassis and remove it.

    • If the cover feels stuck to the chassis, use an opening pick to release any remaining clips around the perimeter of the back cover.

  5. Lenovo ThinkPad X1 Carbon 9th Gen SSD Replacement, Unfasten the battery: stap 5, afbeelding 1 van 2 Lenovo ThinkPad X1 Carbon 9th Gen SSD Replacement, Unfasten the battery: stap 5, afbeelding 2 van 2
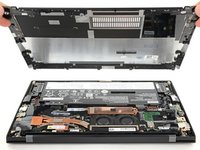
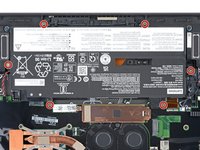
    • Use a Phillips #1 screwdriver to remove the six 4.9 mm screws securing the battery to the laptop chassis.

  6. Lenovo ThinkPad X1 Carbon 9th Gen SSD Replacement, Remove the battery: stap 6, afbeelding 1 van 3 Lenovo ThinkPad X1 Carbon 9th Gen SSD Replacement, Remove the battery: stap 6, afbeelding 2 van 3 Lenovo ThinkPad X1 Carbon 9th Gen SSD Replacement, Remove the battery: stap 6, afbeelding 3 van 3
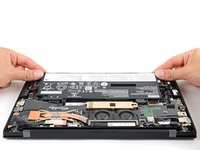
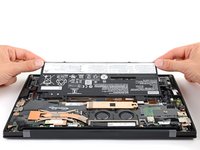
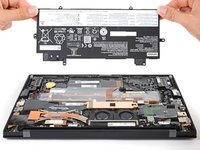
    • Grip the corners of the battery.

    • Pull and lift the battery of its recess and remove it.

    • Be delicate when pulling the battery out at first. The small pins on its connector are easy to bend.

    • There is no cable for the battery. It disconnects when removed from its recess.

  7. Lenovo ThinkPad X1 Carbon 9th Gen SSD Replacement, Unfasten the SSD cover: stap 7, afbeelding 1 van 2 Lenovo ThinkPad X1 Carbon 9th Gen SSD Replacement, Unfasten the SSD cover: stap 7, afbeelding 2 van 2
    • Use your Phillips screwdriver to remove the two 3.5 mm screws holding the metal SSD cover.

  8. Lenovo ThinkPad X1 Carbon 9th Gen SSD Replacement, Remove the SSD cover: stap 8, afbeelding 1 van 3 Lenovo ThinkPad X1 Carbon 9th Gen SSD Replacement, Remove the SSD cover: stap 8, afbeelding 2 van 3 Lenovo ThinkPad X1 Carbon 9th Gen SSD Replacement, Remove the SSD cover: stap 8, afbeelding 3 van 3
    • Lift the SSD cover off the SSD and remove it.

  9. Lenovo ThinkPad X1 Carbon 9th Gen SSD Replacement, Remove the SSD: stap 9, afbeelding 1 van 3 Lenovo ThinkPad X1 Carbon 9th Gen SSD Replacement, Remove the SSD: stap 9, afbeelding 2 van 3 Lenovo ThinkPad X1 Carbon 9th Gen SSD Replacement, Remove the SSD: stap 9, afbeelding 3 van 3
    • Grip the edges of the SSD near the screw indent.

    • Pull the SSD straight out of its socket and remove it.

    • If the SSD feels stuck, gently wiggle it side to side as you pull.

    • Retain the original thermal pad on the laptop, or refer to the general SSD installation guide for how to replace it.

Conclusie

To reassemble your device, follow these instructions in reverse order.

Take your e-waste to an R2 or e-Stewards certified recycler.

Repair didn’t go as planned? Try some basic troubleshooting, or ask our Lenovo ThinkPad X1 Carbon community for help.

2 andere personen hebben deze handleiding voltooid.

Clay Eickemeyer

Lid sinds: 09/19/22

81.913 Reputatie

455 handleidingen geschreven

Team

Guide Team Lid van Guide Team

Staff

9 Leden

11.426 handleidingen geschreven

0 opmerkingen

Voeg opmerking toe

Weergavestatistieken:

Afgelopen 24 uren: 9

Afgelopen 7 dagen: 57

Afgelopen 30 dagen: 273

Altijd: 8,626