Deze vertaling geeft mogelijk niet de meest recente updates van de bronhandleiding weer. Help ons met het updaten van de vertaling of bekijk de bronhandleiding.
Inleiding
De iPhone XR gebruikt de primaire luidspreker en de oorstukluidspreker samen om stereo-geluid voort te brengen. Gebruik deze handleiding om enkel de primaire luidspreker aan de onderkant van de telefoon te vervangen. Het vervangen van deze luidspreker kan problemen zoals het verlies van geluid, slechte geluidskwaliteit of ruis oplossen.
Wat je nodig hebt
-
-
Zet je iPhone uit voordat je met de demontage begint.
-
Verwijder de twee 6.7 mm lange pentalobe-schroeven aan de onderkant van de iPhone.
-
-
-
Plaats op 3 mm van de punt van je plectrum een markering met een stift.
Got to step 2 and realized the fix kit doesn't include an opening pick! Looks like a guitar pick, and I have those lying around. Is that expected? Looks like the pick is used in many steps below. There's a little blue crowbar that isn't mentioned in the instructions. Perhaps that replaces the opening pick?
Hi! I can't see which guide you were using when writing this comment. Can you reply here with which guide and fix kit you used?
I see you posted this in Meta. I hope it's resolved soon! In the meantime, a guitar pick may work well enough for your repair.
what fix kit?
My fix kit didn't include an opening pick either
My AliExpress refurbished screen came with a pick that has a coin-like circle that pops out, so no modification was necessary
It's not an Ifixit KIT if it doesn't include everything. You'll need to order the opening pic separately. Or head to Walmart like myself and look for guitar pics. Hopefully, this will work just as well.
No pick in mine as well. It’s really not clear that you have to order this separately when ordering an IPhone SE 202/2022 screen repair kit. Is this the case?
Frustrated, I ordered a compact package where everything was encapsulated. Useless suction tools could not separate the screen. If it is unable to decouple the screen, then why sucking suction tools you have provided.
For my kit the triangle pick was stuck inside the box with the screen not with the other tools maybe it's also there for you
Y’all are getting far, FAR too detailed with some of this stuff…. Measuring and marking the pick that you won’t actually use to open the device?!? lol that’s kinda funny. Just heat it up, grab a spudger, and the back just pops right off! The iFixit tech need to stick to the KISS method more often, you know KEEP IT SIMPLE STUPID!!! Like l, for reals, I’ve been doing this stuff for YEARS and using iFixit guides regularly and this is just ridiculous at this point!
Will the phone still work if the sensor assembly on the back of the screen is damaged?
-
-
-
Plak een aantal lagen tape op het scherm van de iPhone tot het gehele scherm bedekt is.
-
Als het je in de volgende stappen niet lukt om de zuignap op het scherm te bevestigen, kun je ervoor kiezen om een stuk duct tape in een handvatvorm op het scherm te plakken. Hiermee kun je dan het scherm omhoog tillen om een opening te creëren.
-
-
-
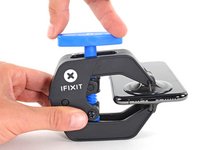
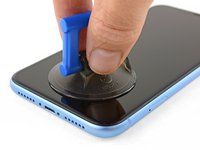
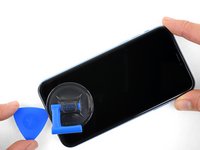
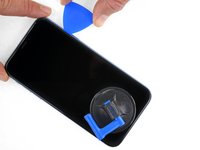
Trek de blauwe hendel naar achteren zodat de anti-klem vrij kan bewegen. (Op deze manier deactiveer je de openingsstand van de anti-klem.)
-
Schuif de armen over de linker- of rechterzijde van je iPhone.
-
Plaats de zuignappen dichtbij de onderkant van de telefoon—één op de voorkant en één aan de achterkant.
-
Druk beide zuignappen aan, om zuigkracht uit te oefenen op de gewenste plek.
-
-
-
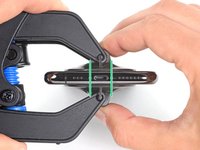
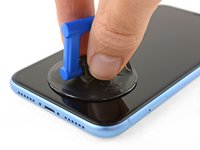
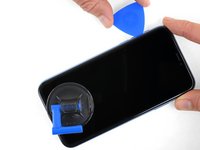
Trek het blauwe handvat naar voren om de armen van de anti-klem te vergrendelen.
-
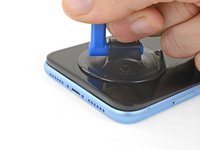
Draai het handvat 360 graden met de klok mee of tot de zuignappen uit beginnen te rekken.
-
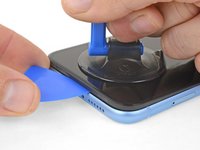
Zorg dat de zuignappen op één lijn met elkaar zitten voordat je begint met het openen van het toestel. Als je ziet dat de zuignappen niet meer op één lijn zitten, maak je ze los en breng je ze weer op de juiste positie aan.
-
-
-
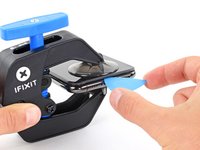
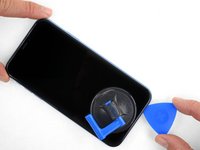
Verwarm een iOpener en plaats deze tussen de armen van de anti-klem op je telefoon.
-
Vouw de iOpener zodat deze op de onderkant van de iPhone komt te liggen.
-
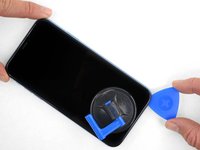
Geef de lijm een minuutje de tijd om los te komen zodat de anti-klem een opening kan creëren.
-
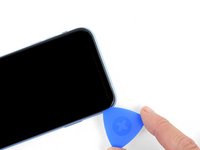
Steek een plectrum in de opening onder het scherm en de plastic rand, en niet onder het scherm zelf.
-
Sla de volgende drie stappen over.
Please UPDATE THIS STEP to say 'insert the opening pick underneath the PLASTIC FRAME OF THE SCREEN' and not the screen. Way too many people are taking this as the way to do it then posting their screen looks different when it's open when they've actually removed the screen leaving the frame in place. It's not rocket science.
Thanks for the suggestion! We updated this step to clarify that.
-
-
-
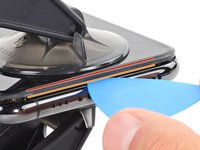
Gebruik een haardroger, een heteluchtpistool of verwarm een iOpener en leg deze, voor ongeveer een minuut, tegen de onderste rand van de iPhone om de lijm eronder week te maken.
An alternative to the Iopener or heat gun is to heat water to EXACTLY 80 degrees F (cooking thermometer is great for this) and pour into a reinforced ziplock type bag. Leave the bag on the screen, but be sure that none of the hot water rests on the zipper portion, as the water is hot enough to soften that seal and leak out on to your device! This meat had is my personal favorite as the heat is distributed very equally and precisely as compared to a heat gun, but is more accessible than the Iopener.
-
-
-
Trek de zuignap met een stevige en constante trekkracht omhoog om zo een kleine opening tussen het scherm en de behuizing te creëren.
-
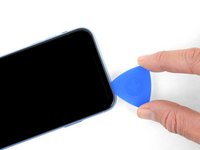
Steek een openingsplectrum in de opening onder de plastic rand van het scherm, niet onder het scherm.
-
-
-
Schuif het openingsplectrum rondom de onderste linkerhoek omhoog naar de bovenste linkerhoek van de iPhone om zo de lijm te verwijderen die het scherm op z'n plaats houdt.
I think it's important to note that depending on how a screen was damaged, make sure to insert the pic under the black bezel directly under the actual screen. This bezel is a frame around the digitizer. I unknowingly inserted the pic between the bezel and the screen, and separated them both. I did this all the way around the phone. So I basically had to struggle to keep together two different sections of the display assembly because of this mishap, until I removed all the ribbon connectors. It made things much more difficult.
-
-
-
-
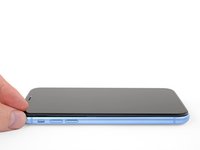
Plaats het openingsplectrum opnieuw in de opening aan de onderkant van de iPhone en schuif het nu via de onderste rechterhoek naar de bovenste rechterhoek om ook daar de lijm van het scherm te scheiden.
My replacement screen for the XR has a black rim but it looks pink. Is that normal?
Step 11 says not to insert your pick around the right side to avoid damaging cables, then Step 12 says to insert it on the right side. Help, I'm confused!
Hi there!
Thank you for the feedback! The wording in step 11 was definitely ambiguous, so we have changed it! You only need to avoid the marked spots rather than the right edge.
-
-
-
Open de iPhone door de linkerkant van het scherm omhoog te liften, zoals je de achterkant van een boek open zou slaan.
-
Laat het scherm tegen een object rusten om het overeind te houden terwijl jij aan de telefoon werkt.
sure looks like the "hinge" is on the right hand side to me.. not left...!
If you leave the suction cup attached to the screen during the “hinging” process, it makes for a very handy holder for the screen until it’s completely detached.
-
-
Gereedschap gebruikt in deze stap:Magnetic Project Mat$19.95
-
Verwijder drie 1.2 mm Y000-schroeven die de beschermplaat van de batterij-aansluiting vasthouden.
-
Verwijder de plaat.
Definitely make sure all three lobes of your tool are aligned before use (it’s a little harder to tell with this style of bit) and apply even and adequate pressure to ensure it grabs as you spin the driver to prevent disfiguring the lobes/slot of the screw head.
Unfortunately my Y000 tool was perhaps not the best fit (tolerance a bit off) in these screws and I ended up stripping out the heads of all three of these. I started to panic but after I sanded the tip of my Y000 bit down a little with super fine grit (1000CW-C) sand paper to flatten the domed tip (visible with macro lens) and give it a bit more bite I was able to remove and reinstall without issue—in fact I had to remove and install them twice since I forgot my adhesive tape during reassembly, so the screws survived and the sanded bit worked.
+1 to above comment. I bought a cheap kit from Amazon and the Y000 screw driver is not good for this job. I’m concerned that I may have disfigured the heads and i type this comment in the midst of my fix :D Be gentle and assess if you can remove at least one screw with your driver before rummaging through all three and other similar screws holding display connector as well.
Update to above comment. I got hold of a Y0.8 screw driver bit (lucky to find an ORIA screw driver kit in my office) and it works like wonders :) Now back to work…
-
-
-
Gebruik de punt van een spudger om de batterij-aansluiting in een rechte beweging uit het contact omhoog te wrikken.
-
Buig de aansluiting weg van het logic board zodat het in geen geval contact kan maken met het stopcontact en dus niet onverwachts de batterij aan kan zetten tijdens de reparatie.
-
-
-
Verwijder de twee 1.2 mm Y000-schroeven die de beschermplaat van de schermaansluiting op z'n plaats houden.
-
Verwijder de beschermplaat.
What if the screw is damaged and you can’t get one out?
-
-
-
Gebruik de top van een spudger om de digitizerkabel omhoog te wrikken en los te koppelen.
-
-
-
Gebruik de top van een spudger om de schermkabelaansluiting los te koppelen.
The new display cable isn’t snapping in but I was just able to snap in the old one. Did I break the new one somehow?
Same it is really frustrating, just keeps slipping up and its bound to get damaged
-
-
-
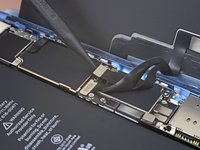
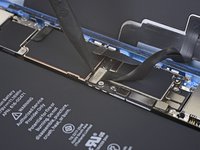
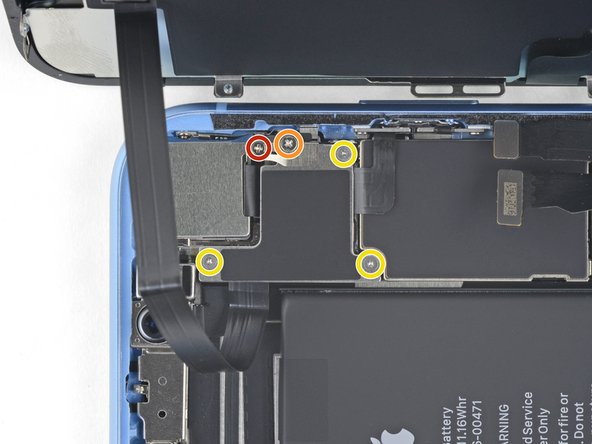
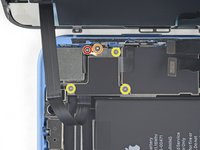
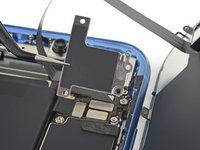
Verwijder de vijf schroeven die de beschermplaat van de logicboardaansluiting aan de behuizing bevestigen:
-
Eén 1.3 mm Philips #000-schroef
-
Eén 1.5 mm Philips #000-schroef
-
Drie 1.2 mm Y000-schroeven
-
Verwijder de beschermplaat
I’m not sure it makes much if any difference, but we went ahead and swapped the order for you guys. Thanks for your comments!
I just repaired another XR, and you are right! It doesn’t make any differnerce in the order these screws come out. I still damaged this fragile piece. As I work on more of these, I’ll figure out a way to remove this screw without damaging the clip. For now everyone, just use extra caution when removing the 1.3mm phillips screw! Thanks Jeff
I’ve now done at least 6 of these so far and I have fairly consistent good results by taking the 2 Philips head screws out first, then doing the Y screws.
Stow -
Is this piece important for the repair if broken? I have broken it on a home repair. What is it used for? Is it a grounding connection or is it completely unimportant. More information needed please
I’m wondering that too. Is this piece important?
I can confirm that taking out the 1.3 mm screw first then the 1.5 mm screw works the best. If done correctly, you should be able to to remove the rest of the screws and pull the panel off with the clip still attached to the panel. For reassembly, start with the 1.5 mm screw then the 1.3 mm screw.
I don’t remove the small screw at all. I just slide out the metal cover plate and slide back in to reassemble.
this is what i have done as well. Care is still needed to avoid damaging this part. However, it is seemingly far less prone to damage or loss and thus less risky for this repair process.
I too broke this shield. In looking over this problem I believe it’s best to loosen, but not remove, either screw first then the other. To be clear, loosen the red or yellow screw but only just to break it free, then the second screw. Then remove both and the others and the shield should remain in one piece. I put it back with the broken part (on the red screw) and made sure the two are in contact so there’s conductivity as these shields serve a purpose other than just holding in connectors. My phone works fine with this fix.
Is this small bracket important if broken??
Mine is broken
Mine is broken and my apple pay doesn’t work. Something to do with NFC antenna this little clip??
I'm guessing so. I replaced a screen on a phone I bought from a friend. I noticed this bracket was broken when I disassembled the phone but didn't think much of it. When I reassembled it my NFC also does not work. Bummer. A lot of people in these comments have asked if it is crucial that this bracket be connected. Can someone from iFixit or other please reply to those comments?
Kyaw-Zin is right because the shield contains of two tin parts. But there is another option:
1. Unscrew the yellow and orange screws first.
2. Lift the shield gently that it can turn about 20° anticlockwise.
3. Open the red screw and let the shield turn with it the first degrees.
The first time I did this repair, I didn’t see the comments ahead of time and broke the bracket, even removing the 1.3mm screws first. The second time I did the repair, I was prepared and being extra careful, but the simple act of turning the 1.3mm screw head was enough to break it. If I ever have to do this repair again, I’ll just leave the screw in and try to slide the plate out with the screw (and bracket, hopefully) still in tact, as per Kyaw-Zin Win.
None of the screw driver bits I got fits the 1.3mm and 1.5mm screws. How do I remove them?
Same issue as above. The bits provided in the kit do not work with the 1.3mm and 1.5mm screws
Further to above comment about bit not working. Had to go and purchase another PH000 from Home Depot and that worked
I’ve broken that little bracket attached to the red screw. Is it important and can I get a replacement????? Thanks all
Broken the clip. Is this important??
Don't remove the 1.3 Phillips screw! Twisting this screw will break the smaller bracket that is clipped to the larger. Remove all the other screws. Block the smaller bracket from moving as you gently slide the larger bracket horizontally toward the battery until free. The smaller bracket can stay in place while the screen is replaced. When reassembling, support the small bracket by backing with a spudger or similar tool.
I just broke the smaller bracket also :( I didn´t notice these comments until now :(
It looks like part of the antenna for NFC, as all except NFC works on my iPhone now.
It should be repairable using some wire wrap wire, either twisted around the two screws that connected that part of the bracket (or soldered in place). I will try and report back if it works.
Success!! I managed to re-construct the small arm of the bracket by screwing the 1.3mm screw back in with some 0.3mm enamel wire soldered into what was left of the small bracket arm on the screw, then the other end of the enamel wire I wrapped under the 1.5 wire screw's head (enamel exposed to bare metal), then screwed both screws down. also I lifted up the small metal arm with a screw driver (to make sure it reconnects with the display grounding square) ..and NFC worked again (slightly different antenna pattern mind (need to place cards slightly higher up the rear of the phone). Anyway works again :)
do you think it would be possible to repair without the use of microsoldering?
i brought a new bracket set for the xr and replaced the old one but even with that nfc/apple pay still doesn't work. i'm questioning if i put a wrong size screw or something else
-
-
-
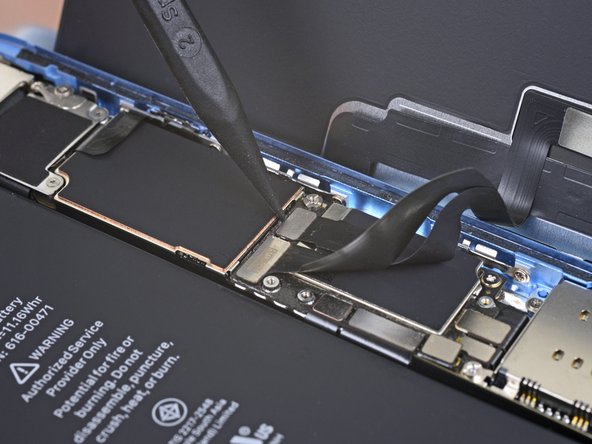
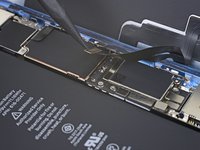
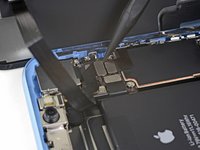
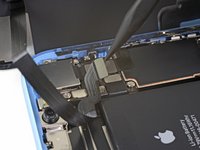
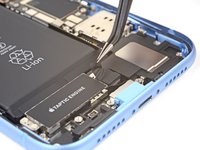
Gebruik de punt van een spudger om de aansluiting van de voorste sensorenmodule uit het contact te wrikken.
During testing, make sure your proximity sensor is not on upside down, as it’s easy to connect upside down. Your phone will boot loop if it’s on incorrectly.
-
-
-
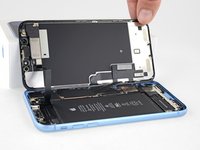
Verwijder de schermmodule
unclear if this is where screen removal ends
I had the same question, but the answer is yes. Steps 21-30 are removing parts from the original screen that need to be reattached onto the new screen. You are no longer working inside the frame, but on the back of the screen itself.
I apologize for missing these comments initially, but yes that’s correct, the screen is removed now and the rest of the guide goes on to other parts, either in the phone or on the back of the screen. Good luck with the repair!
The alternate method of removing the battery should be highlighted as a standard option. There is so much more work and potential to damage the parts than if you left them in place and carefully with plenty of heat remove the battery. I so wish I had seen this before!
-
-
-
Verwijder de zeven schroeven die het paneel onder de trilmotor en de luidspreker bevestigen:
-
Drie Phillips 1.4 mm schroeven
-
Twee Phillips 1.7 mm schroeven
-
Eén Phillips 1.9 mm schroef
-
Eén Phillips 1.6 mm schroef
Why remove all this stuff for the battery? Is it necessary to do any of steps from here to 32 for the battery at all?
Removing these parts facilitates removing the bottom adhesive tabs but is not necessary. If you remove the upper adhesive tabs, then heat the backside of the lower ones (which you do if you couldn't get the tabs out), the battery comes out easily. Removes 14 steps from this procedure.
-
-
-
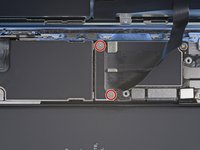
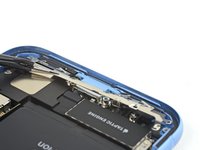
Verwijder de vijf schroeven die de onderste speaker bevestigen:
-
Eén 2.8 mm standoff-schroef.
-
Eén 2.3 mm standoff-schroef.
-
Eén 2.3 mm Phillips-schroef.
-
Eén 1.8 mm Phillips-schroef.
-
Eén 1.6 mm Phillips-schroef.
I was able to get the 2.8mm standoff screw out with a 1.5 mm flat head from my iFixit kit but was not able to find anything to get the 2.3mm screw out. Buying the standoff screwdriver begrudgingly. I wish I'd known about this before I started.
Recommend PH00 for the 1.8 and PH000 for the rest.
I recommend a 2.5 mm flat for the orange and red stand off screws.
use the sharp end of the spudger to stick into the standoff screws - it will hold well enough to position the screw and start threading it in - then use 2.5mm flat to tighten
-
-
-
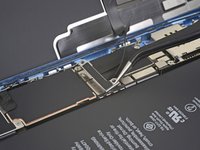
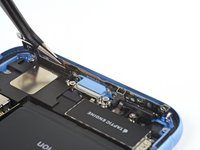
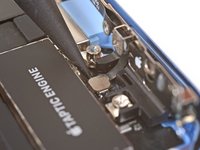
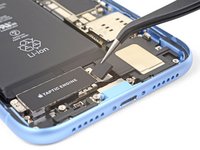
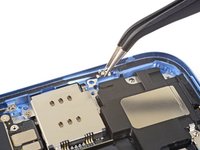
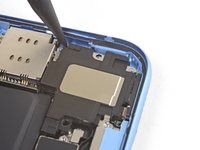
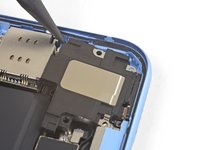
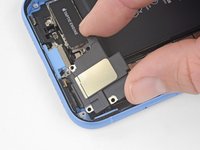
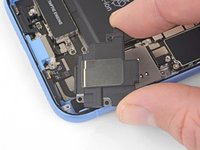
Verwijder het kleine paneeltje in de rechter bovenhoek van de luidspreker.
-
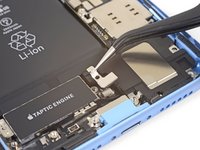
Verwijder het paneeltje dat over de aansluiting van de trilmotor heen zit.
-
-
-
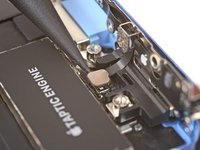
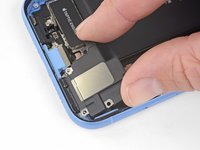
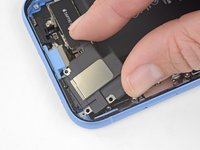
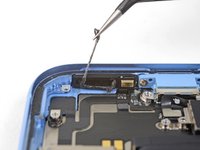
Verwijder de luidspreker.
you may be able to reuse the gasket if you heat the glue. You may want to consider this because I can’t find the gasket through ifixit.
do we have to remove all the extra stuff such as this if we're just replacing screen display? what is the importance?
If you want to get the surface prepped nicely, tightly roll up the corner of a KimTech wipe, add some IP, then gently use your spudger tip to wipe excess gasket material from the area. Take your time!
-


Vergelijk je vervangende onderdeel met het originele onderdeel — het kan zijn dat je meerdere onderdelen mee over moet zetten of beschermlagen voor de lijm moet verwijderen voordat je het nieuwe onderdeel kunt installeren.
Om je toestel weer in elkaar te zetten, volg je deze instructies in omgekeerde volgorde.
Breng je e-afval naar een R2 of e-Stewards gecertificeerde recycler.
Ging je reparatie niet zoals gepland? Check dan onze Antwoordencommunity voor hulp bij het oplossen van je probleem.
Annuleren: ik heb deze handleiding niet afgemaakt.
21 andere personen hebben deze handleiding voltooid.
Met dank aan deze vertalers:
92%

Thomas Keulemans helpt ons de wereld te herstellen! Wil je bijdragen?
Begin met vertalen ›

3 opmerkingen
Where can I buy a replacement gasket for the speaker?
ok, troubleshooting help:
- the original speaker was sounding tinny (potentially water infiltration?)
- replaced the speaker, and I am only getting audio out of the earpiece speaker.
- tested with the original speaker, and no audio from the original either.
- double checked everything is reassembled correctly, forced restart, still nothing.
- presumably something else broke, or was damaged during my teardown, but I'm not sure what 😅
One of my gaskets was as shown in your second photo, the other had been worked into the threads (as if smeared) probably from the factory and was completely unusable.
In place of replacements (unsure of where to purchase) I just used a clear silicone caulking on both screws upon reassembly to offer at least some water seal. I wish these gaskets were included with the gasket waterproofing sealant kit!
Erica - Antwoord
Is there any place to buy these screw gaskets? I haven’t seen it mentioned anywhere but one of mine was pretty much chewed up. Silicone should work but I’d prefer the oem solution.
Chilinh Nguyen - Antwoord
I found a place on Amazon that sells them. It's cheapest to get a full set of screws than to get just these. $5-$6 USD.
J Olin -
Can it be dead?
Lulu navarro - Antwoord
If I transfer the data from the old to the new battery with an icopy, don't I get an error message?
David Julian Krause - Antwoord
how am i supposed to know if the battery is below 25% if the screen won't turn on?
Beth Jackson - Antwoord
Spoiler alert! I just followed all the steps and if you bought the anti-clamp you might save a lot of time and some unreversible steps.
I recommend that you read all the steps before beginning and follow the steps up to the point where the guide removes the screen (step 23). After that read again the precautions of step 41 and try the next thing:
- Using something like the iOpener hot bag, heat up the back side of the phone where the battery is glued to for some minutes
- Alternatively use a 3d printer heat bed at 60 degrees Celsius
- Once the back of the phone is hot to the touch, enough to make it uncomfortable to the touch, find a portion of the battery with a smooth surface and attach the anti-clamp to it and the back of the phone
- Follow the steps 4 and 5 to detach the battery from the frame
If this procedure works you will not have to remove some elements such as:
- lower speaker black tape (step 28)
- lower speaker water proof gasket (step 33)
I hope that someone find this helpful. Happy fixing!!
Julio Beltran - Antwoord