Deze vertaling geeft mogelijk niet de meest recente updates van de bronhandleiding weer. Help ons met het updaten van de vertaling of bekijk de bronhandleiding.
Inleiding
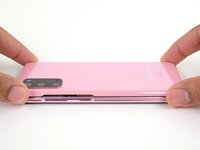
Deze handleiding laat je zien hoe je de batterij van een Samsung Galaxy S20 verwijdert en vervangt.
De batterij wordt op z'n plek gehouden door stugge lijm. Hooggeconcentreerde (>90%) isopropyl alcohol is noodzakelijk om de lijm en de batterij los te weken.
Neem, als je batterij gezwollen is, de juiste voorzorgsmaatregelen en verwarm je telefoon niet.
Ontlaad de batterij van je telefoon, voor je eigen veiligheid, tot onder de 25% voordat je begint met het demonteren van je telefoon. Dit verkleint het risico op een gevaarlijk ongeluk bij het per ongeluk beschadigen van de batterij tijdens de reparatie.
Je zult vervangende kleefstrips nodig hebben om deze reparatie te kunnen volbrengen.
Wat je nodig hebt
-
-
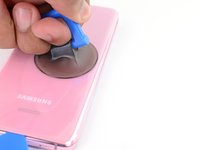
Verwarm een iOpener en leg deze op de onderkant van de achterste behuizing gedurende twee minuten.
-
-
-
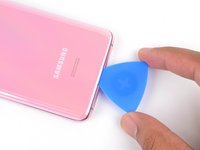
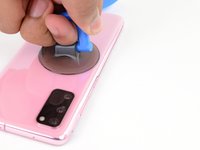
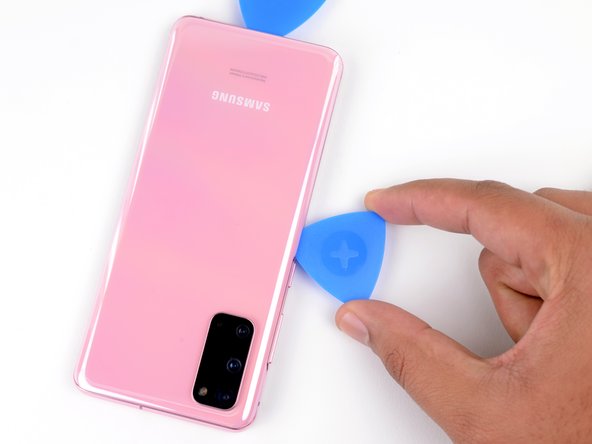
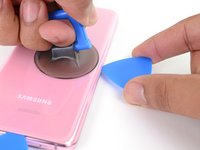
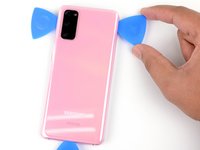
Druk een zuignap op de achterkant van de telefoon, zo dicht mogelijk bij het midden van de onderkant.
-
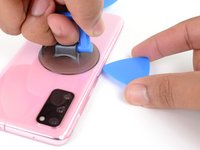
Trek de zuignap met een sterke, constante kracht omhoog om zo een opening te creëren tussen de achterste behuizing en het frame.
-
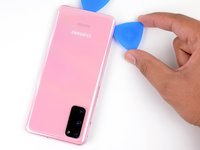
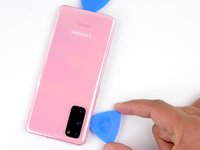
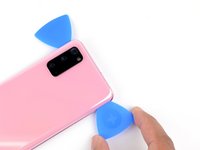
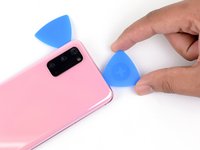
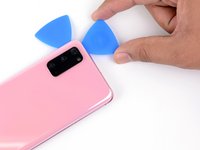
Steek de punt van een openingsplectrum in de opening.
While pulling on the back glass with the suction cup, I found it helpful to use something like the opener tool to press down on the frame. Made it easy to pull open even with the iOpener.
-
-
-
Leg een verwarmde iOpener op de linkerkant van de achterste behuizing gedurende twee minuten.
-
-
-
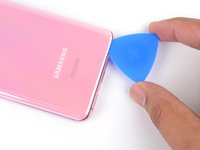
Druk een zuignap op de achterkant van de telefoon, zo dicht mogelijk bij het midden van de linkerzijde.
-
Trek de zuignap met een stevige en constante kracht omhoog om zo een opening tussen de achterste behuizing en het frame te creëren.
-
Steek de punt van een openingsplectrum in de opening.
-
Je kunt ook proberen wat isopropyl alcohol (>90%) in de opening toe te dienen om de lijm te verzachten.
-
-
-
Leg een verwarmde iOpener op de rechterkant van de achterste behuizing gedurende twee minuten.
-
-
-
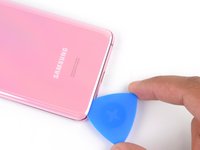
Druk een zuignap op de achterkant van de telefoon, zo dicht mogelijk bij het midden van de rechterkant.
-
Trek de zuignap met een constante en stevige kracht omhoog om zo een kleine opening te creëren tussen de achterste behuizing en het frame.
-
Steek de punt van een openingsplectrum in de opening.
-
-
-
-
Leg een verwarmde iOpener op de bovenkant van de achterste behuizing gedurende twee minuten.
-
-
-
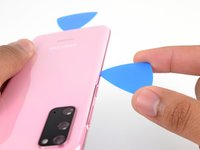
Schuif je plectrum langzaam maar zeker van de rechterkant van het toestel over de rechter bovenhoek.
-
Snijd tijdens het schuiven de lijm langs de bovenkant door totdat je bij de linker bovenhoek bent. Als het goed is heb je nu alle lijm door weten te snijden.
-
-
Gereedschap gebruikt in deze stap:Tweezers$4.99
-
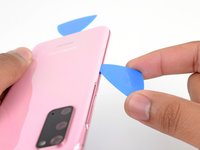
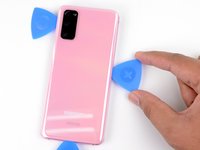
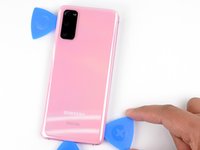
Til de achterste behuizing langzaam omhoog. Gebruik openingsplectrums om resterende lijm door te snijden.
-
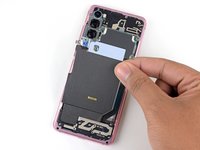
Verwijder de achterste behuizing.
-
Is dit een goed moment om je telefoon aan te zetten en alle functies te testen voordat je je telefoon weer definitief sluit. Zorg dat je je telefoon ook weer uitschakelt als je verder gaat met de reparatie.
-
Verwijder je alle lijmresten met een pincet of je vingers. Gebruik warmte als je moeite hebt met het loskrijgen of verwijderen van de lijmresten.
-
Gebruik je deze handleiding als je gebruikmaakt van Samsung's op maat gemaakte kleefstrips.
-
Gebruik je deze handleiding als je gebruikmaakt van dubbelzijdige tape.
-
-
-
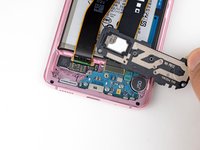
Gebruik een Phillips #00 schroevendraaier om de vijf 4 mm lange schroeven die de beugel over het moederbord bevestigen los te schroeven.
-
-
Gereedschap gebruikt in deze stap:Tweezers$4.99
-
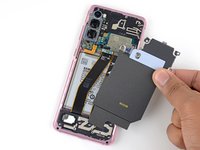
Gebruik een pincet om de beugel op het moederbord voorzichtig van het midframe omhoog te trekken en los te maken uit de klemmen.
-
-
-
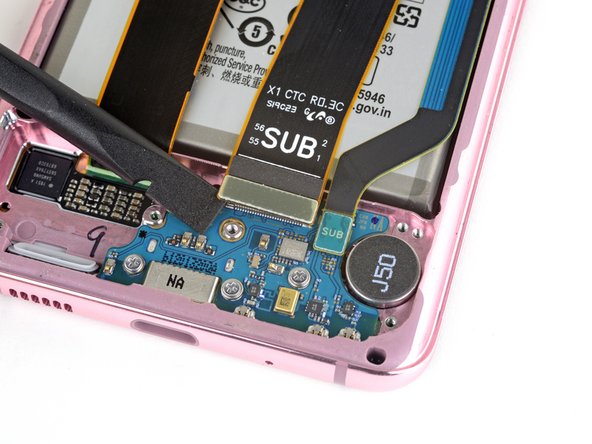
Trek de draadloze oplaadspoel langzaam en voorzichtig weg uit het toestel.
-
Verwijder de draadloze oplaadspoel.
-
-
-
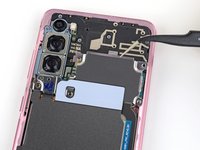
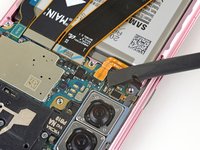
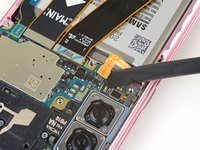
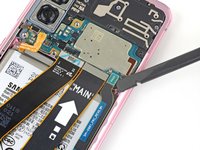
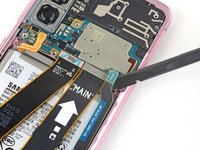
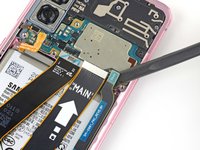
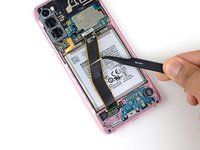
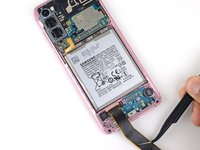
Gebruik een spudger om de batterijaansluiting omhoog te duwen en los te koppelen.
-
-
-
Gebruik een Phillips #00 schroevendraaier om de vijf 4 mm lange schroeven, die de luidspreker en het onderste midframe bevestigen, los te schroeven.
-
-
Gereedschap gebruikt in deze stap:Tweezers$4.99
-
Steek de punt van een spudger of een pincet in de inkeping in de linker bovenhoek van het midframe en duw deze omhoog om het midframe los te maken uit de klemmen die het vasthouden.
-
Verwijder de luidspreker en het onderste midframe.
-
-
-
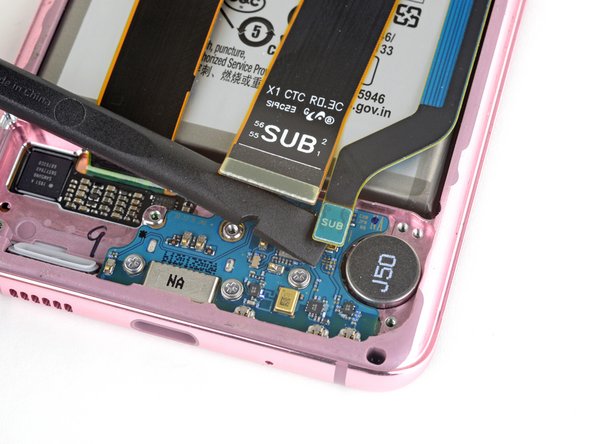
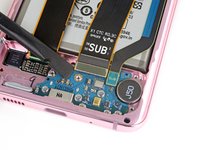
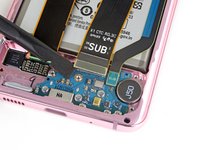
Gebruik een spudger om de hoofd- en secundaire flexkabels van het dochterbord, in de buurt van de onderkant van het toestel, omhoog te duwen en los te koppelen.
-
-
-
Gebruik een spudger om de hoofd en secundaire flexkabels van het moederbord omhoog te duwen en los te koppelen.
-
-
-
Trek de hoofd en secundaire flexkabels voorzichtig omhoog en verwijder deze uit het toestel.
-
-
-
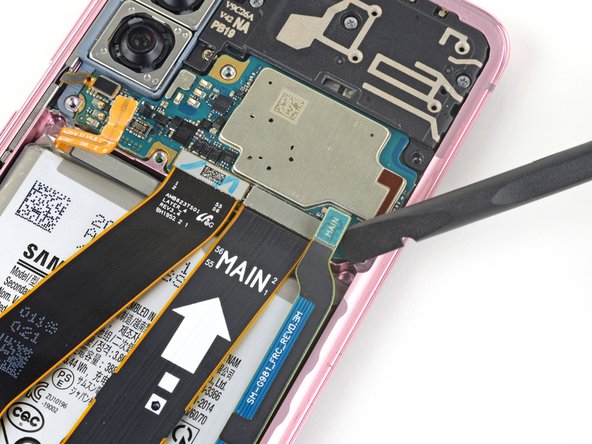
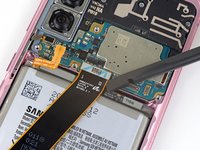
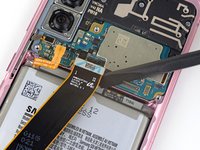
Gebruik een spudger om de hoofdschermkabel van het moederbord omhoog te duwen en los te koppelen.
-
-
-
Trek de flexkabel van het scherm voorzichtig van de batterij af en buig deze vervolgens weg van het moederbord en de batterij.
-
-
-
Dien twee druppels hooggeconcentreerde (>90%) isopropylalcohol toe aan de bovenkant van de batterij.
-
Geef de alcohol een minuut de tijd om in de lijm onder de batterij te trekken.
-
-
-
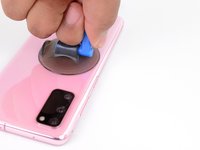
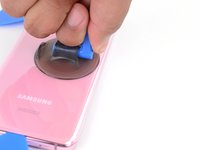
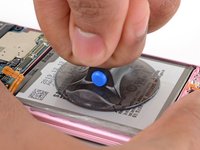
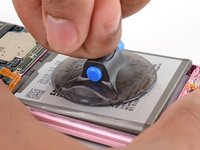
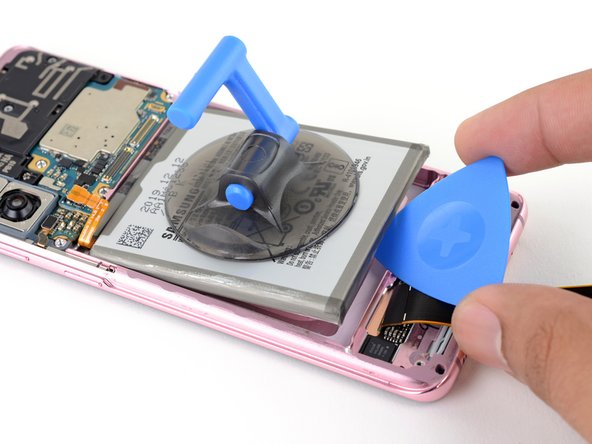
Druk een zuignap op het midden van de batterij.
-
Houd de boven- en onderkant van je toestel goed vast met je ene hand en trek de zuignap met stevige kracht omhoog met je andere hand.
-
Het losmaken van de lijm benodigt tijd en meerdere trekpoging in plaats van botte kracht. Trek de zuignap elke keer voor 15 seconden met een constante kracht omhoog.
-
Als de batterij echt niet los wil komen, breng je 1-2 druppels isopropylalcohol aan de boven-, linker-, en rechterkanten aan, wacht je ongeveer een minuut en trek je nog een keer aan de zuignap.
-
Als je eenmaal voelt dat de batterij lichtjes loskomt uit het toestel ga je verder met de volgende stap.
-
-
-
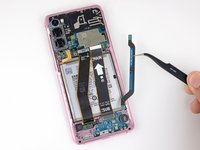
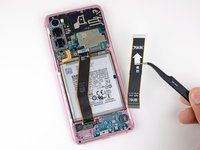
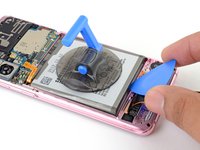
Steek een openingsplectrum onder de onderkant van de batterij en kantel deze om de batterij los te krijgen van de lijm.
-
-
-
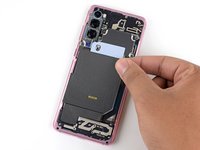
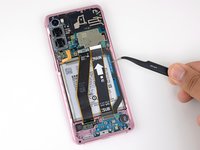
Verwijder de batterij.
-
Verwijder de lijmresten uit de behuizing voordat je het oppervlak onder de batterij schoonmaakt met isopropyl alcohol en een stuk stofvrij doek.
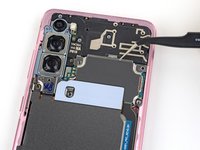
What is the piece behind the battery that looks like its circled called? Is it normal to see this piece when shining a flashlight onto the screen when the phone is off?
That’s the fingerprint sensor! Because it’s embedded in the screen, if you shine a light behind it, you can see it through the front glass.
-


Vergelijk je vervangende onderdeel met het originele onderdeel — het kan zijn dat je meerdere onderdelen mee over moet zetten of beschermlagen voor de lijm moet verwijderen voordat je het nieuwe onderdeel kunt installeren.
Om je toestel weer in elkaar te zetten, volg je deze instructies in omgekeerde volgorde.
Zorg dat je niet vergeet je net geïnstalleerde batterij te kalibreren.
Volg deze handleiding om de batterijcyclus opnieuw in te stellen, en kalibreer jouw nieuw geïnstalleerde batterij.
Breng je e-afval naar een door R2 of e-Stewards gecertificeerde recycler.
Ging je reparatie niet zoals gepland? Check dan onze Samsung Galaxy Antwoordenforum of S20 batterij problemen oplossen wiki voor hulp bij het oplossen van je probleem.
Annuleren: ik heb deze handleiding niet afgemaakt.
29 andere personen hebben deze handleiding voltooid.
Met dank aan deze vertalers:
75%


Deze vertalers helpen ons de wereld te repareren! Wil je bijdragen?
Begin met vertalen ›

25 opmerkingen
I had a huge amount of difficulty removing the battery during this repair. The adhesive is really strong, the suction cup doesn't stick to the battery very well and if you lever it out you run the risk of puncturing the battery. It's also really difficult to pull up on the battery while holding the phone down, especially because you want to avoid touching the circuits.
Eventually I succeeded and everything seemed to work but the next day the phone wouldn't switch on. I think maybe the adhesive remover got somewhere it shouldn't have. If I could add something to this guide, it would be "once battery is removed, allow phone to sit for 30 mins to ensure all adhesive remover has evaporated". If I was allowed a do-over I would try to heat the adhesive instead. Or use the string trick. I'm switching to an iphone now because apparently they don't glue their batteries.
Good point! I would suggest to use pure isopropyl alcohol and not something below 99%. The residual water might be not much but still there is a slight chance of it getting somewhere inside. Also the 99% pure alcohol evaporates much faster and leaves no traces. Apple batteries are also glued in with adhesive. What apple does right are the pull-strings to remove the sticky tape between chassis and battery.
Followed every step and managed to complete it but after a couple of minutes the phone screen stopped working and turned black.
I'm pretty sure that happened because the isopropyl alcohol went through the phone into the screen through the gap right under where the battery seats.
If you attempt this at home be aware this might happen, so disconnect the display too or look into using a different method for removing the battery.
I don't think this repair is worth attempting. I also killed my screen with this one, similar to the two commenters above. Whether it was isopropyl alcohol getting into the LCD or whether it was some issue with flimsy connectors I don't know. I was super careful and I've still bricked it, so I'd rate this repair as 'too risky'.
i typically use an iPlastix opening tool, a heating pad and lots of alcohol, get the very tip of the opening tool to sort of bend or roll into a curve, then slip the bent tip into the gap between frame and battery dripping some alcohol onto the tool, eventually you can get the rolled end to slip underneath the battery. then just slide the tool around the perimeter of the battery, cutting the adhesive, eventually, once all the adhesive is cut the battery will easily pry out of the phone. continually apply alcohol to the surface of the tool once you get the curved end under the battery, the alcohol will drip down the tool and find its way under the battery more easily weaking the adhesive.
since the tool is made of plastic, its almost impossible to scratch, bend or puncture the battery during the removal process by using this method, this is also my preferred method for removing bulged batteries that a suction cup wont stick to, or batteries where putting any unnecessary pressure could cause them to burst.
As with other comments, battery swap went fine, but after a bit of use I connected the phone to a charger and screen went black. Strange experience, feels like it's booby trapped.
I used this repair guide to change my battery in my S20. All went well and successfully especially after using this guide. IPA helped massively to remove the battery but I DO NOT RECOMMEND USING IT. i read the comments about the screen going blank etc. i used a heat gun to evaporate the IPA before reassembling the device thinking this would eliminate any issues. I WAS WRONG. DO NOT USE IPA to remove the battery. I turned my phone back on ant it was okay for a few minutes. Then the screen started flickering and turned completely green then went black. The phone still works as i can hear the notification sounds etc but no screen. Again DO NOT USE IPA TO REMOVE BATTERY
When the alcohol gets into the screen, the screen becomes black, it dies. Do not try this guide.
Did this repair to a T, it killed my display about 30 mins later. DONT USE IPA
I even used my heat gun to evaporate all of it off, let the phone sit for an hour too. still killed it!
Hi Bradley,
I'm really sorry to hear of your repair experience. I think the IPA may have seeped through the fingerprint sensor cutout and into the OLED panel.
When the battery adhesive is still intact, it should seal against moderate use of IPA along the top and side edges. I looked over the guide and changed the wording to give clearer guidance and warnings on how much to apply, where to apply it, and when not to use IPA.
Is there any procedure needed to reset the battery stats or charging levels? I replaced without problem but my battery life is not as good as my old battery! Wondering if there is a step on the software side?
Did you figure it out? I have the same issue. Looks like an original battery, but batt life is weak and Samsung Members diagnostics shows battery needs replacement...
Slawek -
The screws are more likely to be #0 JIS rather than #00 Phillips. Certainly my JIS screwdriver fits much better than my Phillips one.
I haven't had a problem with IPA use yet, but the battery adhesive is stupidly strong. Just use a mechanical clip, Samsung. My Blackberry is: slide back off, lift up battery, insert new battery, slide on back cover. Probably five seconds. Things weren't so bad in the 2010s.
The Samsung battery reset app doesn't recognise the QR code on the packaging so far.
As well i killed my screen, i turned up and and worked a few minutes, later I left it charging, and when I came back the screen was completely black, I plug it to my monitor, and the phone is still working but no the screen. Anyway his method did not help me to remove the battery
After all these comments concerning a screen-blackout after using alcohol I didn't dare to use that. Just pulled with the suction handle and pried with different tools from the bottom. That took a lot of time, sweat, fear to break the battery and quite some force. Why do manufacturers glue in the batteries?!
Worked out fine and I'm happy with the new battery.
why does it needs to be below 25%? I understand it being at maximum 60%, but for what I learned Li-ion batteries are unstable at 0% too. Maybe it needs to be better specified?
Toller Guide!
War mein erster Akkutausch.
Statt dem Alkohol hab ich aber den Akku bzw Kleber mit einem Föhn über die Displayseite erwärmt. Hat wunderbar funktioniert.
Klebereste hab ich dann mit 2 Tropfen Desinfektionsgel und nem Wattestäbchen gelöst. Rückbau hat auch ohne Probleme funktioniert.
I completed the swap without affecting the screen. To avoid killing the screen as others have done, I used 2 tiny drops of acetone from a needle behind the battery then applied constant even pressure to the battery over a long period of time. If you do not have a way of getting the solvent accurately only onto the glue, use the constant pull method alone. Be careful about putting tools behind the battery as there is an area behind the battery with a soft membrane.
I completed the swap without obvious issue. However if I unplug the phone from a charger it immediately turns off as if there is no battery at all. I re-opened the phone and disconnected and reconnected all the upper and lower flex cable connectors carefully. This did not resolve the issue. The battery shows 4000 mAh at 100% or 99% charge when connected to USB and powered on. I don't know if there is something I am missing of if I possibly revived a bad replacement battery.
Thanks for this informative instruction manual. What I would like to ask is, where can I find a genuine S20 battery?
Found that using the iOpener did not provide enough heat to weaken the adhesive, went with a hairdryer instead. Make sure to never keep the hairdryer still, and apply heat on high for 30 seconds to 1 minute per side did the job for me. iOpener just did not get hot enough
Phil R - Antwoord