Deze vertaling geeft mogelijk niet de meest recente updates van de bronhandleiding weer. Help ons met het updaten van de vertaling of bekijk de bronhandleiding.
Inleiding
Gebruik deze handleiding om een kapot of niet goed werkend scherm van je Samsung Galaxy S10e te verwijderen of te vervangen. Deze procedure omvat het verwijderen van de achterste behuizing zodat je het scherm los kunt koppelen van het moederbord.
In deze handleiding vervang je het scherm terwijl je het originele frame intact en in de telefoon laat. Het scherm bevat een glazen deel en een schermpaneel. Hoewel deze procedure ervoor zorgt dat je het glazen gedeelte los haalt van het paneel, kun je het scherm niet hergebruiken.
Wat je nodig hebt
-
-
Prepareer een iOpener en verwarm de achterkant van je telefoon langs de rechterzijde gedurende ongeveer twee minuten. Dit zorgt ervoor dat de lijm die de achterste behuizing vasthoudt, verzacht.
-
-
-
In de volgende stappen zul je de lijm die de achterste behuizing vasthoudt, moeten doorsnijden.
-
Zoals je aan de buitenkant van de telefoon kunt zien, zul je de lijm die in de gemarkeerde gebieden ligt door moeten snijden.
-
De lijm is het dunst aan de rechterkant van de telefoon, net onder de Bixbyknop.
My S10e was two years old so the adhesive was really weak, and it was really simple to open. Still, this guide was totally useful.
That's encouraging, hopefully the older-than-2 years S10e I'm looking to do proves as easy to open-
Gee Foe -
-
-
-
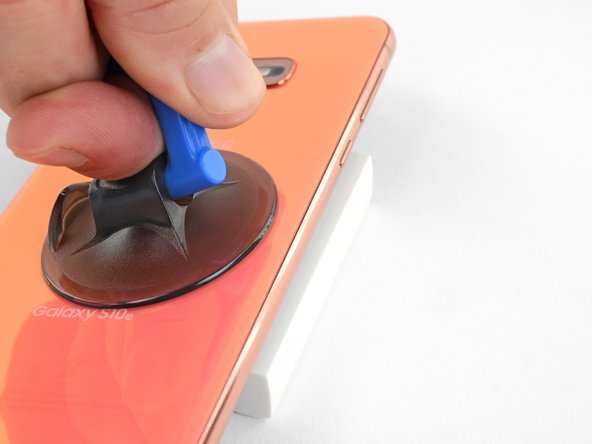
Bevestig een zuignap aan de achterkant, zo dicht mogelijk bij de verwarmde kant en net onder de Bixbyknop waar de lijm het dunst is.
La ventouse n'adhérera pas correctement sur la partie incurvée de la vitre ,
Sur la partie incurvée de la coque.
-
-
-
Leg de verwarmde kant van de telefoon vervolgens op een blokje van ongeveer 13 mm (0.5 inch) dik. Dit zal de telefoon in een hoek leggen die het gemakkelijker maakt om de openingstool in te brengen.
-
Til dan de rechterzijkant van de achterkant op met je zuignap, waardoor er een kleine opening vrijkomt tussen het frame en de achterste behuizing.
-
Het kan zijn dat hier heel wat kracht voor nodig is. Mocht het niet lukken dan kun je wat extra warmte toedienen om de lijm te verzachten en het nog eens proberen. De lijm koelt snel en wordt dus snel hard, dus het kan zijn dat je dit een aantal keer moet herhalen.
-
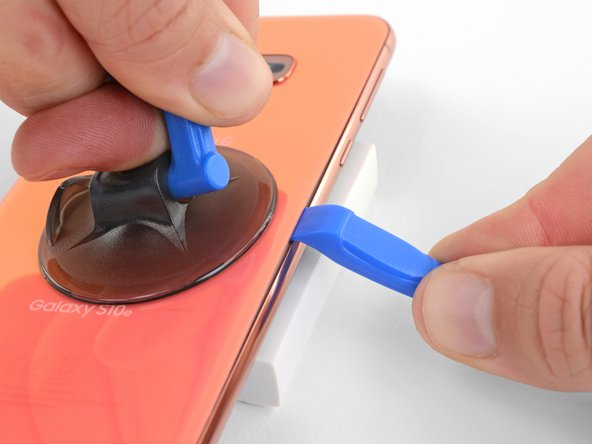
Druk een kant van de openingstool in de zojuist gecreëerde opening.
-
-
-
Schuif de openingstool langs de rechterzijde van de telefoon om door de lijm heen te snijden die de achterkant vasthoudt.
I found that using opening picks for the entire repair was much easier then the pry tool, but that could just be me
You are criminals! This "tutorial" is full of destructive instructions. And whenever trying to make a comment, iFixid admin hides behind the bot personality telling: "Your comment was marked as spam"
People, do not trust them! They tell you everything to break your phone so you will need to bring it to service!You are criminals! No one ever should use the triangular "mediator" pick for iPhones, or planar connector picks! The back cover is NOT gorilla-glass, and it will crack in multiple places immediately! Only very thin "watchmaker" opening plates(initial pickup) and 0.1mm rigid PP stripes (cut from cheap tool packages, or 7-eleven food packs) may be used there. Before that the side rim - not the cover itself should be heated to boiling point and constantly re-heated while tearing the two-sided scotch. The opening strip may be replaced 2-3 times while reaching the opposite side, because it collects the torn glue. This instruction from iFixit is a pure sabotage for tricking non-expecting users to repair-shops.
The same goes to battery, if you don't risk using solvents, which may damage the screen and the circuit. Only rounded PP strips may tear off the battery scotch. It should be preheated from the screen side, until the battery becomes hot.The commenter who keeps saying "you are criminals" over and over may have been using this guide to repair a different phone, so he or she is confused. On the Galaxy S10e, I had no trouble heating and lifting the cover as described (though I had to reheat the iOpener several times). If you heat it gently with the iOpener and long enough, you're not stressing the back cover because the glue will come loose almost immediately. (I could have almost lifted it with a fingernail).
-
-
-
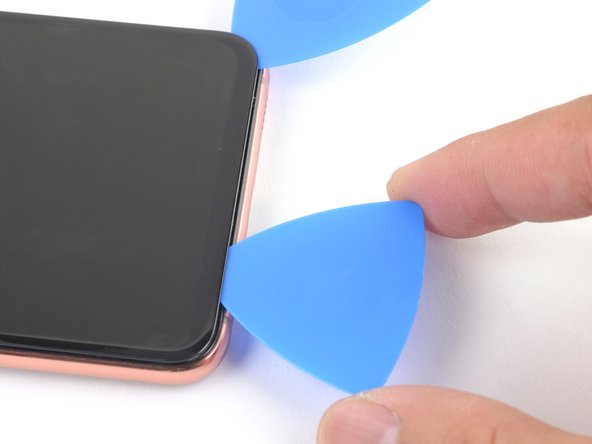
Steek een openingsplectrum net onder de rechter bovenhoek van de telefoon en schuif deze om de hoek heen en langs de bovenkant van de telefoon verder.
-
Laat je plectrum zitten om te voorkomen dat de lijm zich weer aan je telefoon gaat hechten.
-
-
-
Leg een verwarmde iOpener langs de linkerzijkant van de telefoon gedurende twee minuten.
-
-
-
-
Probeer nu op voorzichtige wijze, met behulp van de openingsplectrums, de achterste behuizing omhoog te wrikken.
-
Als je enige weerstand voelt, stop je met wrikken en gebruik je weer een openingsplectrum om enige overgebleven lijmresten door te snijden.
-
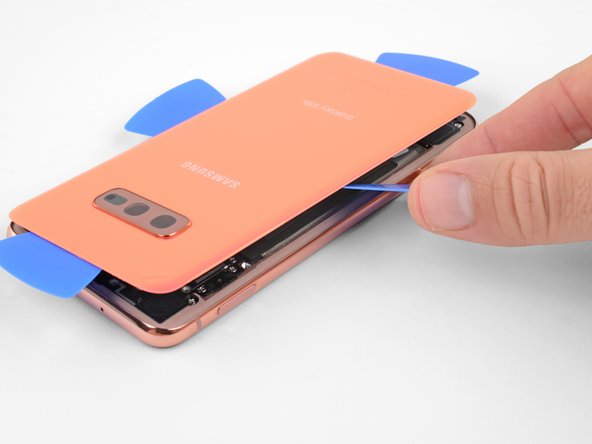
Verwijder de achterste behuizing.
-
-
This should be the very last step in the guide, but the edit button seems to only allow editing the content, not the positioning in the guide. Not sure how to fix this.
The photo seems to show someone lifting the old glue off with tweezers. That certainly wasn't true for my glue! I scrubbed it off with isopropyl alcohol and fabric. (Don't use a paper towel or Kleenex because they fall apart. I used a postage-stamp-size square cut from an old athletic sock. With this and the alcohol I was able to get the cover and the phone as clean as they were at the factory.
When doing this, hold the phone at an angle in your other hand so any alcohol dribble to the outside and not to anywhere important.
-
-
Verwijder de acht 3.9 mm Phillips schroeven die het bovenste gedeelte van het midframe aan de telefoon bevestigen.
Again, criminal lies! These screws have different length! Take notes which are where! There are at least 4 versions of antenna/coil modules, so each time it may be a little different.
Interesting observation! I did not see this comment until after I reassembled the midframe and closed everything, so I can not confirm. If true, I either got lucky or it didn't matter.
WL1 -
I'll note this and see about maintaining the same order for reinstallation -
Gee Foe -
The screws on my SM-G970F/DS were all identical.
-
-
-
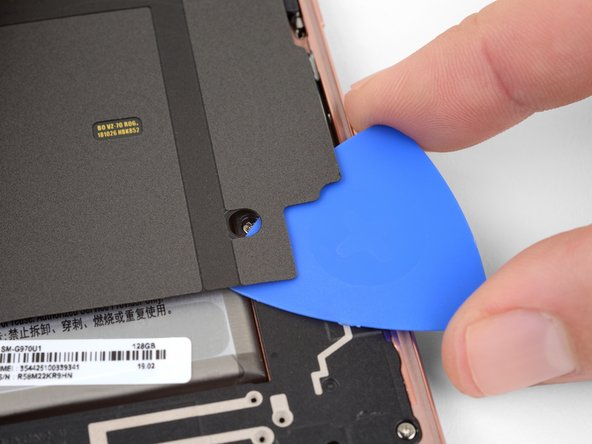
Steek de punt van een spudger in de smalle uitsparing aan de rechterkant van het plasticen deel van het bovenste midframe, dichtbij de Bixbyknop.
-
Gebruik de punt van je spudger om het midframe voorzichtig omhoog te duwen, weg van het chassis van de telefoon.
Criminals! These instructions are given for breaking your phone! Never use the puncher-picker! The antenna module, after gently unglued in the single spot, is pulled down! Not up! DOWN, I said! And it comes off without any force. Minimal force will be required to push it back (after putting it flat on place).
-
-
-
Til het midframe uit de telefoon aan het plasticen gedeelte.
In my phone there was a lot of residual adhesive on the top section, so I initially just flapped it over like a hinge while I finished the other steps. For me, I found, and it should be emphasized, for the reinstall, the top edge needs to be placed flat and snapped UP into the chassis for it to fit.
-
-
-
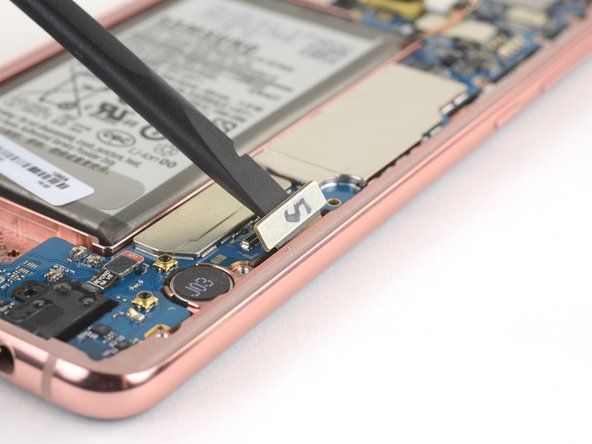
Gebruik het platte eind van een spudger om de batterijaansluiting in een rechte beweging omhoog te duwen van het contact en deze te ontkoppelen.
This manual is a pure SABOTAGE! Never pick up the connector from the camera side! You risk damaging the camera, and the connector itself. Pick it up gently in two steps from left first, then from right, if it does not jump up immediately.
-
-
-
Gebruik het platte einde van een spudger om de schermaansluiting uit het contact op het moederbord omhoog te duwen en los te koppelen.
-
-
-
Draai de telefoon om zodat het scherm naar boven wijst.
-
Leg een verwarmde iOpener gedurende twee minuten op de rechterkant van het scherm.
-
Schermnaad—deze naad bevindt zich boven het dunne, plasticen frame. Je zult langs de naad moeten wrikken om het scherm los te krijgen.
-
Framenaad—deze naad bevindt zich onder het dunne, plasticen frame. Wrik niet langs deze naad aangezien je daarmee riskeert het plasticen frame te beschadigen.
Absolutely useless -this otolaryngological warm-pad is made for treating sinusitis and ear inflammation. It will never heat up the phone frame to 90C. Use the hot-plate and hot-air gun. At least a good hairdrier may work.
-
-
-
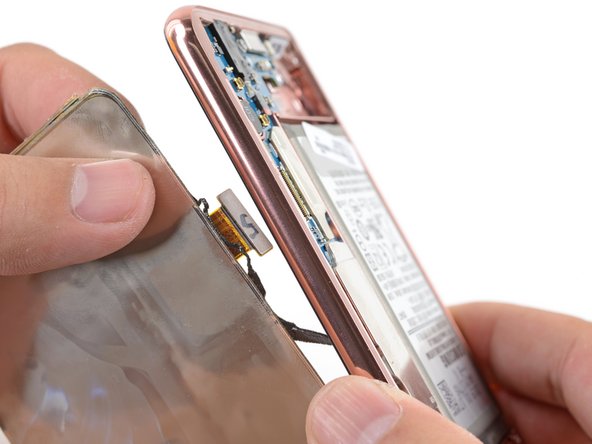
Til het glazen scherm omhoog en verwijder deze.
That's correct. If you were able to detach the screen without separating the layers, you can use it again.
-
-
-
Leg een verwarmde iOpener gedurende een minuut op het OLED-paneel om de lijm onder het paneel te verwarmen en te verzwakken.
-


Om je toestel weer in elkaar te zetten, volg je deze instructies in omgekeerde volgorde.
Breng je e-afval naar een door R2 of e-Stewards gecertificeerde recycler.
Ging je reparatie niet zoals gepland? Bezoek dan onze pagina over probleemoplossing of stel je vraag op ons antwoordenforum voor hulp bij het oplossen van je probleem.
Annuleren: ik heb deze handleiding niet afgemaakt.
15 andere personen hebben deze handleiding voltooid.
Met dank aan deze vertalers:
88%

Thomas Keulemans helpt ons de wereld te herstellen! Wil je bijdragen?
Begin met vertalen ›


L'écran OLED et la la batterie
Isidore LECHAT - Antwoord
My s10e is 4 years old now and I found glue had weakend and heating was uneccissary.
ervan.hady - Antwoord
I purchased my S10e refurbished, so the exact age and prior repairs are unknown. I believe it had ~200 charge cycles. After 2.5 years, the side adhesive started to fail and there was a noticeable slit under the rear cover. It was unclear if the lithium battery was starting to swell, which would have been a more dangerous thing. As such, 3 out of the 4 sides were easy to open just with sliding the pick.
I heated the iOpeners for 30s in my 1000W microwave and it reached a temp of 180oF. I placed this on the final corner and it released fairly easily.
WL1 - Antwoord
Is 180 degrees a good temperature to set the air temperature to if a heat gun is used?
Gee Foe -
Mine released without heat, just caught the edge with a fingernail and was able to work it free without any tools.
Gee Foe - Antwoord
I would definitely NOT use a heat gun; the iOpener is the right thing to use. I've repaired many devices and I have lots of heat guns, but a heat gun puts out a tremendous amount of heat, and spreads it everywhere instead of in a controlled manner. The iOpener is about 150 F -- just getting uncomfortable to touch -- and the heat is all in a thin strip. You want to gently heat the edges of the cover, not cook the battery and electronics. Smart phones are expensive and the iFixit tools are cheap. Don't risk your phone to save a few bucks.
MikeT-NYC - Antwoord