
Nintendo Wii Remote Front Cover Plate and Batteries Replacement
Inleiding
Ga naar stap 1Disassembling the case requires removing screws under the batteries. Removing anything inside requires this guide.
Wat je nodig hebt
Gereedschap


-
-
Flip the Wii Remote over so the battery cover faces you.
-
Push up on the bottom tab.
-
Remove the battery cover.
-
-
-
-
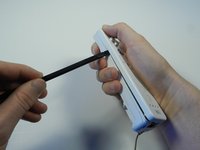
With the flat end of a spudger, gently apply pressure to the tabs located on left side of the controller.
-
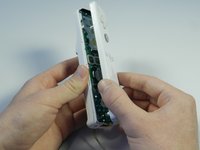
Open the front plate like a book.
Mine is not opening like a book? What do I do?
It stops short of explaining replacing rechargeable battery. Unless you’re referring to the AA’s which don’t involve removing cover
-


To reassemble your device, follow these instructions in reverse order.
To reassemble your device, follow these instructions in reverse order.
Annuleren: ik heb deze handleiding niet afgemaakt.
43 andere personen hebben deze handleiding voltooid.
Team

Cal Poly, Team 3-44, Amido Spring 2013 Lid van Cal Poly, Team 3-44, Amido Spring 2013
CPSU-AMIDO-S13S3G44
4 Leden
28 handleidingen geschreven
4 opmerkingen
Worked! Had to solder the tab to contact the battery which had broken. Saved $50.00.
The Tools section lists a Tri-Point Y1 Screwdriver but the guide mentions a Tri-Wing Y1 Screwdriver. This could cause people to purchase the wrong item.
iFixit’s guides seem to be based on the original Wii controller, model RVL-003. I’m not sure if Nintendo has changed fasteners for subsequent versions but the Wii MotionPlus Controller, model RVL-036, uses a Tri-Wing Y0 screw.
my battery cover is different. The batteries are attached to the actual cover and come out when the back is removed.
Kim Pearson - Antwoord