Deze vertaling geeft mogelijk niet de meest recente updates van de bronhandleiding weer. Help ons met het updaten van de vertaling of bekijk de bronhandleiding.
Inleiding
Gebruik deze handleiding om een kapotte of versleten batterij in je Motorola Moto Z2 Force te verwijderen of te vervangen.
Ontlaad de batterij van je toestel, voor je eigen veiligheid, tot onder de 25% voordat je met deze procedure begint. Dit verkleint het risico op een gevaarlijk ongeluk als de batterij tijdens de reparatie per ongeluk wordt doorboord of beschadigd. Neem, als je batterij gezwollen is, de juiste voorzorgsmaatregelen.
Waarschuwing: De schermmodule van dit toestel bestaat uit een rigide midframe en een flexibel plastic scherm die zich van elkaar kunnen scheiden tijdens het demonteren van het toestel. Excessief gebruik van warmte op het scherm kan er ook toe leiden dat er bubbels in het scherm komen of dat het scherm buigt, wat moeilijk te repareren is. Zorg dat je, als je van plan bent je scherm her te gebruiken, erg voorzichtig te werk gaat, alle waarschuwingen in acht neem en geen warmte gebruikt om het scherm te verwijderen.
Wat je nodig hebt
-
-
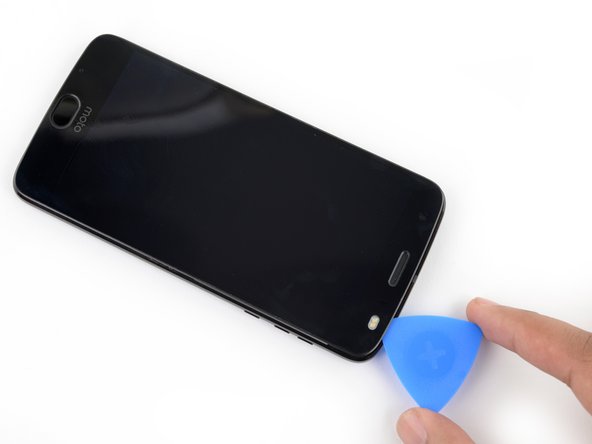
Om de zijkanten van de schermmodule los te maken uit het frame van de telefoon, zul je deze uit de grip van vijf metalen klemmen moeten losmaken.
-
Drie van deze klemmen bevinden zich aan de linkerzijde van het toestel, twee aan de rechterzijde.
-
Je zult het scherm rondom deze klemmen los moeten wrikken om het scherm los te krijgen uit alle klemmen.
-
Je kunt ervoor kiezen om een openingsplectrum langs de klemmen te schuiven, of je kunt kiezen om een plectrum aan een kant te laten zitten terwijl je de andere kant loswrikt met een andere plectrum.
-
-
-
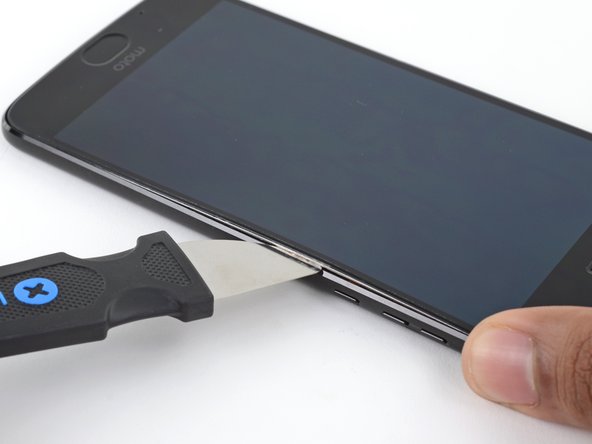
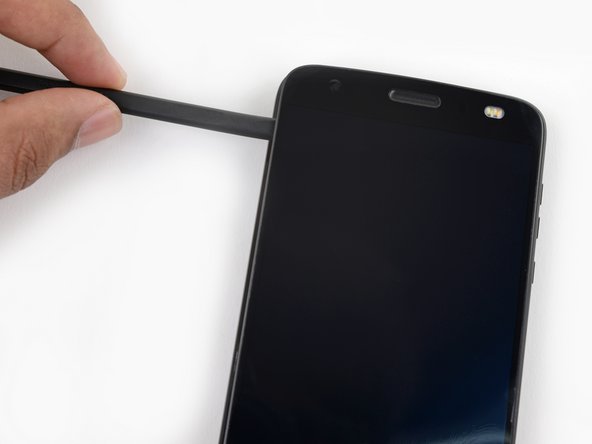
Steek een Jimmy of een andere metalen tool tussen de rechterzijde van het plastic scherm en het metalen frame, bij de knoppen aan de zijkant van de telefoon.
-
Kantel je Jimmy wat naar beneden terwijl je deze tegelijkertijd dieper in de opening duwt om de rechterzijde van de schermmodule omhoog te wrikken.
No — *slaps wrist* No. Bad steps! Don’t use the suction cup at all, ever. It causes the two layers to separate immediately, long before the frame clips give way to let the screen come off.
I’m being super ultra very careful with this second attempt on a new device (that was in pretty pristine condition, if I can keep it that way!), and right when I tried pulling as instructed, the screen layers started to pull apart. Use a blade shoved into the edge of the phone and pry it apart, releasing the latches in the process!
I have to agree with Matt above. At the smallest bit of pressure on the suction cup, the screen de-laminated from the metal base. It still “works”, but….
None of the tools in the kit is terribly suited for getting in there and prying that clip apart without splitting the screen.
lease Read the Comments poste on “STEP 2”, When you apply the heat, the screen becomes unglued from the metal fram that it is attached to. I ended up damaging my screen. You need to make sure that what is coming unglued is the metal, and not just the plastic screen. I found out when I saw another video, where they do not apply heat, they just use a tool to pry the frame-display assembly… But apparently it was too late… You should be more specific about the warning…
A jimmy does not come with the kit. Buy one before beginning this procedure. It is the best way to lift the screen assembly without damaging the assembly.
This whole guide has been rewritten since my last comment, and I super appreciate it. The steps are now much more appropriate and less likely to cause damage. Jamming your Jimmy (huehue) into the edge of the screen is actually quite a good idea, not likely to hit anything as there’s nothing but body underneath it.
-
-
-
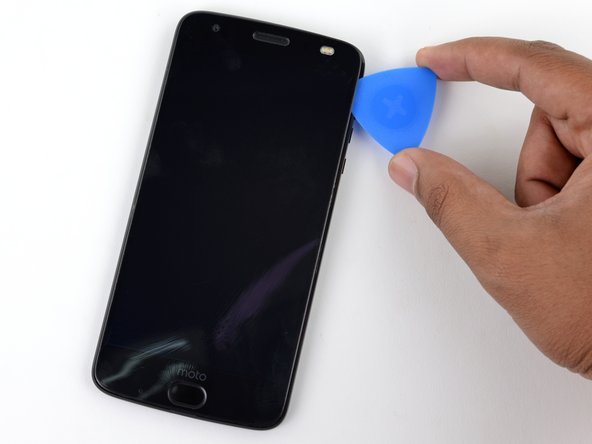
Schuif je openingsplectrum langs de gehele rechterzijde van het toestel om de klemmen en de lijm die de schermmodule op z'n plek houden respectievelijk los te maken en door te snijden.
this is really for the digitizer and screen replacement. there are still more steps for just the screen.
There is an enormous amount of adhesive sticking this thing together. As the adhesive is not essential (it holds together with clips, mostly), you really need to focus on *removing* the adhesive, so that it doesn’t stretch and bunch-up, preventing clean reassembly. Leave behind the adhesive that you can prevent from bunching-up (by cleanly breaking it, in turn by holding down one edge to the phone or screen), so you have some sticky left, but just make sure it’s not bunched-up.
Revisiting this comment a year later: there’s now replacement adhesive available (or maybe there always was - wish I knew!) for this model in the iFixit store. So, it would be best to remove the adhesive whereever you see it, cleaning everything up and preparing for the new adhesive. That darn adhesive in step 9 below, though… ugh. Work slow, don’t expect it to all be apart by this point.
-
-
-
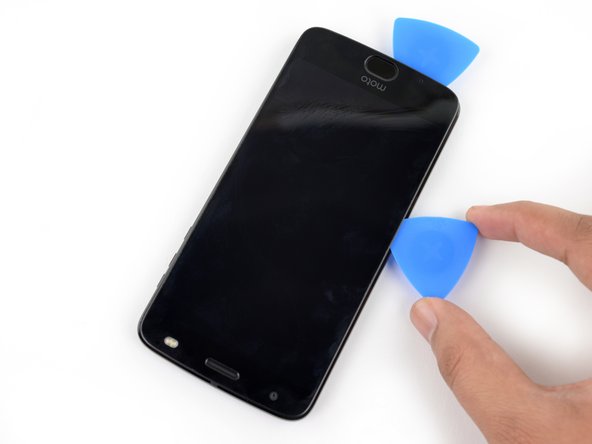
Als de rechterzijde van de schermmodule eenmaal los is, schuif je je plectrum langs de rechter onderhoek van het toestel, zodat deze onder de onderkant van de schermmodule komt te zitten.
-
Schuif je tool langs de gehele onderkant van de telefoon om de lijm aldaar door te snijden. Zorg ook dat je de schermmodule uit de klemmen losmaakt.
-
Laat je tool onder de onderkant van de schermmodule zitten om te voorkomen dat de lijm zich opnieuw aan het toestel gaat hechten. Ga verder met de volgende stap en gebruik een nieuwe tool.
-
-
-
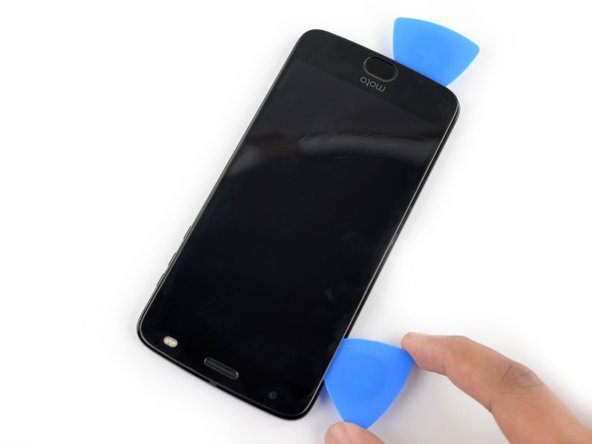
Steek een andere openingsplectrum onder de onderkant van de schermmodule en schuif deze langs de onderkant van het toestel, zodat deze onder de linkerkant van de schermmodule komt te zitten.
-
Schuif je tool langs de gehele linkerzijde omhoog om de schermmodule uit de metalen klemmen los te maken en de lijm die het scherm bevestigt door te snijden.
-
-
-
-
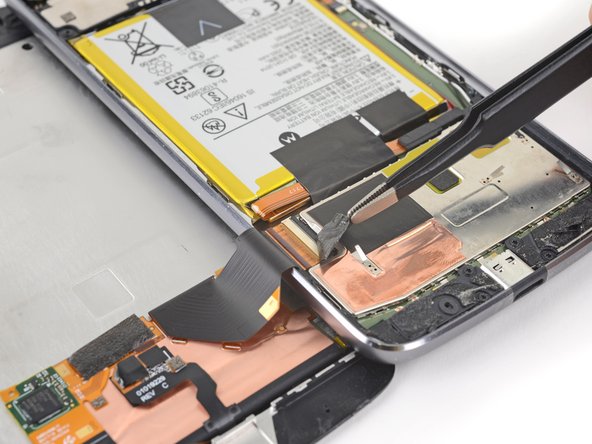
Er bevinden zich twee grote stukken lijm aan de bovenkant van de telefoon die de schermmodule bevestigen. Deze bevinden zich echter dieper in de telefoon dan de 4 mm die je al hebt doorgesneden.
-
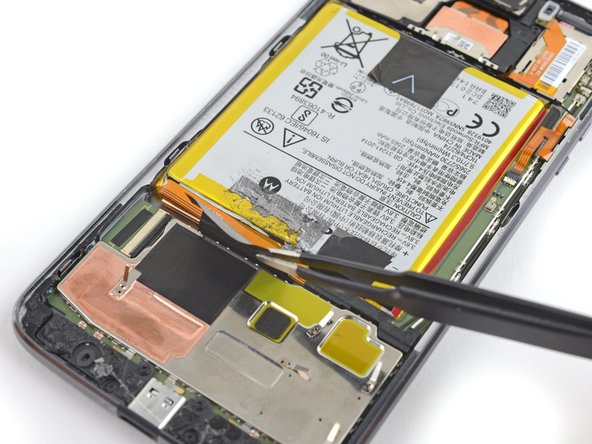
De naar voren gerichte sensoropstelling en -kabel ligt om het rechter stuk lijm heen, aan de rechter- en bovenkant. Als je deze dus vanaf de rechter- of bovenkant probeert los te wrikken, zul je de kabel beschadigen. De volgende stappen beschrijven hoe je de lijm vanaf de linkerkant kunt doorsnijden.
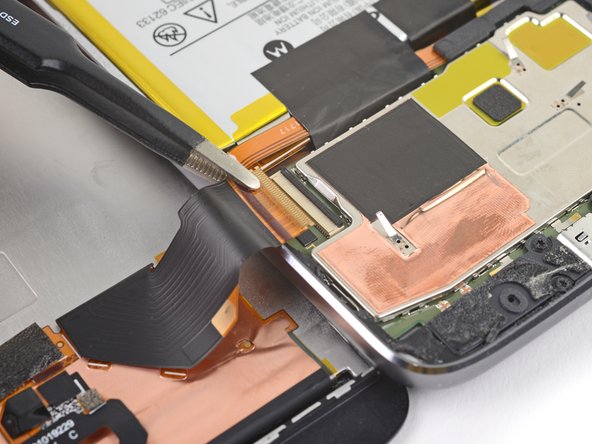
This is a tricky part. See the biggest red-squared section in the photo above? That part always wants to detach — the adhesive to the screen is stronger than the molding that holds the metal into the plastic. The metal will detach from the plastic pretty easily, and there’s no way to get that metal back into the plastic frame (as it seems to have been molded as a single part). So, the adhesive is a booby-trap.
To defuse the booby-trap, heat the heck out of it, insert one end of tweezers (or perhaps a spudger) from the right side, hold the metal plate down, and verrry slooowwly convince the adhesive to separate. At some point, it’ll start cascading and snap free.
The metal finger area, between the two red squared sections above, also is a problem area — it’s latched into a frame above the battery, and those latches can get pulled up on top of the frame, preventing the phone from reassembling clean and flat. Make sure to re-insert those tabs so that little edge with the metal fingers sits flat and proper.
-
-
-
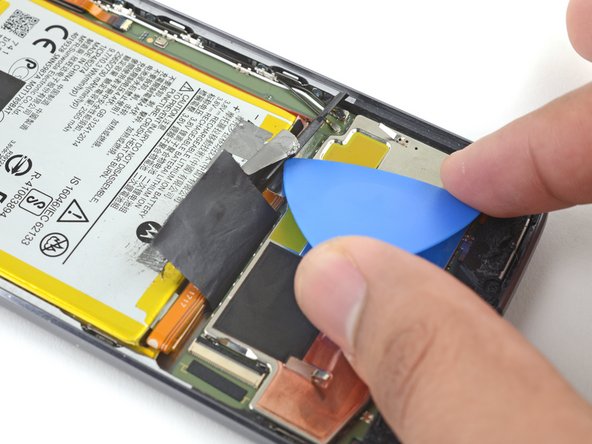
Steek een openingsplectrum zo diep mogelijk onder de linker bovenhoek van de schermmodule om het linker stuk lijm door te snijden.
I found that a plastic card inserted from the left side, and worked with a sawing motion, between the screen and the adhesive worked great after the adhesive was softened by the alcohol.
-
-
-
Schuif het platte einde van je spudger langzaam en voorzichtig onder de linkerzijde van de schermmodule. Duw je tool iets dieper om de bovenkant van de module omhoog te duwen en het rechter stuk lijm los te maken.
Again, pay careful attention to the strong block of adhesive sticking the display to a metal shield that’s molded into the plastic frame - the adhesive strength is quite likely to pull out the metal shield from the plastic frame and there’s no going back from that. Not as catastrophic as ripping a ribbon cable, but still pretty bad. See my comment a couple photos up about that.
I added some alcohol directly to the adhesive patches on this side of the phone and waited a couple of minutes before continuing with this step.
-
-
-
Til de schermmodule omhoog vanaf de rechterzijde en klap deze open. Aangezien de module linksonderin nog steeds aan het chassis van de telefoon vast zit, kun je de module nog niet volledig verwijderen.
-
Als de schermmodule vast blijft zitten, kun je de lijm nog een aantal keer proberen door te snijden, totdat de module los komt.
Do this only after slicing all the little ribbons of adhesive that hang around - and clean up any gummed-up, bunched-up strands of adhesive after removing it. I worked at detaching adhesive until the screen was totally free, only held by the ribbon cable, before moving on from this step.
-
-
-
Gebruik een pincet om het zwarte stuk tape over de batterijaansluiting te verwijderen.
-
-
-
Gebruik je spudger om de sluitklem op het ZIF-contact van de schermkabel open te klappen.
-
Gebruik een pincet om de schermkabel uit het contact te schuiven.
-
-
-
Verwijder de schermmodule.
When reconnecting the display ribbon I found it much easier if you straighten out major 45/90 degree bend that is in the middle of the ribbon until the entire ribbon is all unbent and in parallel with the display face. You will then have a straight shot into the connector without having to hold the display at a 90 degree angle to the chassis and then having to look around, over or through the display to (and if luck is with you) find, lineup and insert the ribbon into the connector. You have to do a little in 3 dimensional thinking to re-bend the ribbon and line the display back up with the chassis but if you’ve made it that far then you should have no problems. Don’t bend the ribbon back and forth too many times.
-
-
-
Gebruik een pincet om de twee zwarte stukken tape die de batterij bevestigen te verwijderen.
-
-
-
Gebruik een openingsplectrum om de kleine zwarte beugel over de batterijaansluiting omhoogte duwen. Deze is met een klein beetje lijm vastgemaakt.
-
Gebruik een pincet of je vingers om de beugel te verwijderen.
-
-
-
Gebruik een spudge rom de batterijaansluiting omhoog te duwen en de batterij los te koppelen.
-
-
-
Leg een verwarmde iOpener gedurende twee minuten op de achterkant van je toestel, direct achter de batterij, om de lijm eronder te verzwakken. Verwarm je iOpener zo vaak als nodig is.
-
Als alternatief kun je ervoor kiezen om wat hooggeconcentreerde isopropyl alcohol (>90%) langs alle kanten van de batterij toe te dienen om de lijm eronder te verzwakken.
-
-
-
Steek een flexibele plastic tool onder de linkerzijde van de batterij. Wij gebruiken in de afbeelding een openingsplectrum, maar je kunt ook een speelkaart gebruiken. Deze werkt langzamer maar is wel veiliger.
-
Wrik de batterij met een constante, stevige kracht omhoog.
-
Probeer de batterij langzaam maar zeker van de lijm eronder los te krijgen zonder de batterij daarbij te vervormen. Als de batterij begint te buigen, zul je langzamer moeten wrikken of meer warmte of isopropyl alcohol moeten gebruiken. Het kan nodig zijn dat je het verwarmen of toedienen van alcohol een aantal keer moet herhalen.
-
Duw je tool langzaam maar zeker steeds verder onder de batterij en ga verder met wrikken totdat de batterij volledig loskomt van de lijm eronder.
-


Vergelijk je vervangende onderdeel met het originele onderdeel — het kan zijn dat je meerdere onderdelen mee over moet zetten of beschermlagen voor de lijm moet verwijderen voordat je het nieuwe onderdeel kunt installeren.
Om je toestel weer in elkaar te zetten, volg je deze instructies in omgekeerde volgorde.
Kalibreer je nieuwe batterij voor een optimale performance: Laad je batterij in een keer op tot 100% en laat je toestel nog minimaal twee uur doorladen. Gebruik je toestel vervolgens totdat deze zich uitschakelt als gevolg van een lege batterij. Laad je batterij tot slot nog een keer ononderbroken op tot 100%.
Breng je e-afval naar een door R2 of e-Stewards gecertificeerde recycler.
Ging je reparatie niet zoals gepland? Check dan ons antwoordenforum voor hulp bij het oplossen van je probleem.
Annuleren: ik heb deze handleiding niet afgemaakt.
16 andere personen hebben deze handleiding voltooid.
Met dank aan deze vertalers:
88%

Thomas Keulemans helpt ons de wereld te herstellen! Wil je bijdragen?
Begin met vertalen ›

14 opmerkingen
Anyone knows where to get the lcd glue/tape/adhesive?
I got everything out, got a new battery, the screen works but the touchscreen doesn’t, anyone had the same problem?
Wow! This guide is way, way improved vs last week’s version! Nice work, Tarun! I picked up a “bad IMEI” copy of my Z2 Force on eBay to replace the damaged screen, and I’ll step my way through this when transplanting the screen. Thanks!
Please Read the Comments poste on “STEP 2”, When you apply the heat, the screen becomes unglued from the metal fram that it is attached to. I ended up damaging my screen. You need to make sure that what is coming unglued is the metal, and not just the plastic screen. I found out when I saw another video, where they do not apply heat, they just use a tool to pry the frame-display assembly… But apparently it was too late… You should be more specific about the warning…
I saw that video (i think it’s the same) on youtube too and it is misleading. It looks like they already removed the screen and did a second take for the video. There is no way the screen can be removed without heat. My phone was bulging and separated on the left side which gave me room to put the pick in but the adhesive was too strong to continue removing the entire screen. Once I used the iopener the pick was able to separate the screen without issue. I just moved slowly and didn’t use too much force.
jon -
Worked great! Thanks for the instructions. One must be patient and work slowly to separate the screen from the frame and since the screen is plastic it’ll take the iopener longer for heat to conduct through to the adhesive. I initially used the 90 minute rule on the iopener instructions but that wasn’t enough. I reread the OP’s instructions and used the two minute rule which worked great.
Add to Instructions: Remove all adhesive, especially around the perimeter, using the spudger or tip prior to reassembly. It’s very thin so be diligent. If you’re not careful, you’ll end up doubling up tape and the screen won’t sit flush. The precut display adhesive pattern only applies to the perimeter so make sure to cut additional adhesive for the areas at the top and bottom. Compare the screen adhesive pattern and you can see what areas that need the additional adhesive.
I used aluminum foil tape to re-adhere the conductive tape to the new battery. This tape is used to seal ventilation ducts for furnaces and AC systems.
Worked but almost damaged my screen. I have just a small black spot on one edge, that does not affect usability. I didn't had to remove the main board to remove the battery. When the camera was disassembled, I had enough space to go under the battery carefully with the spudger step by step and removed it without bending the battery.
I agree that the plastic card is the best tool to use for lifting the battery. It worked great with 2 minutes of the iOpener and a little alcohol. I used a gentle blower to dry the alcohol before reassembly. I found the entire process took about 40 minutes from start until I had books sitting on the phone to anchor the display and the charger plugged in to bring the battery up for the calibration.
Thanks for this guide….everything appears to bee working after putting it all back together. Now to see if replacing the battery fixes the random “where’s the battery?” screens I was getting. Note: I have an iOpener but never used it. Used 99% alcohol a few times to loosen the adhesive and that did the trick. Thoroughly cleaned the old adhesive round the edges and tried to preserve the adhesive patches at the top. With the replacement adhesive in the battery kit…phone looks like it was never taken apart.
Old phone gets new battery and it is working fine. Everything went as described. Tip: be sure to read the extra comments for each step to make things even easier. The hardest part for me was breaking the adhesive grip tape that seals and secures the perimeter between the case and display. Suggest you take your time, working slowly as eventually they do separate with damaging anything.
Ive done the screen and battery. Have you guys encountered boot looping with replacing them?
And if so how did you fix the bootloop. Using oem battery. I do not want to hard wipe it