Inleiding
Gebruik deze handleiding om het scherm van je iPad Air 3 verwijdert en vervangt. Deze handleiding is voor zowel de Wi-Fi als de cellulaire modellen.
De Touch ID-sensor van de thuisknop is aan het logic board gekoppeld. Om de Touch ID-functies te behouden, zul je dus de originele thuisknop naar je nieuwe schermmodule moeten overzetten.
Sommige afbeeldingen in deze handleiding tonen een ander model en bevatten dus licht visuele afwijkingen. Dit heeft echter geen invloed op de reparatieprocedure.
Wat je nodig hebt
-
-
Het kan nodig zijn dat je je toestel meerdere keren moet verwarmen om de lijm zacht genoeg te maken en te voorkomen dat deze weer hard wordt tijdens de reparatie.
-
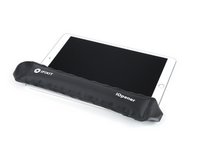
Verwarm een iOpener en leg deze gedurende ongeveer twee minuten op de onderkant van je iPad-scherm.
-
-
-
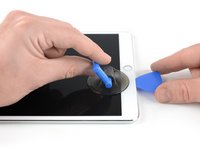
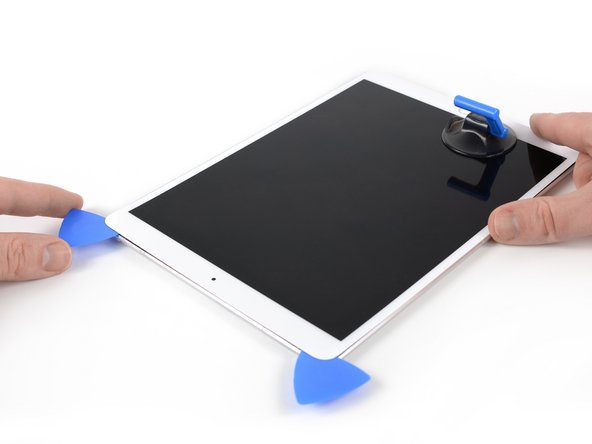
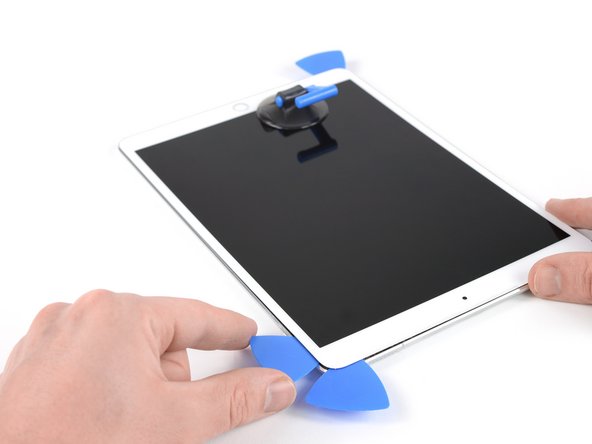
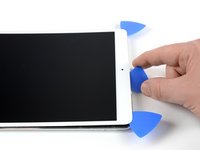
Druk een zuignap naast de thuisknop van de iPad en druk deze naar beneden om een vacuüm te creëren.
-
Trek de zuignap stevig omhoog om een kleine opening tussen het voorste paneel en de achterste behuizing te creëren.
-
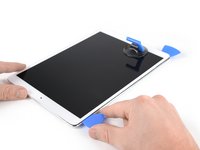
Als je eenmaal een opening hebt gecreëerd die groot genoeg is, steek je een openingsplectrum in de opening.
i used a proper suction tile puller (small one from DIY store used to hold bathroom tiles) to lift the screen off after heating around the edge using a heat gun. Be careful - It didn't damage anything. The tiny suction things that come with those iPhone kits are not strong enough for this. The one in picture might be good, but looks similar to the kits ones that have key ring.
The suction cup that comes with the iPad battery replacement is plenty large enough and strong enough.
CAUTION, do not push the picks in more than a the width of the replacement screen adhesive strips. You will damage the $200 screen, maybe break the glass. The screen is multiple layers and the picks can get in-between the layers if you push too far in. I got into trouble at the lower left corner. After getting the screen loose, I found that I only need a 2-3 millimeters on the sides and bottom, and four or five millimeters in the corners.
These comments need to be highlighted and added to the guide. The pictures showing the pick placement are very misleading. The thickness of the adhesive is only 2mm as you had mentioned! Waiting now for my replacement screen. Apples products look amazing but now I realize I would have been way better off just living with a one hour battery and or buying a new ipad.
-
-
-
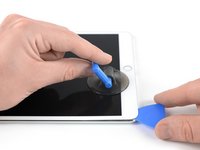
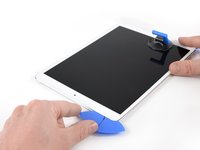
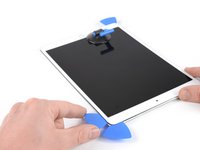
Snijd de lijm onder het scherm door door je plectrum langs de onderkant van het scherm richting de linker onderhoek te schuiven.
-
Laat je plectrum op z'n plek zitten om te voorkomen dat de lijm zich opnieuw gaat hechten.
-
-
-
Verwarm de linkerzijde van de iPad gedurende twee minuten, of totdat het toestel te warm is om comfortabel vast te houden.
-
Indien nodig, herverwarm je je iOpener voor een aantal seconden of tot deze ook te warm is om comfortabel aan te raken. Wees voorzichtig en voorkom dat je je iOpener oververhit. Bij oververhitting loop je het risico dat je iOpener openklapt.
-
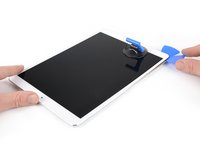
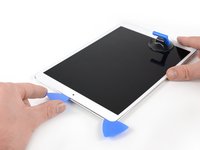
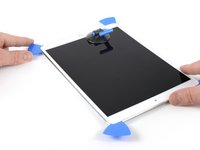
Steek een tweede openingsplectrum in de linker onderhoek van de iPad.
-
Schuif je tweede openingsplectrum langs de linkerzijde van het scherm omhoog om de lijm onder het scherm door te snijden.
-
Laat je openingsplectrum in de linker bovenhoek zitten om te voorkomen dat de lijm zich opnieuw gaat hechten.
-
-
-
Leg je iOpener tot slot gedurende twee minuten op de rechterzijde van de iPad of tot deze te warm is om comfortabel aan te raken.
-
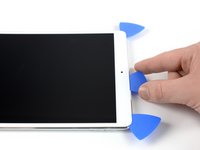
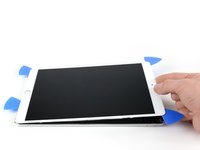
Breng een vierde openingsplectrum aan, in de rechter bovenhoek van de iPad.
-
Schuif je plectrum langs de rechterzijde naar de rechter onderhoek van de iPad om de lijm onderweg door te snijden.
-
Schuif je plectrum langs de rechter onderhoek—verwarm je toestel opnieuw indien nodig—en snijd de resterende lijm aan de onderkant door. Stop echter voordat je bij de thuisknop bent.
We must be very careful when we are prying left and right size bezel to peel off the screen as there very little gap between edges and LCD. Slightly inside push can crack LCD. We need to pay full care and raising edges very very slowly.
-
-
-
Steek een vijfde openingsplectrum in de opening aan de bovenkant van de iPad in de buurt van (maar niet direct op) de naar voren gerichte camera.
-
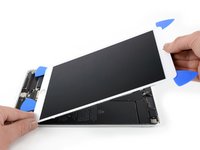
Kantel je plectrum op voorzichtige wijze om de schermmodule van de iPad-body te scheiden.
-
Gebruik, indien nodig, meer warmte en/of snijd de lijmresten door die voorkomen dat het scherm los komt.
Be very gentle when twisting. My screen broke in this step. I would not twist it but try to remove glue further as there is a aluminium support of the screen in the wide area beneath the light sensors and there is glue on that also preventing in easy lifting the screen. Just be careful not to damage the light sensors and camera.
-
-
-
-
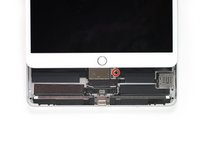
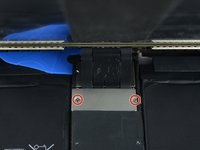
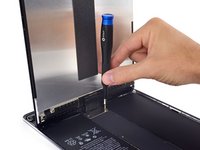
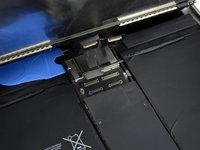
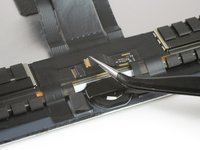
Til de schermmodule vanaf de bovenkant op en schuif het scherm vervolgens naar boven (door het naar je toe te trekken) richting de jack-aansluiting en de naar voren gerichte camera tot de schroef diede batterij-aansluiting bevestigt zichtbaar is.
How do you go about getting to this battery connector as it is covered by a large metal shield above the logic board, if you do not disconnect the battery you risk frying the back light.
The metal shield is not relevant for this. You can leave it in place or remove it if it comes of. Once the screw of the plate is removed you will be able to lift the print a little bit and put someting between the battery connector and the board connector. The connector is beneath the print. Look further on to see a deck card is used for this.
-
-
This picture looks nothing like my A2152 battery connector. I can’t really tell what is happening here.
This is an iPad Pro not an iPad Air which is different.
Dan -
-
-
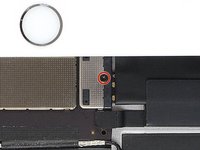
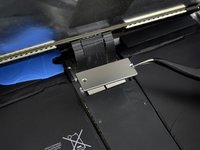
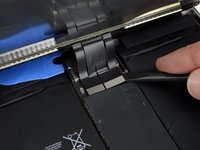
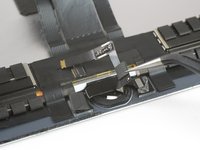
Om de batterij los te koppelen, schuif je de vork van de batterijblokker of de punt van een openingsplectrum onder de batterij-aansluiting om zeker te weten dat het circuit is onderbroken.
-
Laat de batterijblokker op z'n plek zitten terwijl je werkt.
I found it very hard to fit something under the battery power connector. I did not have a battery blocker, so I tried a playing card. I was not able to slide it between the springs. The section of the battery power connector, above the cantilever springs, did not seem to want to give at all, like in the picture above. If other people had success, I would love to hear how.
I didn’t have success either, but i kept myself grounded, and avoided battery contact as much as possible.
I used a playing card cut to shape. I had to make a couple, to try a few times.. It does go in eventually. Not deep, but enough to break connection. You can test by trying to switch on iPad.
It took some time but I was able to get it under the back part and slide it forward.
You must disconnect the battery before plugging the new screen. I think i didn't break the circuit in first attempt and shorted the screen, the result was half of the screen didn't work. I used a playing card. Second attempt was successful with new screen.
I believe I have a good solution to this problem. I was dissatisfied with the thickness of the battery blocker, or even a thin guitar pick, for that matter; both required force and I feared bending the springs or leaving the connection intact.
What worked for me was cutting a small strip of non-conductive, static-proof film (the kind that RAM and other sensitive components come in). There was every reason to trust in its non-conductivity but just to be sure, I used a VOM to test; its resistance was out of the VOMs range, meaning that its conductivity was nil. I used a spudger to gently lift the logic board off of the battery contacts and slid the non-conductive strip in between; went without a hitch.
When reassembling, I laid the strip on the battery contacts, laid the logic board on top, installed it, connected the display panel and gently drew the slip out and installed the battery screw. Worked like a charm.
These are some extremely misleading set of instructions and picture. Much better if you have the battery discharged, so don't need to worry about blocking the connector. But DO NOT force anything in the through the socket and certainly do not try to bend up the soldered cover, as it appears to be happening in the picture. You will break the connector, most likely resulting in ipad shutting down every 3 minutes from the notorious "thermal sensor missing" panic system crash.
-
-
-
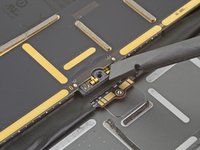
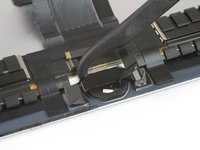
Til het scherm langzaam van de bovenkant weg en wees hierbij voorzichtig dat je de lintkabels niet beschadigt.
-
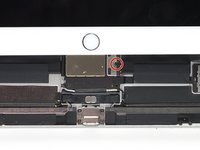
Verwijder de twee 1.3 mm lange Phillips-schroeven die de beschermende beugel op de schermaansluiting bevestigen.
-
Verwijder de beugel op de schermaansluiting.
Here it is very precocious steps to do. Flx cables to connectors are small in size and we cannot lift the display vertically. Therefore, we may struggle to unscrew the metal shield. We need to use smaller size of philip screw driver or place vertically the display to create enough gap between philip screw driver and the cover bracket. Similarly, when we are replacing new display we need to be carefully connect four flex cable with connectors with logic board.
agree, with re-assembly very tiny screws and awkward positioning, the back two cables pop off if not careful.
I did this step using just the tip of the PH000 screwdriver, it made it much easier to get my hands into the small space, the replacement screen from ifixit had tighter cables that I was not comfortable stretching out to go to a 90* angle to screw back on. Make sure your tip is magnetized for best results :)!
Meaning no disrespect for this excellent guide, I found this photo to be a bit misleading; at least in my case. It clearly shows about 90˚ between the case and the display. I tested the limits with the one I was repairing and could find no way to raise the display far enough to clear a screwdriver without jeopardizing the cables. I resorted to the same solution that Amber Wooldridge discovered; using a PH000 bit and hand-tightening. I had a tiny needle-nosed plier that I used to tighten them a bit (but very gently).
-
-
-
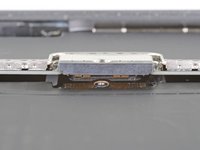
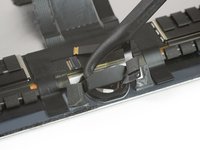
Gebruik je spudger om deze aansluitingen voorzichtig omhoog te duwen en los te koppelen.
I went to replace the LCD assembly on an ipad Air 3, and one of the flex cables on the new LCD assembly broke in half. The flex cables on the old assembly work well and are intact. Is it possible to transfer the old flex cable(s) to the new assembly, or can I solder the broken pieces of the new flex cable together? I have also contacted the part supplier about this and am awaiting a response.
-
-
-
Verwijder de schermmodule.
Definitely test your iPad’s functions before sealing it up. I needed to reopen the display to reconnect the display connectors in order to have the display functioning properly. As a result, the adhesive strips did not work as well and I needed to tape some of the edges closed with a small section of strong clear packing tape.
I stuck the adhesive to the chassis first. That was messy because the plastic that covers the adhesive seems to be for screen side first. So you end up exposing both sides and those collect dust. I now realise you're supposed to put the adhesive on screen first. Not sure if it would have made much difference in the outcome (mine screen is not stuck in some places).
I found this out too. I had two sealing kits and they were both meant to be fixed on the screen first. I did not managed to get the screen to stick with the body as well. Now used some B6000 glue in addition.
agrior -
-
-
-
Gebruik een iOpener of een föhn gedurende een minuut om het gebied rondom de thuisknop te verwarmen en zo de lijm die de thuisknop op z'n plek houdt te verzwakken.
-
-
-
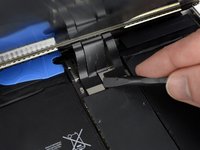
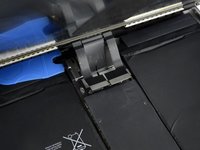
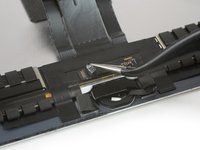
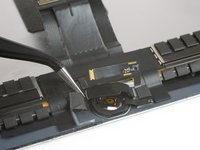
Gebruik een pincet om de tape die over de ZIF-aansluiting boven de thuisknop geplaatst is weg te trekken.
-
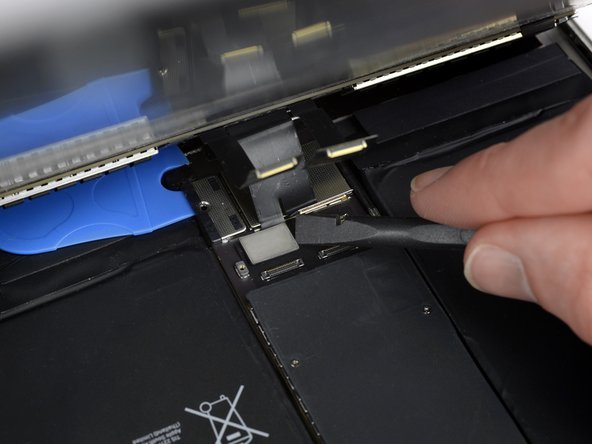
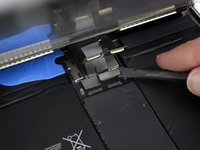
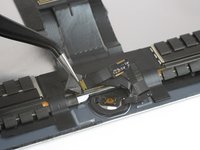
Gebruik de punt van een spudger, een openingstool of je vingernagel om de kleine, gescharnierde sluitklem op de ZIF-aansluiting van de thuisknopkabel open te klappen.
-
-
-
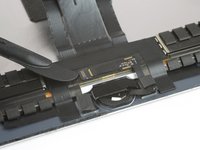
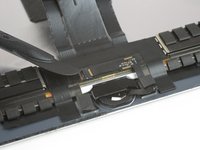
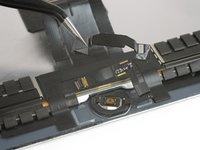
Til de beugel op de thuisknop vanaf de linkerkant rustig omhoog.
-
Trek de beugel vervolgens voorzichtig richting het scherm en voorkom hierbij dat je de thuisknopkabel beschadigt.
-
Schraap zo veel mogelijk van de oude lijmresten weg en maak het vervolgens schoon met wat aceton of isopropyl alcohol (>90%)
-
Bevestig de beugel met wat stevig hechtende lijm, secondelijm of sterke dubbelzijdige tape. Zorg dat je zeker weet dat de beugel op de goede positie zit voordat je 'm vastlijmt, anders kan het voorkomen dat je thuisknop niet klikt bij het indrukken.
You cannot use Tesa or double side tape under bracket. There is some greater technique or material we need to use. I tried super glue even, though, I really not work what original clicking sounds. It happens almost all digital home button related all iPad. We need to strive to find its accurate solution.
What width/size Tesa tape (mm) do we require?
I ordered tesla tape without noticing the width and ended up with 2mm tape. I used three strips of it for this step, so 6mm would be perfect for the home button bracket. Having said that, the 2mm size is probably better if you need it for attaching the display, but I never needed it for that because I loved how the pre-cut adhesive strips in step 16 worked really well.
hdh607 -
-
-
-
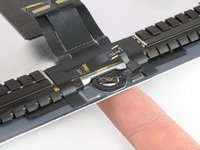
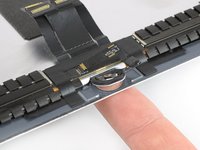
Gebruik het topje van je vinger om de thuisknop van onderaf door het gat in het scherm heen te duwen.
-
Wees extra voorzichtig als je scherm gebarsten is en zorg dat alle kleine glasscherven van de thuisknop verwijderd zijn voordat je deze in je nieuwe scherm bevestigt.
When we lift home button at very last stage, there is also ring/round plastic bracket that we need to peel off and re-attached to home button when transferring to the new display.
Do you glue the plastic ring on both sides , So is it glued to the lcd but also to the home button ?
Thanks for the tutorial, but it ends way to soon. The instructions on installing the new home button are vague, and there is nothing about when to remove the battery blocker or what adhesive is acceptable to use to reattach the screen. Would be great to see this tutorial cover everything from start to finish.
The responsive click is present, but does not have any function on the screen. Is there any correlation between the click and functionality, or did I maybe destroy the cable ?
If it physically clicks but does not invoke any action then maybe the cable does not sit properly inside the ZIF-connector or the cable might be damaged. Try to re-connect and make sure it’s in the ZIF-connector all the way.
I'v transferred a home button to a new screen and stuck it down with b-7000 adhesive. When I go to test and put the screen in place, I push the button but it seems to not stay stuck to the new screen. What should I do? I also have a white plastic ring that was part of the button. Should I have left it on there or remove it?
I changed the LCD but now its completely dim.
What might be the cause?
Either the cable is not installed correctly or You have blown the backlit ic. You will have to send it for micro soldering to replace the chip. Always make sure you disconnect the battery before any repair is performed.
-
-
-
Enkel het scherm blijft over.
When replacing the screen; the adhesive that came with the new screen is not that great or maybe i'm doing something wrong with it. The first time i used it, i heat gunned the edge, and parts of the screen still wouldn't stick. So i used a second set, and tried not to touch the adhesive, i used tweezers alot. It was a bit better second time, but, the case we have wraps around the edge of screen, and is basically holding giving extra confidence to hold screen on.
-


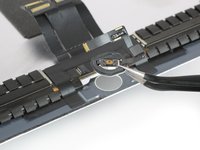

Vergelijk je nieuwe onderdeel met het originele onderdeel om te zien of je nog meer onderdelen mee over moet zetten. Dubbel-check ook of je beschermfolie moet verwijderen voordat je je nieuwe onderdeel plaatst.
Volg bovenstaande instructies in omgekeerde volgorde om je toestel weer in elkaar te zetten.
Breng je e-afval naar een door R2 of e-Stewards gecertificeerd recycle-station.
Ging je reparatie niet zoals gepland? Bezoek dan onze algemene probleemoplossingspagina of stel je vraag op ons iPad Air 3 Antwoordenforum voor hulp bij het oplossen van je probleem.
Annuleren: ik heb deze handleiding niet afgemaakt.
18 andere personen hebben deze handleiding voltooid.
Met dank aan deze vertalers:
100%

Thomas Keulemans helpt ons de wereld te herstellen! Wil je bijdragen?
Begin met vertalen ›

2 opmerkingen
I used this guide to remove and replace a cracked screen from iPad Air 3 successfully. My comments are in the sections above , i summarise here (1) i used a proper suction tile puller (small one from DIY store used to hold bathroom tiles) to lift the screen off after heating around the edge using a heat gun. (2) You must disconnect the battery before plugging the new screen. I think i didn't break the circuit in first attempt and shorted the screen, the result was half of the screen didn't work. I used playing card. (3) The adhesive that came with the new screen is not that great or maybe i'm doing something wrong with it. The first time i used it, i heat gunned the edge (adhesive on), and parts of the screen still wouldn't stick. So i used a second set, and tried not to touch the adhesive, i used tweezers alot. It was a bit better second time, but, the case we have wraps over screen, holds it on.
I used the guide as well and the replacement went well except the home button. The touch-id sensor is working, but until I have new glue, I need to use Assistive touch. Guess I need to glue the home button a bit more.