Deze vertaling geeft mogelijk niet de meest recente updates van de bronhandleiding weer. Help ons met het updaten van de vertaling of bekijk de bronhandleiding.
Inleiding
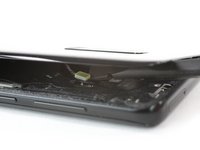
Gebruik deze handleiding om de batterij in je Samsung Galaxy S9 Plus te vervangen.
Het openen van de Samsung Galaxy S9 Plus zal de waterdichte sluiting van de telefoon aantasten. Als je deze niet vervangt, zal je telefoon gewoon functioneren, maar zal deze niet meer waterdicht zijn.
Ontlaad de batterij, voordat je begint met het uit elkaar halen van je telefoon, tot onder de 25%. Verwarm je telefoon niet als je batterij gezwollen is. Gezwollen batterijen kunnen erg gevaarlijk zijn, dus zorg ervoor dat je oogbescherming draagt en voorzichtig bent of je toestel in dat geval naar een professional brengt als je niet zeker weet hoe je dit moet aanpakken.
Je zult vervangende kleefstrips nodig hebben om sommige onderdelen te bevestigen bij het weer in elkaar zetten van je toestel.
Wat je nodig hebt
Video overzicht
-
-
Zet je telefoon uit.
-
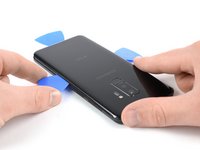
Gebruik een iOpener om de lijm onder de glazen achterkant te verzachten. Leg deze op de telefoon gedurende twee minuten. Het kan zijn dat je deze stap een aantal keer moet herhalen gedurende het proces.
-
-
-
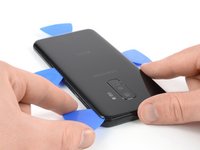
In de komende stappen ga je de kleefstrips doorsnijden die de achterkant aan de telefoon bevestigen.
-
Je gaat de strips doorsnijden op de plaatsen die je op de foto kunt zien:
-
Dikke laag aan kleefmiddel
-
Dunne laag aan kleefmiddel
-
Voorkom dat je snijdt of wrikt in dit gebied om zo de flexbkabel van de vingerafdruksensor te beschermen.
The yellow portion labeled "Avoid prying in this area" is also pretty heavily glued. I had luck using heat to soften it, but I messed up my fingerprint sensor because the image above is mirrored - I sliced through the right side because the image says it's on the left. The fingerprint sensor cable is actually on the right (when viewing the back side of the phone) on the same side as the phone's volume control.
-
-
-
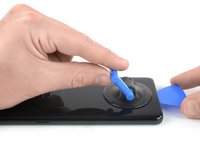
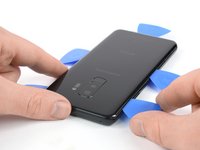
Druk een zuignap op de glazen achterkant.
-
Til de onderkant van de glazen achterkant omhoog met behulp van de zuignap, zodat er een kleine ruimte vrijkomt tussen de achterkant en het frame van de telefoon.
-
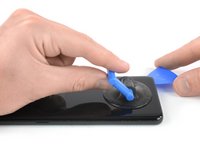
Steek een openingsplectrum in de zojuist gecreëerde opening en schuif deze naar de rechter onderhoek.
This is the most challenging part. The suction cup can barely hold for the amount of force required...but here's a tip, especially for the first-timers like me. It's not obvious in this image, but the back, curved as it is as it attaches to the frame, is curved because the surface under the back is also curved. Therefore, using an angle for the pick that's a bit tilted up will help to get under the back, and get the cutting of the adhesive started.
Don't let that give you too much confidence, though. Sufficient heating of the back, to make the adhesive soft enough to yield to the several picks, is essential. Go slow, if you go too fast, or don't have enough heat, you WILL break the glass...as I did. Replacements, fortunately, are easy to find and not too expensive.
-
-
-
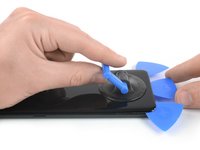
Schuif de punt van een openingsplectrum vanaf de linker onderhoek langs de linkerzijkant van de S9 Plus.
-
Laat je plectrum halverwege de zijkant zitten nadat je de lijm ermee hebt doorgesneden.
-
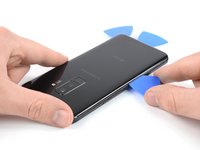
Schuif je openingsplectrum van de rechter onderhoek omhoog tot halverwege de zijkant van het frame en laat ook deze zitten.
-
-
-
Steek een vierde openingsplectrum in de opening aan de rechterkant van het frame en schuif deze naar de rechter bovenhoek.
-
Steek een vijfde openingsplectrum langs de linkerzijde van de telefoon omhoog richting de linker bovenhoek.
-
Gebruik je openingsplectrum om de overgebleven lijm onder het bovenste deel van de glazen achterkant door te snijden.
-
-
-
-
Til voorzichtig de glazen achterkant omhoog aan de kant van de volumeknop.
-
Gebruik de zijde van een spudger om de flexkabel van de vingerafdruksensor omhoog te duwen en los te koppelen.
I also have a G965U model S9+, and its fingerprint read also remained in the back glass.
It's easier to pop the button up than it is to reattach it when reassembling the phone. Well, I sure hope it goes better for you than it did me. (:
-
-
-
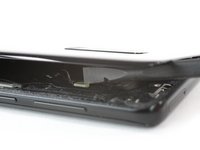
Verwijder de glazen achterkant.
Is it necessary to replace the rear glass adhesive? I have given up on water resistance, just want it to hold in one piece.
Hi Zachary,
in order to assure that the rear glass sticks to the rest of the phone assembly you have to replace the rear glass adhesive once you removed the rear glass. However you can use a narrow and strong double sided tape, tesa tape or our precut adhesive card. All of these will do their job however as you just mentioned you will lose the water protection of your phone. Before installing all of these it is very important to remove the old adhesive backings (for example with high isopropyl alcohol 90% or higher).
Sadly it's not possible to replace the rear glass without new adhesive.
-
-
-
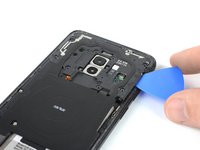
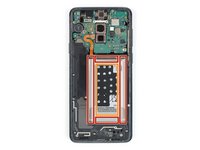
Verwijder de negen 4 mm Phillips #00 schroeven.
Don´t forget to unscrew the two screws on the left side (one near the battery, and one near the edge).
11 screws need to be removed here. Watch the video to confirm the remaining 2.
The 9 screws shown won't let the bracket up unless you finish with the 2 more screws. (near edge and bottom of the bracket).
-
-
-
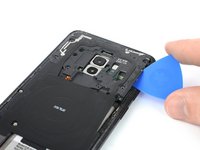
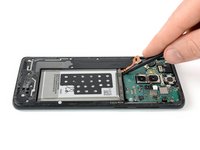
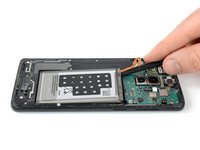
Schuif een openingsplectrum onder de rechterzijde van het plasticen paneel dat de NFC-antenne en de oplaadspoel bevat.
-
Kantel je openingsplectrum naar de zijkant om het plasticen paneel uit de plastic klemmen te tillen.
-
Doe dit rondom het gehele plasticen paneel om deze zo uit de plastic klemmen te krijgen.
I used a pointed metal spudger to pop that piece. The picks were more difficult here. There's an arrow that points the spot that needs to be opened.
-
-
-
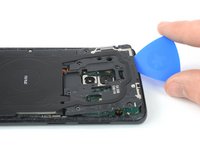
Gebruik het platte eind van een spudger om de flexkabel van de batterij op te tillen en te ontkoppelen.
-
-
-
Gebruik een iOpener om de lijm onder de batterij te verzachten. Leg de iOpener minstens twee minuten op je telefoon.
-
Gebruik in de stap daarna je spudger enkel in de rood gemarkeerde gebieden, waar de lijm van de batterij zit.
-
Vermijd dit gebied. Er zit een gat in het frame direct onder de batterij en via dit gat kun je per ongeluk het scherm beschadigen.
A hairdryer, pizza oven infrared thermometer and 60C did the trick for me.
-
-
-
Schuif het platte einde van een spudger onder de linker bovenhoek van de batterij, waar de flexkabel ook zit, en duw deze rustig omhoog.
-
Herhaal dit langs de gehele linkerzijde en maak zo, met de spudger, de lijm los die de batterij vasthoudt.
Hello Laurence,
there is no risk that the panel gets damaged by the alcohol. The alcohol is relatively pure and will evaporate quickly.
Hello, I replace the battery but I scratched the central part where the battery was lying on. As a result, on the screen there is a bad green permanent vertical line. I could go on for a couple of months, but there is a way to replace that part as well? Is now my phone dangerous for myself?
Hi simnmr69,
it seems like you damaged your screen during the battery removal. You can replace the screen as well following this guide. However a damaged screen won't be dangerous for you when using the phone but take care to use a new and undamaged battery since a punctured or bent battery may leak dangerous chemicals or cause a thermal event.
I used glue to adhere the battery, T-7000 kind from Amazon store. I didn't put it on the glass but rather the outer edge of the battery.
-
-
-
Schuif de spudger nu onder de rechter bovenhoek van de batterij en duw deze kant omhoog.
It took me like 25 minutes to get my battery out. I have a heat gun that was relatively helpful here but prying seemed to work as long as the adhesive was softened.
-
-
-
Verwijder de batterij.
Anyone know the purpose of the black piece with the holes in it? Do I need to transfer it to the new battery?
It is a foam sticker and most likely for transferring heat form the battery to the NFC antenna and to the rear case. If the new battery comes with one pre-installed–lucky you, if not, don’t worry you’ll be fine, too.
Where is a video for placement of glue stickers??
or how to remove the old glue, especially from the rear of the back case lol. Otherwise the kit is very comprehensive
after replacing the battery using the Ifixit kit on my S9+ and following the correct procedure for charging the new battery, its still showing up on the Samsung Members app, Diagnostics as being weak and that it needs replacing. I have charged and used the device normally for the last few days and it still fails the test. Am not impressed.
-


Om je toestel weer in elkaar te zetten, volg je deze instructies in omgekeerde volgorde.
Zet je telefoon, om te testen of je reparatie is geslaagd, aan voordat je de nieuwe kleefstrips installeert en je de telefoon sluit.
Kalibreer, voor een optimale performance, je nieuw geplaatste batterij: laad deze op tot 100% en blijf deze opladen voor minstens twee uur langer. Gebruik je telefoon vervolgens totdat de batterij volledig leeg is en je telefoon daarom uitvalt. Laad je telefoon, tot slot, weer helemaal op naar 100%.
Breng je e-afval naar een R2 of e-Stewards gecertificeerde recycler.
Ging je reparatie niet zoals gepland? Check dan ons Antwoordenforum voor hulp om je probleem op te lossen.
Annuleren: ik heb deze handleiding niet afgemaakt.
55 andere personen hebben deze handleiding voltooid.
Met dank aan deze vertalers:
62%

Thomas Keulemans helpt ons de wereld te herstellen! Wil je bijdragen?
Begin met vertalen ›


7 opmerkingen
Just be careful to remember to try phone parts (such as, battery recharging OBV, Fingerprint sensor…) before closing with the new cover.
Also remember to attach the Wireless card before doing the battery test otherwise the phone will say that can’t charge because the phone is too cold.
That’s because on the wireless charger module there is the heat sensor.
Missed one of the most important parts: Where and how do you install the adhesive pieces? There are a lot of them and the linked article doesn't even come close to explaining it for this phone.
Good instruction, I was successful replacing the battery however I accidentally damaged the fingerprint scanner cable because the image showed above is mirrored and I sliced too far in on the wrong side.
Also, a brief note on which adhesives can/should be removed before reassembling would be very helpful.
Re-assembly is not as straightforward as using the reverse order as above as you need to remove all the old adhesive and re-apply the adhesive supplied with the kit. It's not obvious where the upper and lower adhesive parts go - the following ifixit youtube is very useful at working out where and how to re-apply the adhesive:
How To Re-Apply Adhesive to Your Samsung Galaxy Phone! - YouTube
Hello Flavio, can you describe the problem in detail. I have connected the wireless card before the battery and i have receive the triangle with red thermometer and said can’t charge because the phone is too cold. Any advices? Thanks in advanced
I don't know how much longer should I use for the min heat gun.
Hui Chen - Antwoord
Only heat it up so you can still handle the phone. That depends on your heat gun. Wearing (ESD-)gloves might give you some extra degrees.
Tobias Isakeit -
It is very very hard to remove the back glass due to the adesive… I don't know if it is possibile (at least for everyone) to remove it wothout broking the glass
Luigi - Antwoord
This is nearly impossible without breaking the glass or risking overheating. I would say apply heat repetitively for 6-8 minutes. The very most adhesive is across the bottom so push the pry stick way in. I generally start on the rear side.
Thomas Hayes - Antwoord
Whoah NO. It will damage the camera and other sensitive electronics.
D Harlo -
Heating the back is essential, challenging, frustrating and, for first-timers such as myself, seemingly impossble, but I will say don't give up...I'll have another comment later.
cbclistener - Antwoord
I tried with the iopener but I gave in after three attempts. I then used a hairdryer and a pizza oven infrared thermometer, heating in increments. 60C did the trick and I was able to get the first pick in. Further heating was necessary to ease the rest of the back off, all to 60C.
Chris Harrison - Antwoord