Ga door naar hoofdinhoud
Nintendo 3DS D-pad Replacement

Nintendo 3DS D-pad Replacement

David Hodson

David Hodson en 7 andere bijdragers

Voor het laatst geüpdatet op August 1, 2024

45 minuten - 2 uren
Gemiddeld

Replace the D-pad on your 3DS to get full movement capabilities back.

Wat je nodig hebt

Gereedschap

  • Phillips #00 Screwdriver
    Phillips #00 Screwdriver
  • Tweezers
    Tweezers
  • iFixit Opening Tool
    iFixit Opening Tool
  • Spudger
    Spudger

Toon meer…

  1. Nintendo 3DS D-pad Replacement, Loosen the rear screws: stap 1, afbeelding 1 van 1
    Gereedschap gebruikt in deze stap:
    Phillips #00 Screwdriver
    $5.49
    • Use a Phillips PH00 screwdriver to loosen the four screws along the top of the back cover.

    • All screws in this device are JIS screws. Official iFixit PH000-PH1 Phillips screwdrivers are designed to be compatible with JIS screws, so they are safe to use. Using a screwdriver other than an official iFixit screwdriver or a JIS screwdriver may result in stripped screws.

    • The screws are held in place by locking washers, and will not come out of the back cover.

  2. Nintendo 3DS D-pad Replacement, Remove the rear cover: stap 2, afbeelding 1 van 2 Nintendo 3DS D-pad Replacement, Remove the rear cover: stap 2, afbeelding 2 van 2
    • Hold the device in one hand and turn it over.

    • Grab the top edge of the back cover with your opposite hand so that the cover does not fall back into place.

    • Flip the 3DS over again so that the back cover is facing up.

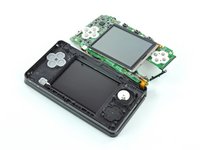
    • Pull the back cover up and away from the rest of the device to remove it.

  3. Nintendo 3DS D-pad Replacement, Battery: stap 3, afbeelding 1 van 3 Nintendo 3DS D-pad Replacement, Battery: stap 3, afbeelding 2 van 3 Nintendo 3DS D-pad Replacement, Battery: stap 3, afbeelding 3 van 3
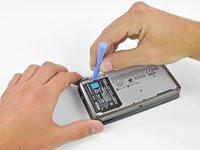
    • Insert a plastic opening tool into the notch in the lower case above the battery.

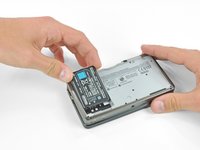
    • Pry the battery up with the plastic opening tool.

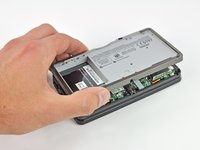
    • Grab the top edge of the battery and lift it out of the lower case.

  4. Nintendo 3DS D-pad Replacement, Lower Case: stap 4, afbeelding 1 van 1
    • Use a JIS #00 screwdriver to remove the nine 6.3 mm black screws from the lower case.

    • JIS (Japanese Industrial Standards) screws are not the same as Phillips. To avoid stripping these screws, make sure you are using a JIS #00 screwdriver and not a PHILLIPS #00 screwdriver. You can use a PHILLIPS #00 with a lot of downwards force but be warned this will deform the screw head and you risk stripping it.

    • iFixit's Phillips head screwdriver is desinged to reduce damage on JIS head screws so it should be fine to use, still apply more force. Make sure it's iFixit's official Phillips screwdriver as we are unaware of any other manufacturer who does this.

    • Use a JIS #00 screwdriver to remove the 2.4 mm silver screw above the game cartridge slot.

  5. Nintendo 3DS D-pad Replacement: stap 5, afbeelding 1 van 3 Nintendo 3DS D-pad Replacement: stap 5, afbeelding 2 van 3 Nintendo 3DS D-pad Replacement: stap 5, afbeelding 3 van 3
    • Lift the bottom edge of the lower case off the rest of the 3DS.

    • There are still two ribbon cables connecting the mother board to the case, so be sure not to pull the lower case all the way off.

    • Use a plastic opening tool to pry the shoulder button ribbon cables off their sockets on the motherboard.

    • Remove the lower case from the device.

  6. Nintendo 3DS D-pad Replacement, Circle Pad Joystick: stap 6, afbeelding 1 van 1
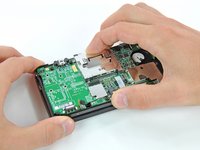
    • Remove the two 7.7 mm Phillips screws securing the back of the Circle Pad to the motherboard.

  7. Nintendo 3DS D-pad Replacement: stap 7, afbeelding 1 van 3 Nintendo 3DS D-pad Replacement: stap 7, afbeelding 2 van 3 Nintendo 3DS D-pad Replacement: stap 7, afbeelding 3 van 3
    • Use the flat end of a spudger to pry the back of the Circle Pad off the motherboard.

    • Lift the Circle Pad joystick off the motherboard and lay it on its back so that the ribbon cable connector is accessible.

  8. Nintendo 3DS D-pad Replacement: stap 8, afbeelding 1 van 3 Nintendo 3DS D-pad Replacement: stap 8, afbeelding 2 van 3 Nintendo 3DS D-pad Replacement: stap 8, afbeelding 3 van 3
    • Use the flat end of a spudger or your fingernail to flip up the retaining flap on the Circle Pad ribbon cable ZIF socket.

    • Be sure you are prying up on the hinged retaining flap, not the socket itself.

    • Lift the Circle Pad joystick off the motherboard.

  9. Nintendo 3DS D-pad Replacement: stap 9, afbeelding 1 van 2 Nintendo 3DS D-pad Replacement: stap 9, afbeelding 2 van 2
    • To decrease the chance of losing it during repairs, you may want to remove the two thin pads underneath the Circle Pad joystick.

    • Use a spudger or screwdriver to lift the pads up and remove them from the device.

  10. Nintendo 3DS D-pad Replacement, SD Board: stap 10, afbeelding 1 van 1
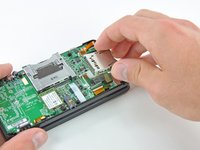
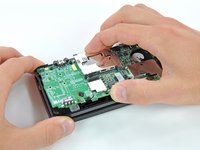
    • Remove the two 4.5 mm Phillips screws securing the SD board to the motherboard.

  11. Nintendo 3DS D-pad Replacement: stap 11, afbeelding 1 van 2 Nintendo 3DS D-pad Replacement: stap 11, afbeelding 2 van 2
    • Use the flat end of a spudger to pry the SD board ribbon cable connector off its socket on the motherboard.

  12. Nintendo 3DS D-pad Replacement: stap 12, afbeelding 1 van 3 Nintendo 3DS D-pad Replacement: stap 12, afbeelding 2 van 3 Nintendo 3DS D-pad Replacement: stap 12, afbeelding 3 van 3
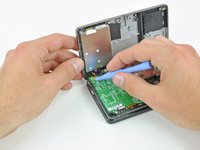
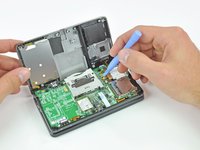
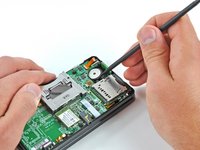
    • Insert the flat end of a spudger between the SD board and the motherboard.

    • Pry up slowly to loosen the SD board from the RF shield underneath it. If you pry too quickly, you may tear the shield or break its solder points.

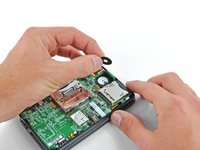
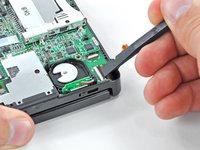
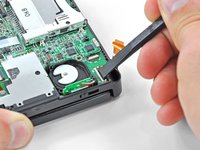
    • Run the spudger along the sides of the SD board to free it from the adhesive holding it in place.

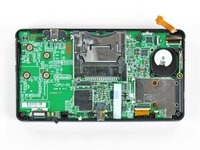
    • Once completely freed, lift the SD board straight off the motherboard.

  13. Nintendo 3DS D-pad Replacement, Pry the Wi-Fi card up: stap 13, afbeelding 1 van 2 Nintendo 3DS D-pad Replacement, Pry the Wi-Fi card up: stap 13, afbeelding 2 van 2
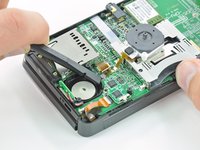
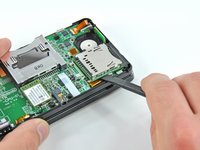
    • Slide the flat end of a spudger under the corner of the Wi-Fi board, and lift it away from the motherboard.

    • The Wi-Fi antenna cable is still connected to the Wi-Fi board, so you cannot completely remove the Wi-Fi board yet.

  14. Nintendo 3DS D-pad Replacement, Disconnect the Wi-Fi board: stap 14, afbeelding 1 van 3 Nintendo 3DS D-pad Replacement, Disconnect the Wi-Fi board: stap 14, afbeelding 2 van 3 Nintendo 3DS D-pad Replacement, Disconnect the Wi-Fi board: stap 14, afbeelding 3 van 3
    • Lift the Wi-Fi board off the motherboard and rotate it so that the bottom side is facing up.

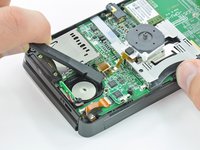
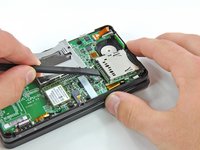
    • Use the flat end of a spudger to pry the Wi-Fi antenna cable connector off its socket on the Wi-Fi board.

    • Remove the Wi-Fi board from the device.

  15. Nintendo 3DS D-pad Replacement, Motherboard Assembly: stap 15, afbeelding 1 van 2 Nintendo 3DS D-pad Replacement, Motherboard Assembly: stap 15, afbeelding 2 van 2
    Gereedschap gebruikt in deze stap:
    Tweezers
    $4.99
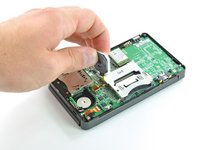
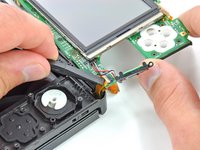
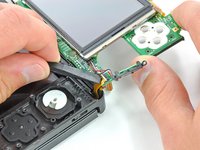
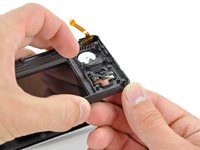
    • Grasp the microphone ribbon cable near the microphone with a pair of tweezers.

    • Pull the microphone straight up out of the upper case.

  16. Nintendo 3DS D-pad Replacement: stap 16, afbeelding 1 van 3 Nintendo 3DS D-pad Replacement: stap 16, afbeelding 2 van 3 Nintendo 3DS D-pad Replacement: stap 16, afbeelding 3 van 3
    • Use the flat end of a spudger or your fingernail to flip up the retaining flap on the speaker assembly ribbon cable ZIF socket.

    • Be sure you are prying up on the hinged retaining flap, NOT the socket itself. Damaging the socket or cable will result in a 3DS that will blink its power LED when you press the power button - and do nothing else.

    • Disconnect the speaker assembly ribbon cable with a pair of tweezers.

  17. Nintendo 3DS D-pad Replacement: stap 17, afbeelding 1 van 2 Nintendo 3DS D-pad Replacement: stap 17, afbeelding 2 van 2
    • Use the flat end of a spudger or your fingernail to flip up the retaining flap on the camera ribbon cable ZIF socket.

    • Be sure you are prying up on the hinged retaining flap, not the socket itself.

    • When reassembling, note that the gold contacts face toward the motherboard (as opposed to the camera cable's gold contacts facing away).

  18. Nintendo 3DS D-pad Replacement: stap 18, afbeelding 1 van 3 Nintendo 3DS D-pad Replacement: stap 18, afbeelding 2 van 3 Nintendo 3DS D-pad Replacement: stap 18, afbeelding 3 van 3
    • Remove seven Phillips screws securing the motherboard to the upper case:

    • Four 2.5 mm gold screws

    • Two 3.5 mm black screws

    • One 2.5 mm silver screw

    • When you remove this screw the volume slider can fall out.

    • Lift the side of the motherboard that sits along the bottom edge of the 3DS.

  19. Nintendo 3DS D-pad Replacement: stap 19, afbeelding 1 van 3 Nintendo 3DS D-pad Replacement: stap 19, afbeelding 2 van 3 Nintendo 3DS D-pad Replacement: stap 19, afbeelding 3 van 3
    • Continue lifting the motherboard assembly and rotate it until it is resting next to the rest of the device.

    • Use the flat end of a spudger or your fingernail to flip up the retaining flap on the LCD ribbon cable ZIF socket.

    • Be sure you are prying up on the hinged retaining flap, not the socket itself. Damaging the socket or cable will result in a 3DS that won't have a functional top screen.

  20. Nintendo 3DS D-pad Replacement: stap 20, afbeelding 1 van 1
    • Remove the motherboard assembly from the rest of the device.

  21. Nintendo 3DS D-pad Replacement, D-pad: stap 21, afbeelding 1 van 1
    • Peel the black silicone cover off the back of the D-pad.

  22. Nintendo 3DS D-pad Replacement: stap 22, afbeelding 1 van 2 Nintendo 3DS D-pad Replacement: stap 22, afbeelding 2 van 2
    • Open the 3DS and orient it so that the bottoms of the buttons are facing upward.

    • Use your finger to push the D-pad through its hole in the upper case.

    • Remove the D-pad.

Conclusie

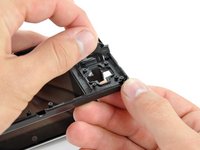
To reassemble your device, follow these instructions in reverse order.

9 andere personen hebben deze handleiding voltooid.

David Hodson

Lid sinds: 04/13/10

152.757 Reputatie

127 handleidingen geschreven

0 opmerkingen

Voeg opmerking toe

Weergavestatistieken:

Afgelopen 24 uren: 16

Afgelopen 7 dagen: 131

Afgelopen 30 dagen: 555

Altijd: 48,600