
Motorola Moto X Back Cover Replacement

Inleiding
Ga naar stap 1Use this guide to replace the back cover of your Motorola Moto X.
Wat je nodig hebt
Onderdelen

Gereedschap


Toon meer…
-
-
Insert the SIM card eject tool into the hole in the side of the SIM card tray and push to eject the tray.
-
Remove the SIM card tray.
-
-
-
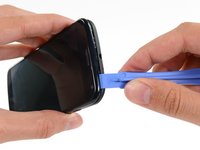
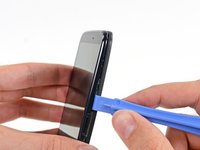
Insert a plastic opening tool into the seam between the front and rear covers near the SIM card slot.
-
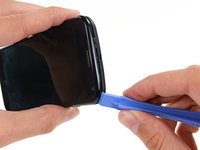
Slide the plastic opening tool along the seam toward the upper corner.
-
-
-
-
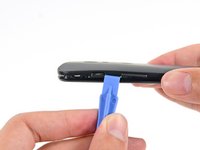
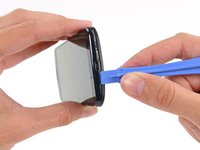
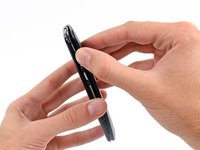
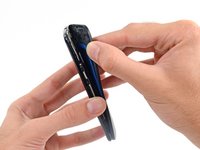
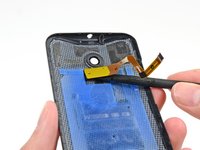
Run the opening tool along the seam around all four sides, separating the remaining clips holding the cover on.
Be *very* careful not to push the opening tool too deep when you go around the buttons! I accidentally broke the volume rocker ribbon by doing so, and didn't even realize it until I had completely removed the cover.
When i removed the volume rocker i cant get it back in correctly seems to be in right but the volume up is not clicking and only works if i push it really hard any ideas?
-
-
-
Heat an iOpener and lay it over the phone for approximately 90 seconds to loosen the adhesive securing the back cover.
There is NO GLUE holding on the back of a Moto X with a wood back! That little fact just made the extra $50 I spent on the phone totally worthwhile.
Lucky for you, I have the bamboo, and plenty of adhesive.
Kelly F -
-
-
-
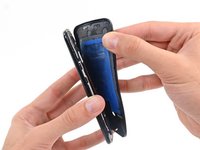
Starting from the SIM slot side, carefully peel the back cover off of the phone.
Step 15 seemed to be the hardest part for me. (step 25, the battery was also difficult). I am now not a fan of sticky stuff, "Mild adhesive" is definitely an understatement, IMHO, just saying I don't like sticky stuff, maybe I didn't do it right. The iOpener seemed to help a little, but not much.
CAUTION
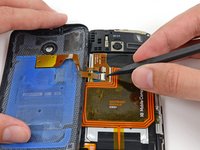
BE CAREFUL with the NFC antenna, it says "X8 Mobile Computing System" on it. The adhesive seemed stick to the the blue stuff on the back cover more and loosen up on the bottom of the antenna, the part that sticks to the battery. So in the process of peeling the back cover the antenna started to come up and was torn at the connector strip before I realized what was happening, step 19 has a good picture of the connector strip that I'm talking about. I like using NFC once in awhile, so now my next FIX will be the antenna.
Overall instructions were GREAT, I now have a camera again. Thank you.
So you are saying that there is no problem if I don't connect the NFC antenna? I'm asking this because I bought a replacement battery that don't include the NFC antenna. I would really appreciate your help with this :)
The adhesive was crazy hard on mine as well and I ended up with two small cracks on the edges of my back cover. The blue rubber piece actually separated from the back and removed it from the battery after it was open. The battery itself was also very difficult to remove (pull tab did nothing) and bent/pried the old battery out. I see no reason for all that adhesive! Other than getting the dang thing open the rest was easy. Great guide!
The adhesive holding the back very strong! In the process of removing the back, I cracked the edges of the back cover and ripped part of the NFC connector. Luckily the friend I was doing the repair for did not even know what NFC was, so she was ok with this. Take your time removing the back cover! Also, the adhesive holding the battery in place was not what I would call mild. The black tab was next to useless in removing the battery
So you are saying that there is no problem if I don't connect the NFC antenna? I'm asking this because I bought a replacement battery that don't include the NFC antenna.
-
-
-
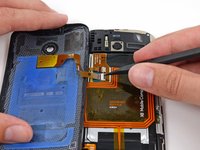
Gently set the back cover down in a way that exposes the camera flash cable connector, but does not put strain on it.
As I had seen in another video, my Moto X with a custom back did not have the blue sticky pad. But the back was still well-adhered in the top corners and with a strip of adhesive along the bottom. In the photo in this step you can see the only adhesive I had to deal with, which was on either side of the lens (two dark areas on the phone back) and along the bottom of the phone (dark area at the bottom of the phone back).
-
-
-
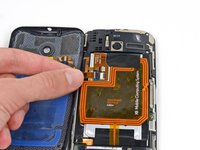
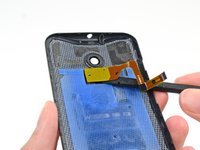
Use the flat end of a spudger to gently pry between the flash assembly and back cover to separate the adhesive.
-
Remove the flash assembly from the back cover.
-


Compare your new replacement part to the original part. You may need to transfer remaining components or remove adhesive backings from the new part before installing.
To reassemble your device, follow these instructions in reverse order.
Take your e-waste to an R2 or e-Stewards certified recycler.
Repair didn’t go as planned? Check out our Motorola Moto X Answers community for troubleshooting help.
Annuleren: ik heb deze handleiding niet afgemaakt.
51 andere personen hebben deze handleiding voltooid.


6 opmerkingen
Hey I'm looking at replacing my rear battery door cover, because white gets dirty too quick (esp. Since I work at a bike shop). Looking at replacement covers available, it seems to be that there's a lack of the camera lens protector as seen on the original battery cover. How do I go about removing this, to transfer it to the new cover?
I used a guitar pick and my thumbnail to detach the plastic. Then I used a hair dryer gun at low temp carefully to loosen the glue (which is actually only at the top and bottom of the phone. Just be cautious removing the back since you need to detach the ribbon cable from the flash. Once it was removed, I used the case opener tool to gently lift the flash assembly loose, leaving the grey adhesive on the case back. After the flash was removed,I used an Xacto blade to start to remove the adhesive which peeled off relatively easily, and was then stuck back on to the flash. There is a clear silicon type of "gasket" on the case back that will also peel off easily, so I transferred that to my new case back and stuck the flash in its place. The lens cover was the same.. just a little adhesive on the outer ring. I just put some pressure with my finger on the front side, and it popped out, adhesive still intact. Everything checked out, so I snapped it all together again! Easy Peasy!
ozarkana -
By the way, I build bicycles too!
ozarkana -
Guide was extremely helpful in replacing my white back cover with a black one. Was a pain with that adhesive though, but got the new cover on without breaking anything, and it looks great. Thanks for the writeup.
thanks for the guide. I’d like to substitute my back cover because it is damaged. I found the cover on parts4repair.com but it doesn’t have the adesive on the back, it’s just the cover. Is this a problem after the installation? Can I buy this cover and use it? thanks in advance for any help
Sim not work
Radhey Kashyap - Antwoord