
Microsoft Surface Pro Battery Replacement

Inleiding
Ga naar stap 1Use this guide to replace the battery pack in the Microsoft Surface Pro.
Wat je nodig hebt
Onderdelen
Gereedschap


Toon meer…
-
-
Use a heated iOpener or a heat gun to heat the edges of the display and soften its adhesive.
-
-
-
Apply a suction cup as close as possible to the edge of the display.
-
Use the suction cup to lift the edge of the display enough to insert an opening pick under the edge.
-
Slide the opening pick all the way around the edges of the display to cut through the adhesive on the bezel.
-
Ribbon cables and a circuit board are approx. 0.6 cm from the edge of the glass.
-
-
-
Starting from the top edge, lift the display slightly.
-
Before completely removing the display:
-
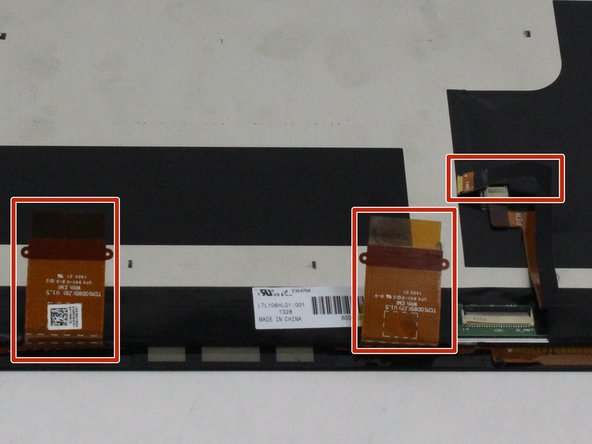
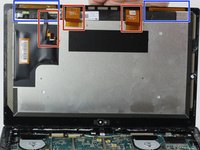
Disconnect the three display cables.
-
Gently peel from the frame 2 orange ribbon cables that are glued to it, as those should stay with the display. (e.g. use a thin plastic card to separate them)
【注意!!】 画面ガラスの下部の接着がデジタイザーのフレキケーブルとも接着されています。
両面接着剤の温めが甘かったり、無理に剥がそうとするとデジタイザーのフレキケーブルが切れますので丁寧に作業を行って下さい。
my surface pro 1 has 4 flat flexi-cables connected.
I don’t know how to put back the narrow flexi cable. It is too thin and without a pulling tape?
-
-
-
Gereedschap gebruikt in deze stap:Tweezers$4.99
-
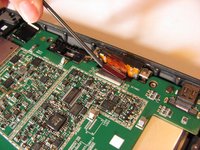
Using tweezers, gently pull the eight orange ribbon cables from their sockets.
-
-
-
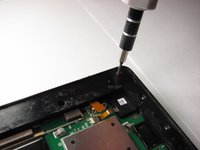
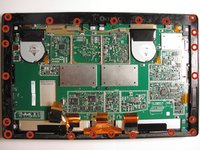
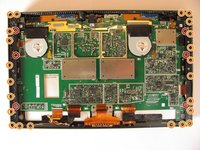
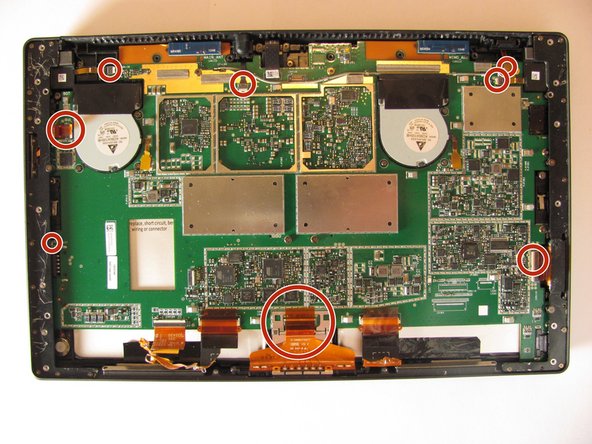
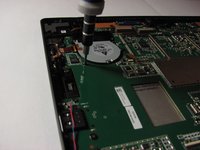
Unscrew the 17 T5 torx screws on the mother board with the T5 torx screw driver
-
-
-
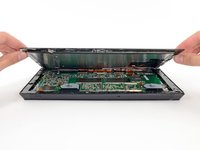
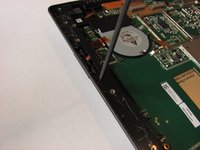
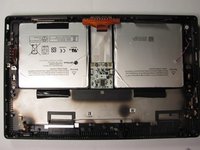
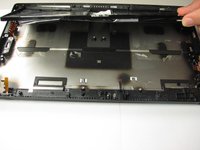
Use your hands to pry off the entire battery pack with enough force to overcome the glue keeping the batteries in place.
This is possible to do. The worst part are all the tiny screws and glue to get the cover and touch screen off. I bought the battery for $45 off of Ebay and a set of four Torx screw drivers for $5.
Tips:
check the 12V coming into the main board after the cover is off. You will see a red boot light on the main board flash for a sec. You should hear the tiny fans going.
Use an external monitor and cables to check the per and boot before putting it all back together.
I am looking to get mine repaired and I am terrified to do it myself. Do y’all know somewhere I can send it.
-


To reassemble your device, follow these instructions in reverse order.
To reassemble your device, follow these instructions in reverse order.
Annuleren: ik heb deze handleiding niet afgemaakt.
39 andere personen hebben deze handleiding voltooid.

Team

Cal Poly, Team 8-20, Regan Fall 2013 Lid van Cal Poly, Team 8-20, Regan Fall 2013
CPSU-REGAN-F13S8G20
4 Leden
16 handleidingen geschreven
24 opmerkingen
Thank you for that awesome guide!
Do you know where can i buy a battery for surface pro 2??
Thanks
I am also trying to find out where to acquire the Surface Pro batteries...???
im also looking for a surface pro replacement battery.
I just bought one for $70 at a site called newpower99.com... should be here in 2 days. I have no idea if it will work, but it says it comes with a toolkit to replace it. I hope it works.
Matt -
I guess we can assume the people who tired using the aftermarket batteries were killed in the process of repairing their Surface Pro. May their valiant efforts be remembered for all the days.
I completed this repair.
Notes:
The battery from newpower99 is the correct battery. It does not, however, come with the correct screwdrivers to complete the repair. (I believe they sent a T3, T4, and T5 torx when the repair requires a T2, T3, and T5).
The screen removal is the most difficult part of the repair. In addition to the cables on the bottom of the unit as other repairs have mentioned, the screen assembly itself is very vulnerable to being punctured. In places on the screen assembly, there is only a thin layer of tape sealing the gap between what looks like the LCD/Digitizer and the glass panel.
When you are prying the screen off, be very careful about how deep you go, as puncturing the seal can brick your screen (my screen fell victim to it).
To that end, pay very close attention to the bezel width. It is a different width on every edge. The left side is approximately the same width as the bezel on the glass, the right side is a mm or two skinnier, top is skinnier still and the bot is small.
Continued:
Once the screen assembly is off, the repair is not bad. My unit is a surface Pro 2, so there were a few different screw placements, but it's almost the same.
The screws are incredibly obnoxious. Not only do they require three different screwdrivers, there are many multiple widths and lengths within a screw type. Screw organization is a must.
The adhesive is a big problem as well. The tape holding together my battery assembly looks like it bled some adhesive, which cause my logic board to stick to the battery. A precarious few minutes later, I was able to put enough pressure to pull the board without flexing it too much. The battery is basically welded to the back panel with tape and adhesive. It took all my strength to tear it off the back panel.
If you are reading this and looking to complete this repair, do yourself a favor and order a replacement screen assembly ahead of time. They are approximately $60 now, and there is a good chance of the screen not surviving disassembly.
Scalar -
The Microsoft part number for the OEM Surface Pro 1 Model 1514 battery is P21GU9. The Surface Pro 2 Model 1601 uses the same battery. If you search on eBay for “battery P21GU9”, you’ll find a lot of them - all from Chinese sellers. I just bought one that’s theoretically OEM and brand new (unused) for $35. The seller has a high rating, so hopefully it’s true.
how do i glue the new battery back in place?
Any chance anyone who’s done this replacement is still following this page? My Surface Pro 2 battery has started to majorly crap out, so I think I’m going to grab a battery here and give this a try. I have definitely not been happy with the build quality of my Surface, in fact, the adhesive at the bottom and 90% of each side has failed more than 6 months ago, so I’m thinking it should be much easier for me to remove the screen. I’ll mainly just need to deal with the top edge of the device.
My question is how to re-”glue” the screen once you take it off? Is that possible? I saw someone mention double sided tape to use to attach the new battery, but would you use the same thing for the screen? Hoping someone can help offer insight from experience. Thanks!
@rchmx To reinstall the screen, remove all the old adhesive and clean the mating surface with >90% isopropyl alcohol, and then secure it with a strong/thin double-sided tape, such as Tesa 61395. This repair is not for the faint of heart. Good luck!
@jeffsu Thanks Jeff! Yes, I had found that after doing a bit more searching. The battery in my SP2 is now completely non-functional, but luckily a while back it had bloated to the point where 70+% of the screen has been detached for the casing, so hopefully that will make the process a bit easier. And anyways, it’s necessary to return the device to a more than basically functional level, so I have no choice but to dig in after the holidays are over.
you might be able to find one on Newegg
What type of glue do you use to re-seal the system?
? Wish me luck ! I’m going to try it. Thank You All, for your contributions . Microsoft valued my Surface at $7.50
exchange. I’ve got nothing to loose.
warning: this is not the surface pro 5, because when MS anounced the pro 5 they anounced it as the Surface Pro. I learned it the hard way and now i need a new display, because the edge (where the glue ist) is thinner at the pro 5. In total, it will take you arround 40 screws for the pro 5 to change the battery. way less than here
hellow me surface pro 4 battery dead and i want to change it . but iam from iran and microsoft doesnt any branch in country and i confused . but finally i find nozhino microsoft surface repair clinic in google and they change my surface battery with best performance thanks for nozhino
Replaced the battery and although it charges the surface wont run off battery at all.
Which battery did you buy?
iluecker -
Be patient. I spent at least 10 to 15 minutes warming and trying to pry up the screen with my spudgers and such. It got so hot I would use one spudger to hold the Surface from the opposite side while pried with the other spudger from the other side. I would get a little lip up and slide and when I felt resistance then I would heat more and make my way around the screen. I continued that many times until I was able to use the suction cup to pull it up.
Dan - Antwoord