
MacBook Air 11" Late 2010 Logic Board Replacement

Inleiding
Ga naar stap 1Use this guide to replace the bare logic board on your MacBook Air. Before reinstalling the heat sink, be sure to apply a new layer of thermal paste.


-
Gereedschap gebruikt in deze stap:P5 Pentalobe Screwdriver Retina MacBook Pro and Air$5.99
-
Remove the following ten screws:
-
Two 8 mm 5-point Pentalobe screws
-
Eight 2.5 mm 5-point Pentalobe screws
-
-
-
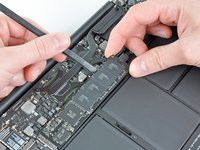
Use the flat end of a spudger to pry both short sides of the battery connector upward to disconnect it from its socket on the logic board.
-
Bend the battery cable slightly away from the logic board so the connector will not accidentally contact its socket.
-
-
-
Remove the single 2.9 mm T5 Torx screw securing the SSD to the logic board.
So when i change my ssd in mac do i have to reinstall Mac OS
Correct, the SSD does not come with OS preinstalled. To install the OS you can completely clone your existing hard drive or you will need to create a bootable flash drive and format your SSD and create a partition in order to be able to install the OS.
-
-
-
Use a spudger to help lift the free end of the SSD just enough to grab it with your other hand.
-
Pull the drive straight out of its socket and remove it from the logic board.
I performed all the steps above and fitted a Transcend JetDrive 500 which was very easy however when I re-assembled and turned on all I get is a question mark in the middle of the screen, can you explain if I did anything wrong?
-
-
-
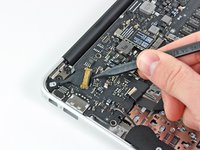
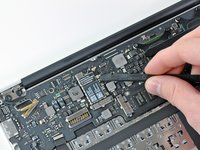
Use the flat end of a spudger to pry the I/O board cable connector upward out of its socket on the I/O board.
-
-
-
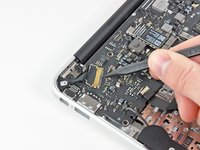
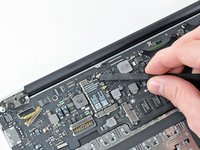
Use the tip of a spudger to carefully flip up the retaining flap on the fan cable ZIF socket.
-
-
-
-
Remove the following five screws securing the battery to the upper case:
-
Two 5.2 mm T5 Torx screws
-
One 6 mm T5 Torx screw
-
Two 2.6 mm T5 Torx screws
-
-
-
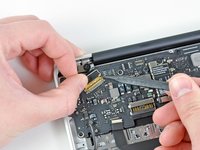
Disconnect the I/O board by pulling the power cable away from its socket on the logic board.
-
-
-
Gently push the tip of a spudger under the black plastic flap stuck to the display data cable lock to make the lock pop upward and away from the socket.
-
While holding the lock away from the socket, use the tip of a spudger and your fingers to gently remove the display data cable from its socket.
-
-
-
Use the flat end of a spudger to pry both antenna cable connectors up and off their sockets on the AirPort/Bluetooth card.
Heads up when replacing a late 2010 display with a 2011 or later... On later model Airs the wifi card orientation changed, which causes two issues: 1) the antenna cables are longer on the newer displays, so you have excess wire to deal with, 2) On 2010 displays the longer wire goes on the antenna port closer to the battery, on 2011 and later displays the longer cable goes on the port further from the battery (flip-flopped). If you switch them up, your wifi reception will be terrible
-
-
-
Remove the single 2.9 mm T5 Torx screw securing the AirPort/Bluetooth card to the logic board.
-


To reassemble your device, follow these instructions in reverse order.
To reassemble your device, follow these instructions in reverse order.
Annuleren: ik heb deze handleiding niet afgemaakt.
24 andere personen hebben deze handleiding voltooid.

7 opmerkingen
Just so you guys know I could successfully reaplace the A1370 Core2Duo Late 2010 board for a A1370 i7 Mid 2011 board. you are going to need the heatsink and battery from the newer model as well. the problem I am facing right now is the wifi/bluetooth antenna been too short for the new position of the airport card. as soon as I get a chance I'll try to re route the cables and try to fix it.
Igorfeghali, another question: why do you need the battery too?
kautame -
Hello everybody,
I made it too: I replaced my 2GB RAM C2D-logic board in my native 11” 2011 MBA for a 2nd-hand “ i5 1,6 GHz / 4GB RAM” logic board. The same here: you will need a 2011 battery (the connector of the 2010 battery is too far left for the connector of the 2011 logic board). My logic board luckily came w/ native fan and heatsink, so my only challenge will now be to get BT and WIFI antenna cable long enough to fit the new place of the bt/wifi-card.
@igorfeghali, and others: How did you manage this problem? Any idea for an adapter-cable? Any suggestions, anybody?
Thank you, alle the best,
Chris
Chris -
Igorfeghali. was everything fine with your MacBook after you installed the Mid 2011 board? I'm interested in doing something like that. Did you use something like this
http://www.ebay.com/itm/181804089959
to extend your antenna cable?
Word of caution: there are two variations of this logic board, one with two heat sinks as shown here and one with a single heat sink. The layout and position are slightly different as well, so me careful when ordering replacement boards to order the proper match.
I recommend that one of the tools you obtain is a jeweler's loupe that mounts on your glasses. It makes things easier.
blairweaver - Antwoord
This is not correct. You need the pentalobe tool at this point.
Duane Hellums - Antwoord