Inleiding
The internal battery of a laptop supplies power to the device when it is not plugged into an outlet. When the battery begins to lose power, has started to drain quickly or is damaged (like in the case of a swollen battery), you will want to replace the battery of your Lenovo ThinkPad T480.
This guide will walk you through the steps to replacing the internal laptop battery of your Lenovo ThinkPad T480.
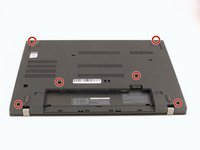
Prior to beginning this guide, be sure to disable the internal battery first, then turn off the device and remove it from the charging cable.
Wat je nodig hebt
-
-
-
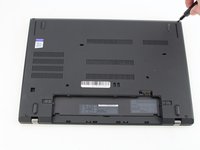
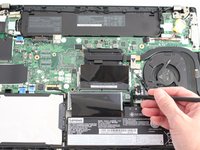
Insert the blue plastic opening tool into the space between the lower case and the chassis.
-
Slide the opening tool around the perimeter of the case to release the clips holding the case and the chassis together.
-
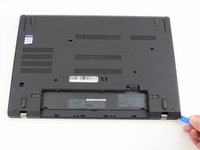
Remove the back case.
I found a tough spudger (or even better a plectrum) is best here as the clips, although easy to separate, hold the case firmly leaving a tight gap which a soft spudger may fail to enter.
Hi Benjamin, thanks for the tip!
You also have to pry the near the battery. I experienced that you can't pry the front side.
I used a credit card to pry the clips loose, it worked great. Added 2nd RAM stick easily.
-
-
-
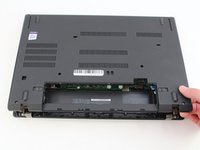
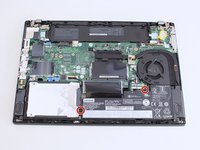
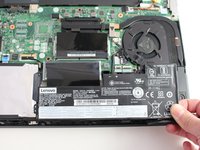
Use a Phillips #1 screwdriver to remove the two 4.6 mm screws that secure the internal battery to the frame.
-
-
-
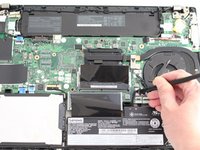
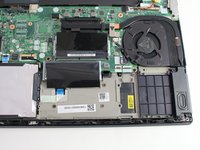
Lift the battery straight out of its recess and remove it.
DO NOT wedge out the battery - T480 has two screws that hold down a plastic battery tray which easily lifts out after the two frame screws are removed. Wedging out will ruin the battery and could damage the cell and cause a fire.
The guide says to remove those two screws. They are "lifting" with the wedge. Probably more of a way to promote their tools than out of necessity, but idk
-


To reassemble your device, follow the above steps in reverse order.
Take your e-waste to an R2 or e-Stewards certified recycler.
Repair didn’t go as planned? Try some basic troubleshooting, or ask our Answers community for help.
To reassemble your device, follow the above steps in reverse order.
Take your e-waste to an R2 or e-Stewards certified recycler.
Repair didn’t go as planned? Try some basic troubleshooting, or ask our Answers community for help.
Annuleren: ik heb deze handleiding niet afgemaakt.
10 andere personen hebben deze handleiding voltooid.


7Gids Commentaar
"What you need" contains a wrong part.
Hi @cumledomla, I've added the internal battery for this guide. Thanks for pointing that out! The external battery will show up in the "What you need" section because it's imported from the prerequisite guide for the external battery. Hope this helps.
The "Battery 2" on my T480 does not load. Is Battery 2 the internal or the external battery?
Battery1 is the internal
Battery 2 is the external battery.
Does anyone know more details about the the two 4.6 mm screws securing the internal battery to the frame?
I have a refurbished t480 with no internal battery, so to install one I will need to also get hold of suitable screws.
I'm assuming 4.6 mm is the length, how about pitch or gauge? Or are they M# something or another style where all that is standardised?
Or any idea where I could look for a part number?
Hi Dru, you are correct that 4.6 mm is referring to the length of the screws. I looked up the hardware maintenance manual and it shows the screws are M2 x 3 mm, small head, nylon coated. When I measured the screws, the length was different, but you may want to go with the length in the hardware maintenance manual or try both lengths to see which fits best. However, both screw lengths are M2. The manual also lists the Torque as 0.181 Nm (1.85 kgf-cm). I hope this helps! Here is a link to the hardware maintenance manual.