Ga door naar hoofdinhoud
Lenovo ThinkPad T431S Fan Replacement

Lenovo ThinkPad T431S Fan Replacement

Joe Minnich

Joe Minnich en 4 andere bijdragers

Voor het laatst geüpdatet op June 3, 2020

10 minuten
Gemiddeld

This guide will show you how to locate and replace the Lenovo T431s fan. The cooling fan is what keeps your processing unit cool so the elements of your computer don’t overheat. If you are experiencing malfunction, overheat warning messages, or hot components, you might need to replace your cooling fan.

Wat je nodig hebt

Gereedschap

  1. Lenovo ThinkPad T431S Fan Replacement, Fan: stap 1, afbeelding 1 van 2 Lenovo ThinkPad T431S Fan Replacement, Fan: stap 1, afbeelding 2 van 2
    • Remember before starting any disassembly, to prevent electric shock or harm, disconnect from any external power source and make sure device is powered off.

    • Use a Phillips #1 screwdriver bit to remove eight 5.0 mm screws from the back panel.

    • Carefully pry off the back panel using the opening tool.

  2. Lenovo ThinkPad T431S Fan Replacement: stap 2, afbeelding 1 van 2 Lenovo ThinkPad T431S Fan Replacement: stap 2, afbeelding 2 van 2
    • Use a Phillips #1 screwdriver bit and remove the four 3.0 mm screws from the heatsink.

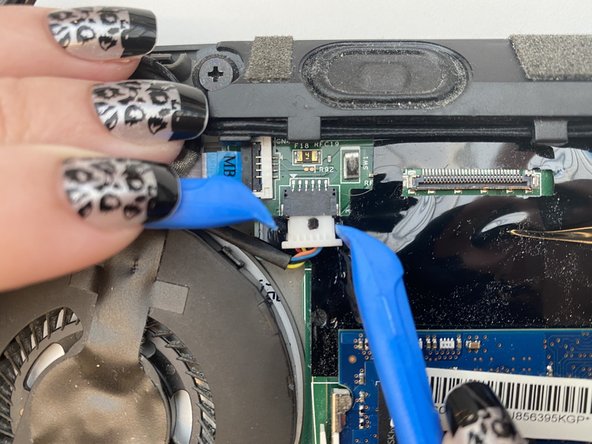
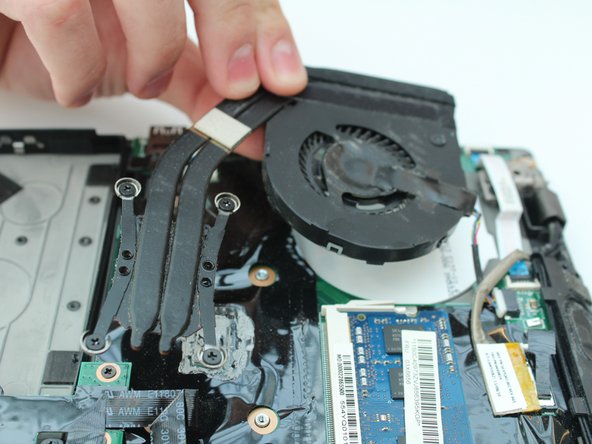
  3. Lenovo ThinkPad T431S Fan Replacement: stap 3, afbeelding 1 van 3 Lenovo ThinkPad T431S Fan Replacement: stap 3, afbeelding 2 van 3 Lenovo ThinkPad T431S Fan Replacement: stap 3, afbeelding 3 van 3
    • Disconnect the cable attached to the fan, pulling the connector straight down.

    • Lift and remove the fan.

Conclusie

To reassemble your device, follow these instructions in reverse order.

2 andere personen hebben deze handleiding voltooid.

Één opmerking

Well done. I will have a go at fixing the fan on my T430s now that I’ve seen how easy it is to do.

Jocko - Antwoord

Voeg opmerking toe

Weergavestatistieken:

Afgelopen 24 uren: 0

Afgelopen 7 dagen: 8

Afgelopen 30 dagen: 20

Altijd: 388