Ga door naar hoofdinhoud
JBL Charge 4 Speaker Replacement

JBL Charge 4 Speaker Replacement

Rohith Dara

Rohith Dara en 2 andere bijdragers

Voor het laatst geüpdatet op September 24, 2024

20 - 30 minuten
Moeilijk
Uitgelichte studenten-handleiding

The speaker is responsible for creating the sound coming out of the device. If the sound quality is low or your speaker is not making sound at all but powering on it may be the result of a damaged or broken speaker. This guide will show you how to replace the speaker in your JBL Charge 4. This guide requires knowledge of desoldering. Find a guide on soldering and desoldering here.

Wat je nodig hebt

Gereedschap

Toon meer…

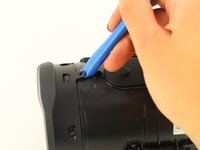
  1. JBL Charge 4 Speaker Replacement, Speaker Grill: stap 1, afbeelding 1 van 1
    • Flip your speaker over and insert the plastic opening tool into the slit on the grille.

    • Pry away from yourself towards the back of the speaker to release the clip.

    • Repeat this process for the clip on the other side.

  2. JBL Charge 4 Speaker Replacement: stap 2, afbeelding 1 van 2 JBL Charge 4 Speaker Replacement: stap 2, afbeelding 2 van 2
    • Remove the two 8mm Phillips #0 screws from the other edge of the grille.

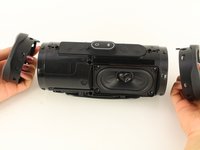
  3. JBL Charge 4 Speaker Replacement: stap 3, afbeelding 1 van 1
    • Pull apart both sides of the grille.

    • Lift the cover off of the speaker.

  4. JBL Charge 4 Speaker Replacement, Passive Bass Radiators: stap 4, afbeelding 1 van 2 JBL Charge 4 Speaker Replacement, Passive Bass Radiators: stap 4, afbeelding 2 van 2
    • Using the plastic opening tool, lift the tab on top of the speaker to release the radiator from the clips.

    • Repeat this process on the other clips around the radiator to release it from the frame.

  5. JBL Charge 4 Speaker Replacement: stap 5, afbeelding 1 van 2 JBL Charge 4 Speaker Replacement: stap 5, afbeelding 2 van 2
    • Push the radiator off of the frame of the device.

    • Repeat on the other side.

    • The passive bass radiators seal out water from inside the device. Removing them multiple times may compromise the waterproof nature of the speaker.

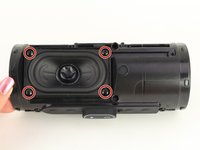
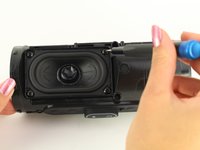
  6. JBL Charge 4 Speaker Replacement, Speaker: stap 6, afbeelding 1 van 2 JBL Charge 4 Speaker Replacement, Speaker: stap 6, afbeelding 2 van 2
    • Flip the device so that the speaker faces you.

    • Remove the four 8mm Phillips #1 screws.

  7. JBL Charge 4 Speaker Replacement: stap 7, afbeelding 1 van 1
    • Gently pull out the speaker.

  8. JBL Charge 4 Speaker Replacement: stap 8, afbeelding 1 van 2 JBL Charge 4 Speaker Replacement: stap 8, afbeelding 2 van 2
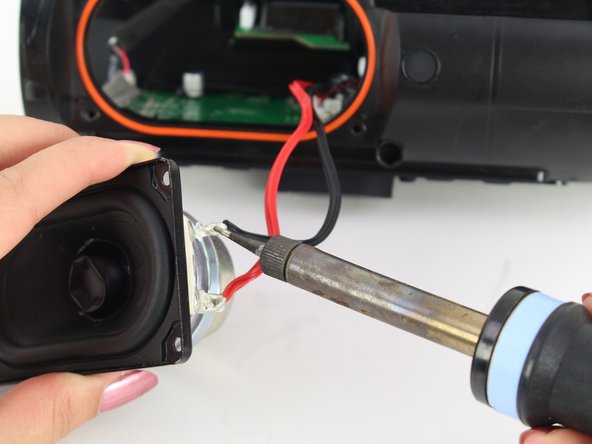
    • Desolder the red and black wires.

    • A guide for soldering and desoldering can be found here.

Conclusie

To reassemble your device, follow these instructions in reverse order.

11 andere personen hebben deze handleiding voltooid.

Rohith Dara

Lid sinds: 01/24/19

384 Reputatie

1 Handleiding geschreven

Team

Cal Poly, Team S1-G1, White Winter 2019 Lid van Cal Poly, Team S1-G1, White Winter 2019

CPSU-WHITE-W19S1G1

4 Leden

27 handleidingen geschreven

11 opmerkingen

Perfect - But where to get the replacement speaker ??? I’ve searched whole web. Please give me the info about replacement speaker diaphragm. Regards, T

Tadej Tomašič - Antwoord

Jbl charge 4 Led indicator board G ribbon cable authentic

carlos maltez - Antwoord

Voeg opmerking toe

Weergavestatistieken:

Afgelopen 24 uren: 5

Afgelopen 7 dagen: 44

Afgelopen 30 dagen: 146

Altijd: 24,522