Deze vertaling geeft mogelijk niet de meest recente updates van de bronhandleiding weer. Help ons met het updaten van de vertaling of bekijk de bronhandleiding.
Inleiding
Volg deze handleiding als je niet zeker weet hoe je op maat gemaakte kleefstrips aan of in je toestel bevestigt. De kleefstrip kan bedoeld en gemaakt zijn voor je scherm, je achterste behuizing, batterij etc. Lees de gehele handleiding voordat je de strips plakt.
Als de reparatiehandleiding van je toestel specifieke instructies heeft voor het aanbrengen van kleefstrips, dan gaan die instructies altijd voor deze handleiding.
Voor Samsung Galaxy S telefoons, volg je deze handleiding.
Voor iPhone's, volg je deze handleiding.
Voor iPad's, volg je deze handleiding.
Als je algemene Tesa kleefstrips gebruikt, volg je deze handleiding.
Wat je nodig hebt
-
-
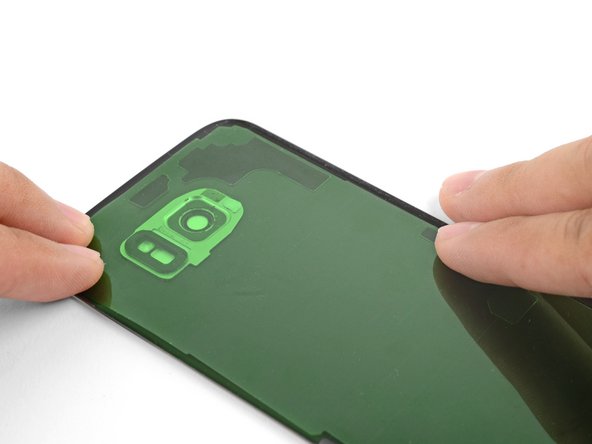
Kijk goed naar je op maat gesneden kleefstrips en probeer uit te vinden waarvoor ze bedoeld zijn.
-
Kleefstrips voor het scherm of de achterste behuizing - vaak in de vorm van het toestel
-
Kleefstrips ter ondersteuning van de achterste behuizing - deze komen overeen met de vormen van de elementen die tegen de achterste behuizing aangedrukt zitten
-
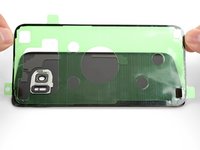
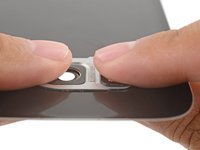
Kleefstrips voor de batterij - normaal gesproken een rechthoekige omtrek die grofweg de vorm van de batterij heeft
-
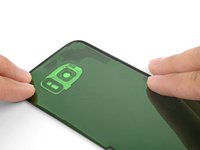
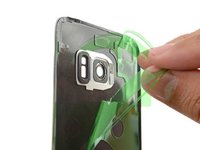
Kleefstrips voor de componenten - de contouren van deze kleefstrips komen vaak overeen met de specifieke componenten waarvoor ze zijn ontworpen, zoals camera's en vingerafdruksensors
-
-
-
Verwijder grote stukken lijm met je vingers, spudger, plasticen openingstool of met pincetten.
-
Gebruik lijmverwijderaar of hoog geconcentreerde (>90%) isopropyl alcohol om de overgebleven restjes van metalen oppervlakten te verwijderen. Veeg met een pluisvrij doek of een koffiefilter in één richting totdat alle restjes weg zijn.
-
-
-
-
Zorg ervoor dat je, voordat je de bescherming van de kleefstrip aftrekt, de locatie van de niet-gekleurde kant hebt vastgesteld.
-
Om het plakken makkelijker te maken, kun je de strip op de juiste plek leggen om vervolgens één kant vast te tapen zodat de strip op z'n plek blijft liggen. Hierdoor kun je de beschermlaag eraf trekken zonder dat de kleefstrip verschuift.
-
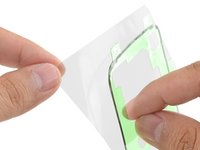
Als je weet waar je de kleefstrip gaat aanbrengen, kun je de niet-gekleurde beschermlaag eraf trekken.
-
Haal het middenstuk, zowel de witte (papier) als de zwarte (kleefkant) laag, er voorzichtig uit, beginnend met de U-vormige uitsnede (als deze er is).
-
Haal de overgebleven beschermlaag eraf, zodat de kleefkant vrijkomt.
-
-
-
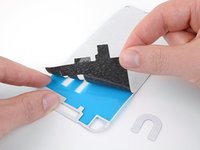
Pak de opengemaakte kleefstrip bij de lipjes en breng een kant langzaam en voorzichtig aan op een van de kanten van de achterste behuizing.
-
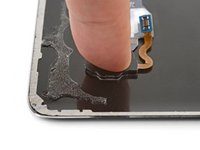
Breng de gehele kleefstrip aan op het oppervlakte van de behuizing en druk deze stevig vast met je vingers.
-
Haal dan de gekleurde beschermlaag van de kleefstrip af om de andere klevende kant vrij te maken.
-


Als de kleefstrip juist wordt aangebracht, zou deze voor lange tijd moeten functioneren.
Deze reparatie zal de waterdichtheid van het toestel waarschijnlijk niet kunnen herstellen. Wees daarom voorzichtig en stel het toestel niet bloot aan vochtigheid.
Als de kleefstrip juist wordt aangebracht, zou deze voor lange tijd moeten functioneren.
Deze reparatie zal de waterdichtheid van het toestel waarschijnlijk niet kunnen herstellen. Wees daarom voorzichtig en stel het toestel niet bloot aan vochtigheid.
Annuleren: ik heb deze handleiding niet afgemaakt.
106 andere personen hebben deze handleiding voltooid.
Met dank aan deze vertalers:
25%

Deze vertalers helpen ons de wereld te repareren! Wil je bijdragen?
Begin met vertalen ›


9 opmerkingen
Diese Anleitung sollte im Akku-Tausch Tutorial verlinkt sein und auch in der Produktbeschreibung. Ich habe diesen Artikel erst gefunden, nachdem ich die Rückseite schon befestigt hatte (zum Glück richtig).
Although obvious to anyone who has used this type of strip, I didn't realize it until my first experience gluing a screen into my phone: the adhesive is ONLY the black goo attached to the strips. Once you peel off the clear side, place the strip and then peel off the coloured side, all that's left is the black goo, hopefully exactly where it needs to be. Mine could be carefully re-aligned with tweezers as necessary before setting the screen into place.
What's the popular recommendation regarding how long to leave weight on these pre-cut adhesive strips?
It merely says 'a few hours'?
Is it okay to check on it or is it like opening the oven door?
It's okay to check, and 2 hours is usualy plenty enough.
If you have any OLED display, DO NOT put books on it!!! Unlike LCDs, some Hard OLEDs cannot handle the pressure. If you have bought a display from ifixit they will also not warranty it and consider it user damage!!! That last section need to put in a warning for OLEDs.
Great point, wished i would have read this earlier... :(
Ruined a pixel 3a screen after replacing a battery and placing some books on the screen for the adhesive as instructed.
Screen now has to be replaced since it's leaking / purple as a result of the books pressure.
MHacking -
i'm replacing a front screen and wondering about the order of putting the adhesive strip on the screen back, attaching ribbon cable from new screen to phone, then taking off coloured side of the adhesive strip, or should i take of coloured side, then attach ribbon cable, then place screen with glue onto phone frame?
obviosuly if one puts the ribbon cable on before taking off coloured side of adhesive, then one would be stuck with fiddly job of manouevering the coloured paper around the screen (or cutting the coloured thing, whereas if one takes of coloured paper, then one has to try and attach ribbon cable without messing up the adhesive now on the edges of the screen....
oh wait, it also isn't obvious whether one puts first side on phone or on new screen....help! (this is pixel 3a screen replacement with ifixit template)
endlich wieder freie Luft zum atmen hatte mir samsung flip angeschafft und damit in die Android Falle geraten.
vor lauter schreck hab ich mir ein neues z2bestellt 348,00€
und meinen 4 moto´s ein fünftes hinzugefügt
meist sind es ja Kleinigkeiten z.B ist bei einem der SD slot kaputt iss ja nicht schlimm mit dem Elleful Stick hat man auch sensible Daten
u.a. weg wenn internetzugang läuft bei der Werkseinstellung um rauszukriegen was nicht klappt
wer was braucht kann über mail belezebub10.jul@gmail.com kommunizieren.
hans
As other comments have noted: applying the new adhesive might be the hardest part. I actually found that the small pieces are actually easier to do contrary to other reviews (I think one whole sheet would actually be significantly harder). Also note some holes on the adhesive pieces line up with screws on your phone and other holes seem to just be random lol. Last thing to note about the adhesive pieces is that everything doesn't have to align perfectly as much as my OCD would like, as long as the adhesive doesn't stick out the screen/ frame and most of the edges are glued, the phone screen will stay in it's case!
If you're installing a screen, you might need to cut out a hole on the backing so that you can attach the first side, and attach the screen ribbon connector through the hole before removing the second backing.
Asela Gunawardana - Antwoord
I don't understand how one-sided adhesive is supposed to make the screen stick on. It needs to be double-sided adhesive, not one-sided. One side has to stick to the back of the screen and one side has to stick to the frame. This display adhesive I have is one-sided, unless I'm doing something wrong.
Google Pixel 3a Display Adhesive - Genuine
Tim Davenport - Antwoord
I've got one for a Pixel 4a here, but the same general scheme should apply: They are double sided adhesive. One sticky side sticks to the clear plastic film and the other sticky side sticks to the colored plastic film. However, the packaging of them should have been better. They were just loosely thrown into the box and some of them came off their supporting film, sticking to the packaging and each other.
Art -