
Apple Time Capsule Model A1302 Hard Drive Replacement

Inleiding
Ga naar stap 1Use this guide to replace the hard drive in your Apple Time Capsule Model A1302.
Wat je nodig hebt
Onderdelen

Gereedschap


Toon meer…
-
-
Open the Time Capsule by exposing the screws that hold the device together. The screws are concealed by the rubber base, which is the bottom surface of the device.
-
Use a heat gun or hair dryer to heat the rubber base, which softens the adhesive holding it on.
-
Starting in a corner, carefully lift the rubber base to prevent tearing. You can use a guitar pick or a small, plastic ruler to help separate the rubber from the metal.
-
-
-
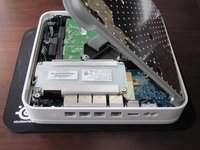
Once the rubber base is separated from the device, remove the 8 Phillips PH00 screws that attach the metal bottom of the case to the plastic top of the case.
Instead of removing the rubber floor, I cut windows in the rubber base at the designated places and dug them out. To do this, I had rectified the photo and printed it out as a square with an edge length of 19.8 cm and used it as a stencil.
Statt den Gummiboden zu entfernen, habe ich an den bezeichneten Stellen Fenster in die Gummiplatte geschnitten und ausgehoben. Dazu hatte ich das Foto entzerrt und als Quadrat mit der Kantenlänge 19,8 cm ausgedruckt und als Schablone benutzt.
-
-
-
Gereedschap gebruikt in deze stap:Tweezers$4.99
-
Lift up the left side of the metal plate and slowly flip it over the right edge of the device.
-
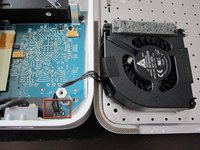
Since many people have had serious problems with the fan power connnector breaking, it is advisable to NOT try to disconnect the fan power connector. Be VERY careful with this connector. It is extremely fragile. If you absolutely have to disconnect the fan from the logic board, VERY carefully use a spudger or tweezers to do so.
I'd destroyed the connection between my fan and logic board by trying to remove the fan. This is a bigger problem than a broken hard drive. DO NOT TRY TO DISCONNECT THE FAN. Instead be careful with the base (making sure not to stretch the fan wire) as your proceed to step four.
I wish I had read the comments too!! DO NOT try to disconnect the fan!!!! The connector broke off with out a lot of force. Now I have a worthless piece of metal and plastic!!!!
This is not my guide, but in order to try to prevent future damage, I've edited the guide to warn against disconnecting the fan from the logic board. Hopefully the update will be approved soon :0\
Jeff G -
I had no issues removing the fan plug from the board.
It seems to me that the fan on the lid is not installed correctly. The air intake is blocked by a lid. The exhaust rests against the hard drive. It is more logical to turn the fan over, then the air intake will open, and the air flow will be along the components of the motherboard
-
-
-
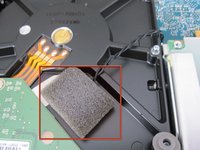
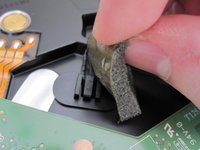
Peel off the foam and set the sensor aside. Be gentle with the foam because you will reuse it to connect the sensor to the new HDD.
-
Lift the HDD out of the device and disconnect the two SATA cables from the HDD.
-
-
-
Using a Phillips #00 screwdriver, remove the four metal spacers (pegs) from the old HDD and install them in the same locations on the new HDD.
-
Place the temperature sensor in approximately the same position on the new HDD as on the old HDD. Cover the sensor with the foam, using adhesive tape if necessary.
You should reconnect the heat sensor in about the same location as on the original drive.
About the HDD compatibility:
I replaced the 1TB HDD in my Time Capsule (3rd generation, model A1355, firmware version 7.6.3) with a Western Digital Red 3TB SATA-3 (WD30EFRX)
Works just perfect :)
Hey many thanks for posting! I am thinking to upgrade my TC 3rd gen with same drive as you WD30EFRX (3TB). Any reports WD40EFRX (4TB) works as well?
Question: Does your WD30EFRX HDD spins down (power save)?
I JUST bought the WD40EFRX. It will be here on Jan 4th and I'll post if it works.
This works beautifully with the WD40EZRX Western Digital Green 4TB 3.5" SATA3 64MB Buffer Hard Drive on a Time Capsule MD032LL/A (4th Generation) running firmware 7.6.4.
I just installed a WD40EFRX as well and my first back is running fine. I love how easy apple makes things. My original 2TB was still working fine, but since I doubled the space on my Macbook Pro hard drive and created a Fusion drive on it I decided it would be nice to have more space on my Time Capsule. Now I can add this old 2TB to my Airport Extreme (already had an empty enclosure laying around) that extends my WiFi network and have a NAS for sharing home movies, media, etc. Your write up was awesome. Thank you.
One other note, take your time on removing the rubber cover on the bottom. I used a heat gun on low and worked little by little. All the adhesive stayed on the rubber cover beautifully. To reinstall just lightly heat it again and the weight of the TC will cause it to reattach.
Also used a WD Red 3TB/SATA3/64M/3.5. Model WD30EFRX. ($129 at MicroCenter) Fit is perfect and performance is outstanding. Directions are fine except the rubber base is glued pretty strongly and is a bit delicate when peeling off. Didn't use a heat gun, just patiently and slowly peeled it back.
I just installed a WD Red 6TB WD60EFRX in my 4th Gen A1409 with firmware 7.6.4. The drive formatted just fine showing 6TB of free space.
I can add that the drive seems to spin down just as it should.
Jonatan -
Just try WD60EZRX in my Time Capsule, no idea of the generation, but it is firmware 7.6.4. It goes on, for 1 minute. Light blink amber, and TC go off.
Any idea ?
Gilles
Gilles -
I updated two different Time Capsule Models with the WD Red 6TB WD60EFRX. The drive works in both Models A1355 (third Generation) and A1409 (fourth Generation) and shows fully 6TB of Space. By the way ... the A1355 1TB had been equipped with a Samsung HD103SI, the A1409 2TB with a WD Green WD20EARS. Partitioning ist also possible! The WD60EFRX is now fitted into the A1409 and the WD20EARS into the A1355. Everything works fine!
Tom
I can concur regarding a 6TB drive working just fine. I just installed a WD Red WD60EFRX 6TB drive in a A1254 (2nd gen TC). I took the precaution of upgrading the firmware to 7.6.4 before doing the install. After the physical install, I simply connected using Airport Utility. I could see the new disk immediately under Edit -> Disks and the disk capacity was correct (6TB).
I selected "Erase Disk" and "fast" as the method (since it was a brand new drive). I also renamed the disk (which you can do by clicking on the name in the "Disks" pane).
The disk that I removed (because it failed) was a Hitachi Deskstar HDS721010KLA330 (1TB).
Hope this helps.
John
Anyone use a SSD yet, I'm looking to replace the HD to save some heat... Did I read earlier that a blank drive will work, if erased?
I installed (12/12/16) a Western Digital 3TB AV 3.5" 64MB WD30PURX (purple surveillance HD) successfully. $106.99 at B&H in NYC. Special thanks to Ray Haverfield for guiding me in on that purchase. He's an expert system when it comes to Time Capsules. Hails from Australia. His site: https://sites.google.com/site/lapastenag....
I wouldn’t expect there to be any benefit to using SSD since you’ll more likely be CPU constrained. Also spinning disks work well with backup jobs because of their sequential nature of writing to disks. Also you’re going to save a ton of $$/TB with HDD versus SSD. SSD would provide less heat, but I think the other benefits weigh in favor of the HDD as a better option.
Using an ssd is possibly faster but you will lose read write ability over time as the ssd doesn’t have the longevity of spinning disks. I just upgraded my 500g drive to a 2tb and went over the rubber pad with a hair dryer as proposed, then went over it again in and it pulled up flawlessly.
Great tutorial.
Some notes: The A1355 (3rd generation) is nearly physically identical to the A1302 (2nd generation). The hardware steps in this guide work for the A1355 BUT the A1355 is MUCH fussier about what drives work, I ended up buying an A1302 to replace the A1355.
From my tests, these drives DO NOT WORK in the A1355: WDC WD100EMAZ-00WJTA0 10TB; WDC WD00EMAZ-00WJTA0 8TB;; WDC WD40EFRX 4TB RED; WD 5000AAKS-42H2B0 0.5TB (pulled from an A 1302!)
Drives that DID work in the A1355: Seagate ST6000VN0021 6TB; WD20EARX 2TB (GREEN)
Every drive on the list worked without a problem on the A1302.
The A1355 was running 7.8.1 firmware. It’s not just the drive size that’s an issue - something else causes the drive to thrown an error when erasing those drives.
Because of @Phillip Remaker's comment regarding A1355 and 4TB WD RED not working, I bought Seagate IronWolf, 4TB, NAS CMR 3.5 Inch, SATA, 6GB/s, 5,900 RPM, 64MB Cache drive (ST4000VNZ08) and upgraded the TC. TC Firmware is 7.8.1 and it recognised the Seagate drive and let me erase it. So far so good.
My 1302 model worked perfectly fine with a Seagate IronWolf 10TB, NAS, HDD, 3.5'', 7.200 RPM, CMR, 256 MB Cache, SATA 6 Gb/s, Model-Nr.: ST10000VN0004.
-


To reassemble your device, follow these instructions in reverse order.
To reassemble your device, follow these instructions in reverse order.
Annuleren: ik heb deze handleiding niet afgemaakt.
290 andere personen hebben deze handleiding voltooid.

68 opmerkingen
I dislodged the fan connector from the logic board. How can I go about fixing this? Can I just solder the connector back onto the board? Thanks
Yes. It says to follow the article bakcward so yes connecting correctly sshould work…
I successfully took mine apart in order to harvest the hard drive (Apple told me that the unit as a whole wasn't fixable, but that the drive should be good).
However, I got to the point of trying to remove the 4 metal spacers in Step 5 and I can't get them to budge one bit. I need them out in order to fit the drive in the enclosure I got for it, and they just won't move. I've tried a couple different Phillips #00 screwdrivers on them, and no joy.
Any suggestions? Alternatively, anyone know of an enclosure that would work for the drive that doesn't require me getting these spacers out? I hate trashing a perfectly good drive if I don't have to.
This might help you: http://www.ifixit.com/Tools/Screw-Extrac...
If it's too expensive for you, grab a pair of pliers and try to twist the screw
I had a 2nd Generation 1TB TimeCapsule (model A1302) that was starting to act up, lots of 'backups incomplete' and then it started showing up as "Time Capsule may be overheating..." in AirPort utility. The Genius at Apple pointed out it was well out of warranty so I could buy a new one, or try a DIY fixit. I decided to try the WesterDigital 3TB green drive as it's had received good reviews from other upgrades. I can confirm that the WD30EZRX installed without a hitch, rebooted the TimeCapsule and all I had to do was erase the disk to see the whole 3TB space (it reported 2.7TB in AirPort utility, but When I restarted TimeMachine it reported 3TB free). yes! I did have to remove the old backup drive and restart a whole new backup from scratch - but maybe that's not a bad thing?
You wrote " I can confirm that the WD30EZRX installed without a hitch, rebooted the TimeCapsule and all I had to do was erase the disk to see the whole 3TB space (it reported 2.7TB in AirPort utility, but When I restarted TimeMachine it reported 3TB free). yes! I did have to remove the old backup drive and restart a whole new backup from scratch - but maybe that's not a bad thing?"
I bought and installed this drive. Can you also tell me how you removed the old backup drive? Thank you for your help!
Lisa -
Thanks for the instructions. It made everything easy to do as your instructions were excellent. I was working on a first generation 1TB TC (A1254) whose drive had gone bad. I removed it and decided not to replace it. I'm now using the TC solely as a Airport Express to extend my wireless signal throughout the house. It fired up perfectly and has the added advantage of running much, much cooler.
Constant yellow light doesn’t mean once and for all that the HDD is faulty. In my case it showed that the electronic was not alright. When I put out the HDD both worked fine - the AirPort of TimeCapsule and the HDD in an external dock. The guide is excellent, but be very careful trying to put out the plug of the fan, as this seems to be the predetermined breaking point.
Most excellent and easy to follow - thank you
Had to try several times (including some hard resets) before Airport Utility successfully erased/re-formated (zero'd the data) the new hard drive. I also took everything apart and put it back to together again several times. Maybe there was loose connection. Who knows. The directions were very clear, just not sure why I had trouble with the last step. Used a WD EZEX 1TB HD.
Thanks!
Good morning to all,
I have a Time Capsule Mod A1302 and one week ago just die.....
I saw this guide and I open it to replace the HDD, inside I found a SATA HDD WD Black Caviar, my question is this:
i don't know if the new HDD WD in the market has the temperature sensor on top of them like my?
I ask the technicians in the stores but know one knows if this sensor is an Apple's specific request for the Time Capsule, if it is like this can I install a new HDD with out temperature sensor or I must send my capsule to recycle?
thank you all in advanced.
Time Capsule 802.11n (2nd Gen)
This just saved me $300 bucks!!! Thank you so much it worked like a charm. First generation TC replaced my broken 1 TB Hitachi HD with a WD 3 TB HD. I was already thinking about buying a brand new 3 TB TC, but decided to check this out and I could not believe how easy it was. Thank YOU!!
I haven't been able to do backups since I had to swap out my 500GB drive for a 1TB one because my Time Capsule, 1st Generation, was only 500GB. After reading this guide, I bought a WD Red 3TB EFRX model and, after a bit of a struggle with some of the screws, it's up and running. Starting to wonder if the fan no longer works as there's no sound from it, but I think it's working fine as the backup is going along smoothly, no error reports and the light is green. Should anyone know differently, please post.
Thanks from Italy! The upgrade process (from a Seagate 500GB HD to a WD Green 3TB HD) has been smooth and easy (removing the rubber on the bottom apart!! @). BTW, my TC is a second generation model, after Apple changed for free my previous first generation, due the famous problems with the power supply module (it died after two years). Thanks again iFix.
Worked like a charm! Installed a 3TB Wd Red NAS drive. Cloned the old disk over to the new one using an ICY BOx clone station (cn be done manually also). Then ran a repair on the new disk to have the partition table use the whole disk, deleted the empty partition added on the free space, and then the Time Capsule partititoon expanded to fill the rest of the space automatically :)
Excellent stuff thanks. Very simple and I now have a Time Capsule with an 8TB drive. Plenty of space for all my backups.
Would it be possible to tell us which 8TB did you choose. The replacement of my original 1TB to 2TB and then 4TB within the "green" series of Western Digital was fine. But in order to move to 8TB, I wonder why Western Digital stopped its green series. Green means that the hard drive stops when not used (which is appropriate for a backup drive like a Time Capsule). The red series does not stop, with higher comsumption and permanent noise. I also wonder why Apple doesn't propose any solution (I did not find any) above 3TB. Does it mean that above 3-4TB, this is the end of Time Capsule backup technology with the very Apple specific tools like tmutil and sparsebundle format? With higher capacity (8-10TB) and low rpm (5400RPM), backup and restore times are too long to be useful?
revher -
The SATA bridge maxes out at 3.2TB. I wouldn't use this with an 8TB drive.
Reply to Steve. Any reference for the limitation to 3.2TB? I am using a 4TB Green (same SATA bridge) without any problem since years now.
revher -
For anyone contemplating this, it is quick, easy, and effective. I just installed a Seagate 8T Archive drive (ST8000AS0002).These drives are great for this sort of use where high performance isn't needed, but long term reliability and low power are good. The price point is nice too! Now my backup speed is no longer constrained by the USB interface the backup is performing well.
I did the opposite myself. I have an old 1TB TC that I took the disk out of and swapped in a WD green 250 gig disk, and repurposed the 1 TB in a server. I use the disk in the TC for sharing files via AFP. That works great by forwarding port 548 through my router, then I can share files with people I want to. Throughput sure could be better going to the TC.
I have a couple others on hand, one 500 gig courtesy of craigslist and I also found a 2 TB a few months back in a pawn shop. Speaking of those, I notice only the 1 TB TC flickers its green light when there is activity, the others just have a steady green light. Is there a model/generation reason why that is?
Randy -
Work`s just great! Thank you!
Tore from Sweden
Upgraded A1254 to a 3TB WD Green. At first the HD only showed a capacity of 2.2TB but after upgrading to firmware 7.6.7 and reformatting the drive it now shows as 3TB and is working perfect! Thanks!
how does the hard drive know its an airport? is there any software that needs to be loaded? Like when you change a hard drive in a computer you need to load the OS. Sorry if this is a sorta lame question...
The operating system is stored on the logic board. The hard drive is simply a container for your backups. After installing the new drive you format it from the airport utility.
rousp -
Upgraded A1302 from a WD500AAKS CAVIAR to a 3TB WD RED WD30EFRX 3TB (NAS). works fine, now i am using the ethernetport to make the initial copy The only problem was to get the rubber base off, maybe I was to inpatient, but it came off in 3 parts :-( not that it is a real problem it is on the bottom anyhow :-) thanks for the tutorial Gert Jan
The technique I used to get the rubber base off was to heat it up by ironing it with a domestic clothes iron through a sheet of paper. Then I was able to get the corner to lift off, and eventually by ironing it a few more times I was able to peel the whole base off very cleanly, with no rips or glue left behind.
Pretty Easy. compared to other certain iFixits. Mine did not come with the Rubber base. I guess I’ll have to find some rubber feet for it. The unit gets pretty hot. I Suppose SSD drives will work in these? That would take care of the heat issue.
I bought it mainly because it had a 1TB HDD inside. But it actually works better than a Linksys Router I was using! So I’ll just have to suffer with the fat32 FS on the drive, heh.
Upgraded to WWD30EZRZ - now I have 3Tb too. Thank you for the manual.
Are there any issues installing a 3 or 4 TB HDD WD30EZRZ or WD40EZRZ on an A1355 TC (Firmware 7.6.8)?
Just installed WD Red 6 Tb SATA-III 64 Mb (WD60EFRX). Only reformat required after physical installation and seems to work fine.
i just installed a seagate ironwolf 4TB, 5400rpm in my A1355 TC and the unit shut down when the hard disk start up. Does any one of you face this problem, please advise and help. I read up somewhere claiming that the power supply current is not enough to power the HD, but i saw on the HD that it uses less current compared to the original HD inside the TC.
Great procedure! I attempted this on an A1355 with an 8 TB WD Red and it would not format the drive. I finally gave up after multiple attempts, then got a 4TB WD Blue from Best Buy; it formatted in about a minute, and system is working great.
Anyone have any insight into why I had problems with the 8 TB?
hmm, drives larger than 4tb nowadays are 4kb block size as opposed to 512 kb… might just not be supported.
I want to destroy the hard drive on an old time capsule and would like to know the following:
What was the hard drive made of? Metal or glass? Do you know what year it was made?
Used this guide to upgrade an A1355 timecapsule from a 1TB to a 4TB drive… worked flawlessly…. Drive is a Seagate Ironwolf 4TB disk.
I tried this with a 4TB WD Blue drive, and the Time Capsule shuts itself off whenever it has to access the drive. Works fine without a drive, works fine with the old 1TB drive, but as soon as I put the WD Blue in, it shuts off.
Could this be a symptom of a failing power supply, or is something wrong with the new drive?
I’ve got the same issue. To remedy we tried installing a new 3.5-inch drive and that failed too. Not blown capacitors appear on the board. One workaround we found successful is to install a 2.5-inch SATA drive and the Time Capsule seems to keep running.
Hard lesson: Looks like 10TB drives will NOT work. You get an error when erasing them on the airport, and when you pull them out they show the capacity as 2.3TB. I suspect there is a FAT32 step in there someplace,
If I formatted it as MacOS Journaled, the time capsule recognizes it, but will not month the drives.
The original drive is split into two equal sized partitions. I think there is some kind of logical volume management going on. Need to dog more.
However, the 10TB drives will NOT work in this generation of Time Capsule.
I had swapped out the original 1TB drive from my Time Capsule a number of years ago with a 3TB WD Red NAS HDD, which was recently filled. Yesterday at home I removed the 3TB HDD and replaced it with a Seagate Exos Enterprise 10TB (Helium) 7200 RPM HDD (as I’d bought several others for server backup). This morning when I got back to the office I plugged the Time Capsule back in to the office network, and, lo & behold—it’s working! I erased the drive in the Airport Utility, which seemed to do the trick. Given problems others have encountered with 10TB drives, I feel fortunate.
Tanks a lot. Exchange was done in 10 Minutes following the description.
I’m not seeing a guide for the Apple Time Capsule 2TB MC344LLA / A1355 so I’ll have to see which one is closer to my model when it arrives,
But in the meantime has anyone been able to upgrade the hard drive past 2TB without any issues?
Is a Firmware update needed to do so?
This same guide also worked with my Apple Time Capsule 2TB MC344LLA / A1355 but I installed a Samsung 860 QVO 2TB SSD, It greatly reduced the weight of the unit and there’s less heat dissipation without the bulky standard WD 2TB 3.5 drive.
I have an old 3TB HDD 3,5” that was in a previous iMac . I want to use it in replacement for the actual 2TB HDD 3,5” in my Time Capsule (4th generation).
How can I know if that drive is still in very good order ?
Plug the drive into an external enclosure or into another machine and run a SMART test on it. For example on windows you can use crystal disk info program to see the smart and disk status stuff.
Thank you! Imagine, I’m doing this in 2021! Thank you iFixit
Because of @Phillip Remaker's comment regarding A1355 and 4TB WD RED not working, I bought Seagate IronWolf, 4TB, NAS CMR 3.5 Inch, SATA, 6GB/s, 5,900 RPM, 64MB Cache drive (ST4000VNZ08) and upgraded the TC. TC Firmware is 7.8.1 and it recognised the Seagate drive and let me erase it. So far so good.
Me too on the A1355 model but I used the Seagate IronWolf 6TB (ST6000VN001)
Open airport Utility on MacOS and it’s in there
For model A1355 I also had success with the Seagate IronWolf 6TB (ST6000VN001) see Amazon. I pulled the existing Samsung “spin master” drive out, put in the IronWolf then used Airport Utility on MacOS (don’t use iPhone air port utility) to format the drive. I did not need to do anything special like preformat the drive nor change the sector size.
Really is nice breathing new life into a piece of 13 year old equipment.
Slowly start peeling at one corner... worked better than shown on the pictures.
Markus - Antwoord
Slow down particularly near the bottom label where it is stiffer. Either that or I needed to give it more heat. Going too fast can risk tearing the rubber base if the adhesive is strong.
ElvinC - Antwoord
If you are wondering if the Time Capsule will still work as a router if you remove the HDD and leave it out, the answer (according to another webpage I read) is YES, it will still work. Apparently, you get a warning with the AIrPort Utility about a missing HDD, but it still works. I wanted to keep and reuse the 1TB Hitachi HDD for offsite data backup.
CraigH - Antwoord
Use an iron instead of a heating gun or hairdryer!
Gradually raise the temperature while checking for separation, while moving over the rubber. I first cleaned the rubber with some soap, to avoid scorching dust or grease. The setting for synthetic fabrics seemed to do the job with my Tefal iron; probably a little over 100 degrees centigrade. No steam off course!
Worked like a charm without leaving almost any residual glue.
Sticking the rubber sole back after the repair was also successful.
Frits de Bruijn - Antwoord
Thanks for sharing this.
kenatkenichikato - Antwoord
Adhesive tape used is Nitto No. 5015. I found a piece of a back-paper left underneath the rubber…
vesa - Antwoord
Is there a possibility to change an already changed 2TB SATA to a bigger one? Mine is full. because I added another MacBook Pro, but I’d rather not buy a newer TimeCapsule
Bette Rose - Antwoord
I have a heater plate from my beer fermenting days. Sat the router on this rubber side down for an hour or so and the rubber came off easily and cleanly. A pet bed heater may work just as nicely.
publiclee - Antwoord