Ga door naar hoofdinhoud

MacBook Pro 17インチ Unibodyのバッテリーの交換

Waarschuwing: Je bewerkt een vooraf vereiste handleiding. Alle wijzigingen die je hierin maakt, beïnvloeden alle 30 handleidingen die deze stap bevatten.

Stap 1 vertalen

Stap 1
MacBook Pro 17" Unibody Battery Replacement: stap 0, afbeelding 1 van 3 MacBook Pro 17" Unibody Battery Replacement: stap 0, afbeelding 2 van 3 MacBook Pro 17" Unibody Battery Replacement: stap 0, afbeelding 3 van 3
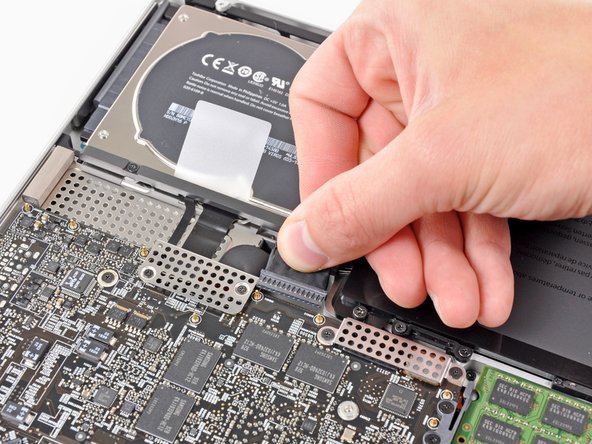
  • Whenever working near the logic board, it is always wise to first disconnect the battery to avoid short circuits.

  • If present, grab the plastic tab attached to the battery connector and pull it toward the front edge of the device. For Late-2011 models the battery connector will not have a tab and is simply a plug that inserts straight down into the motherboard--to remove pry the plug straight up.

  • If the plastic tab is missing, use a spudger to pry the connector up from its socket.

  • Pull the tab parallel to the face of the logic board.

ロジックボードの近くで作業するときは、最初にバッテリーを外してください。

バッテリーコネクタに取り付けられているプラスチックのタブを掴み、デバイス前端に向けて引っ張ります。 Late 2011モデルでは、バッテリコネクタにタブが付いておらず、差し込み口をマザーボードの内部に取り付けるだけです。そのため、外すにはプラグをまっすぐ持ち上げます。

プラスチックのタブが付いてない場合、スパッジャーを使用して、ソケットからコネクタを引き上げます。

ロジックボード表面に、タブを並行に引きます。

Je bijdragen zijn gelicentieerd onder de open source Creative Commons-licentie.