Deze versie kan foutieve bewerkingen bevatten. Schakel over naar de recentste gecontroleerde momentopname.
Wat je nodig hebt
-
-
Schakel je iPhone uit voordat je begint deze uit elkaar te halen.
-
Verwijder de twee 3.5 mm pentalobe schroeven aan de onderkant van de iPhone.
-
-
-
Plaats op 3 mm van de punt van je plectrum een markering met een stift.
-
-
-
Plak een aantal lagen tape op het scherm van de iPhone tot het gehele scherm bedekt is.
-
Als het je in de volgende stappen niet lukt om de zuignap op het scherm te bevestigen, kun je ervoor kiezen om een stuk duct tape in een handvatvorm op het scherm te plakken. Hiermee kun je dan het scherm omhoog tillen om een opening te creëren.
-
-
-
Trek de blauwe hendel naar achteren zodat de anti-klem vrij kan bewegen. (Op deze manier deactiveer je de openingsstand van de anti-klem.)
-
Schuif de armen over de linker- of rechterzijde van je iPhone.
-
Plaats de zuignappen dichtbij de onderkant van de telefoon—één op de voorkant en één aan de achterkant.
-
Druk beide zuignappen aan, om zuigkracht uit te oefenen op de gewenste plek.
-
-
-
Trek het blauwe handvat naar voren om de armen van de anti-klem te vergrendelen.
-
Draai het handvat 360 graden met de klok mee of tot de zuignappen uit beginnen te rekken.
-
Zorg dat de zuignappen op één lijn met elkaar zitten voordat je begint met het openen van het toestel. Als je ziet dat de zuignappen niet meer op één lijn zitten, maak je ze los en breng je ze weer op de juiste positie aan.
-
-
-
Verwarm een iOpener en plaats deze tussen de armen van de anti-klem op je telefoon.
-
Vouw de iOpener zodat deze op de onderkant van de iPhone komt te liggen.
-
Geef de lijm een minuutje de tijd om los te komen zodat de anti-klem een opening kan creëren.
-
Steek een plectrum in de opening onder het scherm zodra de anti-klem een opening heeft gecreëerd die groot genoeg is voor je plectrum.
-
Sla de volgende drie stappen over.
-
-
-
Gebruik een föhn of een warmtepistool, of prepareer een iOpener en leg deze op de onderkant van de iPhone gedurende ongeveer 90 seconden om zo de lijm die eronder zit te verzachten.
-
-
-
Verwijder de vier Phillips (JIS) schroeven die het paneel van de onderste schermkabel aan het logic board bevestigen, met de volgende lengtes:
-
Twee 1.3 mm schroeven
-
Eén 1.4 mm schroef
-
Eén 2.7 mm schroef
-
-
-
Gebruik de punt van een spudger of een nagel om de grote, onderste schermaansluiting los te koppelen door deze in een rechte beweging uit het contact omhoog te duwen.
-
-
Deze stap is niet vertaald. Help het te vertalen
-
Remove the two Y000 screws securing the rear camera connector cover bracket:
-
One 1.4 mm screw
-
One 1.4 mm (nonferrous) screw
-
-
-
Deze stap is niet vertaald. Help het te vertalen
-
Remove the two screws securing the rear camera module cover plate:
-
One 1.8 mm Phillips screw
-
One 2.7 mm (nonferrous) standoff screw
-
-
Deze stap is niet vertaald. Help het te vertalen
-
Remove the cover plate from the rear camera module.
-
-
Deze stap is niet vertaald. Help het te vertalen
-
Use an iFixit opening tool or a fingernail to disconnect the two camera cable connectors by prying them straight up from their sockets.
-
-
Deze stap is niet vertaald. Help het te vertalen
-
Use the flat end of a spudger to pry up the rear-facing camera assembly from the top edge of the iPhone.
-
-
Deze stap is niet vertaald. Help het te vertalen
-
Remove three Phillips screws securing the upper left antenna component:
-
Two 1.3 mm screws
-
One 3.1 mm screw
-
-
Deze stap is niet vertaald. Help het te vertalen
-
Remove the 1.3 mm Phillips screw securing the antenna component to the top edge of the rear case.
-
-
Deze stap is niet vertaald. Help het te vertalen
-
Tilt the antenna component up towards the top of the phone.
-
Slide the screw boss down and out of its recess.
-
-
-
Verwijder de drie schroeven die het L-vormige plaatje aan de trilmotor bevestigen:
-
Eén 1.3 mm Y000 schroef
-
Eén 2.6 mm Phillips schroef
-
Eén 3.5 mm Phillips schroef
-
-
-
Verwijder de drie schroeven die de trilmotor bevestigen:
-
Twee 1.5 mm Phillips-schroeven.
-
Eén 2.4 mm standoff-schroef.
-
-
Deze stap is niet vertaald. Help het te vertalen
-
Insert a SIM card eject tool or a paperclip into the small hole in the SIM card tray.
-
Press firmly to eject the tray.
-
-
Deze stap is niet vertaald. Help het te vertalen
-
Use the point of a spudger to push the SIM card eject plunger out of the logic board's way.
-
-
Deze stap is niet vertaald. Help het te vertalen
-
Remove two Phillips screws securing the bracket over the upper cable connector:
-
One 3.1 mm screw
-
One 1.3 mm screw
-
-
Deze stap is niet vertaald. Help het te vertalen
-
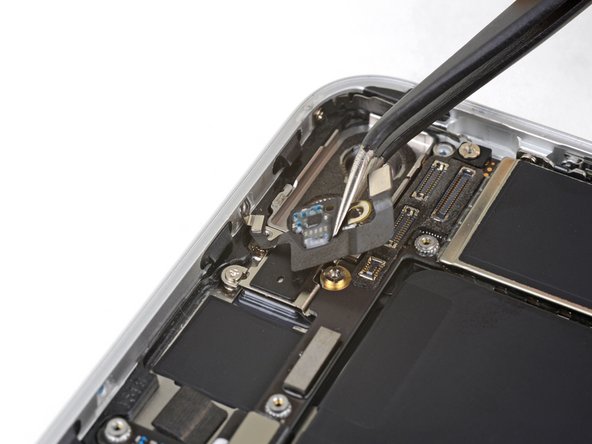
Remove the two 1.2 mm Phillips screws securing the grounding clip at the top left edge of the logic board.
-
-
Deze stap is niet vertaald. Help het te vertalen
-
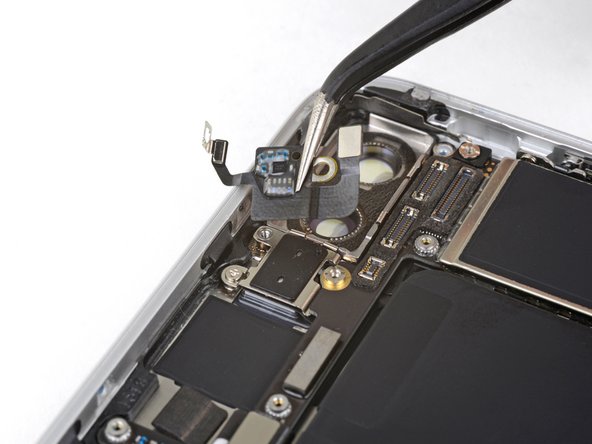
Remove the 1.2 mm Phillips screw securing the antenna flex cable to the top edge of the iPhone's rear case.
-
-
Deze stap is niet vertaald. Help het te vertalen
-
Use a fingernail or the sharp end of an iFixit opening tool to pry up and disconnect the antenna flex cable connector from the logic board.
-
-
Deze stap is niet vertaald. Help het te vertalen
-
Slide the flat edge of a spudger underneath the antenna flex cable to separate the adhesive holding it in place.
-
-
Deze stap is niet vertaald. Help het te vertalen
-
Tilt the antenna flex cable up toward the top of the iPhone.
-
Slide the screw boss down and out of its recess.
-
Remove the antenna flex cable.
-
-
Deze stap is niet vertaald. Help het te vertalen
-
Remove the three Phillips screws securing the lower speaker:
-
Two 1.4 mm screws
-
One 2.4 mm screw
-
-
Deze stap is niet vertaald. Help het te vertalen
-
Prying from the top edge, use your fingernail or a spudger to pry up and disconnect the upper cable connector.
-
-
Deze stap is niet vertaald. Help het te vertalen
-
Use the point of a spudger to carefully pry up and disconnect the wireless charging coil's flex cable.
-
-
Deze stap is niet vertaald. Help het te vertalen
-
Use the point of a spudger to pry up and disconnect the Lightning connector assembly's flex cable from the logic board.
-
-
Deze stap is niet vertaald. Help het te vertalen
-
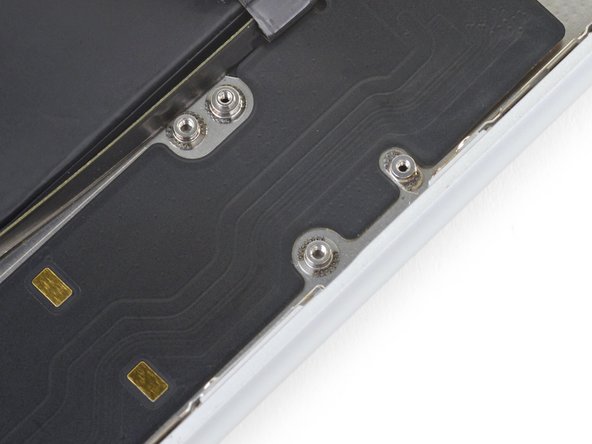
Remove the five screws securing the logic board:
-
Two 1.8 mm Phillips screws
-
One 2.3 mm standoff screw
-
One 2.4 mm standoff screw
-
One 2.7 mm standoff screw
-
-
Deze stap is niet vertaald. Help het te vertalen
-
Lift the logic board from the bottom edges and slide it toward the bottom of the iPhone to remove it.
-
-
Deze stap is niet vertaald. Help het te vertalen
-
Remove the two Phillips screws securing the barometric vent at the bottom left corner of the iPhone:
-
One 3.2 mm screw
-
One 1.8 mm screw
-
-
Deze stap is niet vertaald. Help het te vertalen
-
Gently push the barometric vent in the direction of the battery to separate the adhesive securing the vent to the bottom edge of the iPhone.
-
-
Deze stap is niet vertaald. Help het te vertalen
-
Remove the five Phillips screws securing the Lightning connector assembly to the rear case:
-
Two 1.2 mm screws
-
Two 2.4 mm screws
-
One 2.5 mm screw
-
-
Deze stap is niet vertaald. Help het te vertalen
-
Remove the two 1.3 mm Phillips screws securing the Lightning port to the bottom edge of the iPhone.
-
-
Deze stap is niet vertaald. Help het te vertalen
-
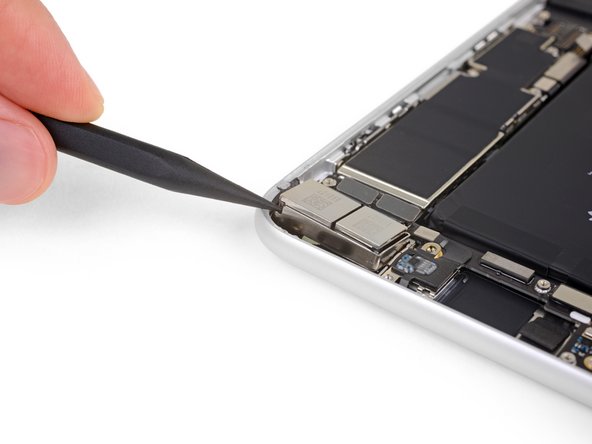
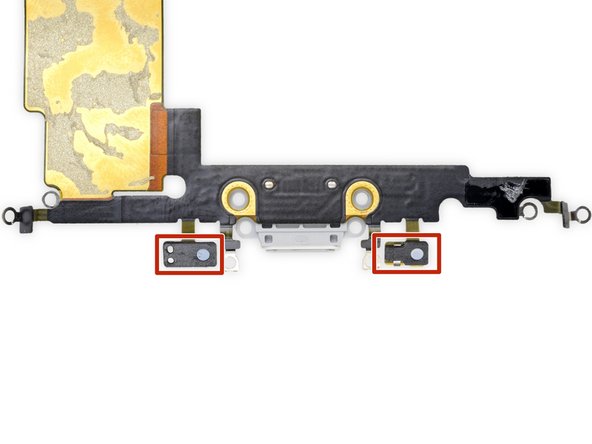
Use the sharp edge of an iFixit Opening Tool to pry the two microphones free from the adhesive securing them to the lower edge of the iPhone.
-
-
Deze stap is niet vertaald. Help het te vertalen
-
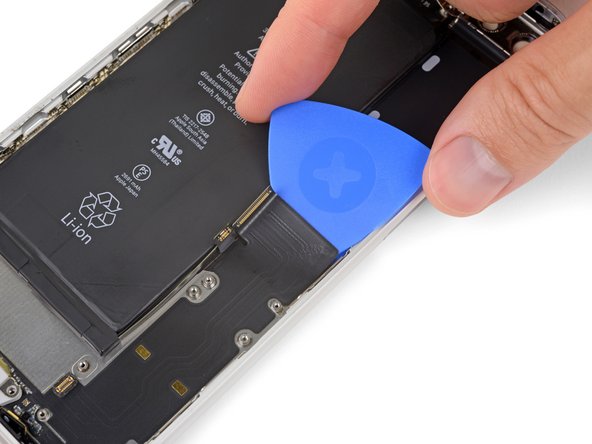
Apply an iOpener or use a hair dryer to heat the rear case behind the Lightning connector flex cable. This will soften the adhesive securing the flex cable, making it easier to separate.
-
-
Deze stap is niet vertaald. Help het te vertalen
-
Use the flat edge of a spudger to gently fold the battery flex cable connector away from the upper portion of the Lightning connector assembly.
-
-
Deze stap is niet vertaald. Help het te vertalen
-
Slide an opening pick or thin pry tool underneath the top portion of the Lightning connector assembly flex cable.
-
Gently slide the pick toward the outside edge of the iPhone (away from the battery).
-
-
Deze stap is niet vertaald. Help het te vertalen
-
Continue separating the upper portion of the Lightning connector flex cable, being careful not to damage any other components along the way.
-
-
Deze stap is niet vertaald. Help het te vertalen
-
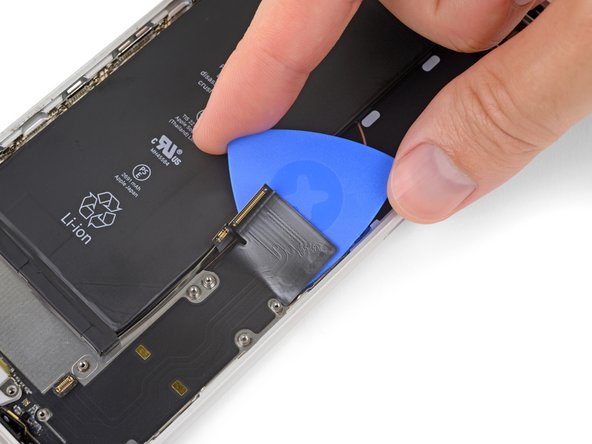
Continue separating the Lightning connector assembly's flex cable until you pass the lower edge of the battery.
-
-
Deze stap is niet vertaald. Help het te vertalen
-
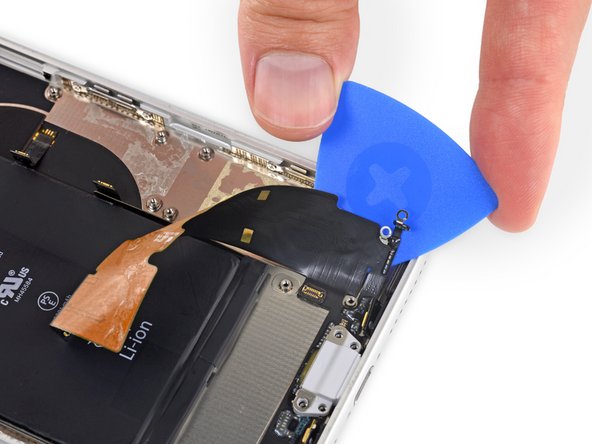
Carefully slide your pick from the corner of the battery to the corner of the iPhone to separate the portion of the flex cable adhered to the outer frame.
-
-
Deze stap is niet vertaald. Help het te vertalen
-
Slide your pick across the width of the iPhone to separate all the remaining areas of the Lightning connector assembly from the rear case.
-
-
Deze stap is niet vertaald. Help het te vertalen
-
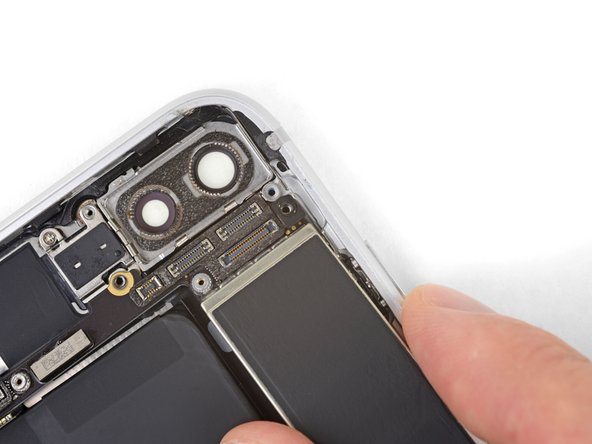
Remove the Lightning connector assembly.
-
Use a plastic tool to scour any bits of adhesive residue from the rear case.
-
Thoroughly clean any remaining residue from the surface with isopropyl alcohol (90% concentration or greater) and a lint-free cloth. Wipe in one direction only, not back and forth.
-


Annuleren: ik heb deze handleiding niet afgemaakt.
75 andere personen hebben deze handleiding voltooid.


17 opmerkingen
40 minutes seems crazy fast for this repair. If anyone can do this entire repair from beginning to end utilizing these steps in 40 minutes… they should spend a day or two practicing the Rubik’s cube and go smash the world record.
The guide helped me accomplish the repair. So, for that, thank you very much.
Very well done and easy to follow. Great piece of work and I appreciate the time spent putting it all together.
Have repaired 2 other iPhones, 6 and 6S, using the guides found here. When confronted with the iPhone 8 plus repair this is the site I came to.
Again, very well done indeed.
Kudos
Where dose one find a new gasket for the lighting cable?
You will not find a more comprehensive or thorough or accurate guide to dismantling and replacing the charging port on an iPhone 8 Plus than this. Awesome guide, thanks for your attention to detail and thoroughness! Bravo!
Thank you very much for the very detailed repair instructions. My microphone wasn’t working properly and I was able to get it fixed for just $12! (got the replacement from eBay)