Deze versie kan foutieve bewerkingen bevatten. Schakel over naar de recentste gecontroleerde momentopname.
Wat je nodig hebt
-
-
Schakel je iPhone uit voordat je met de demontage begint.
-
Verwijder de twee 3.4 mm pentalobe schroeven aan de onderkant van de iPhone.
-
-
-
Plaats op 3 mm van de punt van je plectrum een markering met een stift.
-
-
-
Trek de blauwe hendel naar achteren zodat de anti-klem vrij kan bewegen. (Op deze manier deactiveer je de openingsstand van de anti-klem.)
-
Schuif de armen over de linker- of rechterzijde van je iPhone.
-
Plaats de zuignappen dichtbij de onderkant van de telefoon—één op de voorkant en één aan de achterkant.
-
Druk beide zuignappen aan, om zuigkracht uit te oefenen op de gewenste plek.
-
-
-
Trek het blauwe handvat naar voren om de armen van de anti-klem te vergrendelen.
-
Draai het handvat 360 graden met de klok mee of tot de zuignappen uit beginnen te rekken.
-
Zorg dat de zuignappen op één lijn met elkaar zitten voordat je begint met het openen van het toestel. Als je ziet dat de zuignappen niet meer op één lijn zitten, maak je ze los en breng je ze weer op de juiste positie aan.
-
-
-
Verwarm een iOpener en plaats deze tussen de armen van de anti-klem op je telefoon.
-
Vouw de iOpener zodat deze op de onderkant van de iPhone komt te liggen.
-
Geef de lijm een minuutje de tijd om los te komen zodat de anti-klem een opening kan creëren.
-
Steek een plectrum in de opening onder het scherm.
-
Sla de volgende drie stappen over.
-
-
-
Het verwarmen van de onderkant van de iPhone helpt de lijm, die het scherm op z'n plek houdt, te verzachten, wat het makkelijker maakt om de telefoon te openen.
-
Gebruik een föhn of een warmtepistool, of prepareer een iOpener en leg deze op de onderkant van de iPhone gedurende ongeveer 90 seconden om zo de lijm die eronder zit te verzachten.
-
-
-
Druk een zuignap op de onderste helft van het voorste paneel, net boven de thuisknop.
-
-
-
Verwijder de volgende vier tri-point Y000 schroeven die het plaatje op de onderste schermkabel aan het logic board bevestigen:
-
Drie 1.2 mm schroeven
-
Eén 2.6 mm schroef
-
-
-
Gebruik het platte einde van een spudger of je nagel om de twee onderste schermaansluitingen los te koppelen door deze in een rechte beweging uit het contact op het logic board omhoog te duwen.
-
-
-
Deze stap is niet vertaald. Help het te vertalen
-
Remove three Phillips screws securing the antenna component:
-
Two 1.3 mm screws
-
One 1.2 mm screw
-
-
Deze stap is niet vertaald. Help het te vertalen
-
Remove the 1.3 mm Phillips screw securing the antenna component to the top edge of the rear case.
-
-
Deze stap is niet vertaald. Help het te vertalen
-
Tilt the antenna component up towards the top of the phone.
-
Slide the screw boss down and out of its recess.
-
-
Deze stap is niet vertaald. Help het te vertalen
-
Insert a SIM card eject tool or a paperclip into the small hole in the SIM card tray.
-
Press firmly to eject the tray.
-
-
Deze stap is niet vertaald. Help het te vertalen
-
Use an iFixit opening tool or a fingernail to disconnect the dual camera cable connectors by prying them straight up from their sockets.
-
-
Deze stap is niet vertaald. Help het te vertalen
-
Remove the two screws securing the rear-facing camera bracket:
-
One 1.6 mm Phillips screw
-
One 2.2 mm standoff screw
-
-
Deze stap is niet vertaald. Help het te vertalen
-
Remove the bracket covering the rear-facing camera.
-
-
Deze stap is niet vertaald. Help het te vertalen
-
Remove the two 1.3 mm Phillips screws securing the upper cable bracket.
-
-
Deze stap is niet vertaald. Help het te vertalen
-
Remove the two 1.3 mm Phillips screws securing the grounding clip at the top left edge of the logic board.
-
-
Deze stap is niet vertaald. Help het te vertalen
-
Remove the 1.3 mm Phillips screw securing the antenna flex cable to the top edge of the iPhone's rear case.
-
Remove the remaining Phillips screw from the antenna flex cable.
-
-
Deze stap is niet vertaald. Help het te vertalen
-
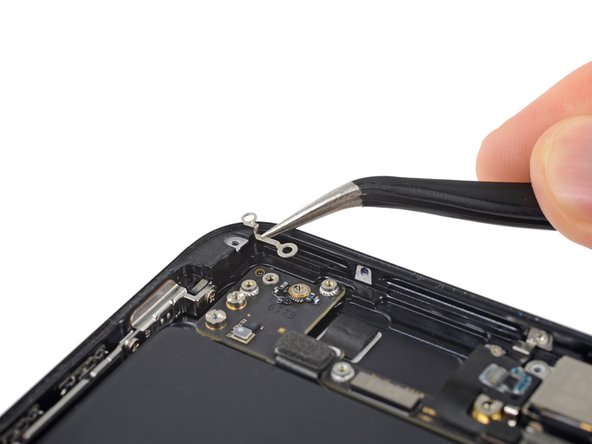
Use a fingernail or the sharp end of an iFixit opening tool to pry up and disconnect the antenna flex cable connector from the logic board.
-
-
Deze stap is niet vertaald. Help het te vertalen
-
Slide the flat edge of a spudger underneath the antenna flex cable to separate the adhesive holding it in place.
-
-
Deze stap is niet vertaald. Help het te vertalen
-
Tilt the antenna flex cable up toward the top of the iPhone.
-
Slide the screw boss down and out of its recess.
-
Remove the antenna flex cable.
-
-
Deze stap is niet vertaald. Help het te vertalen
-
Use a thin pry tool or tweezers to carefully pry up and disconnect the two coaxial cable connectors from the logic board.
-
-
Deze stap is niet vertaald. Help het te vertalen
-
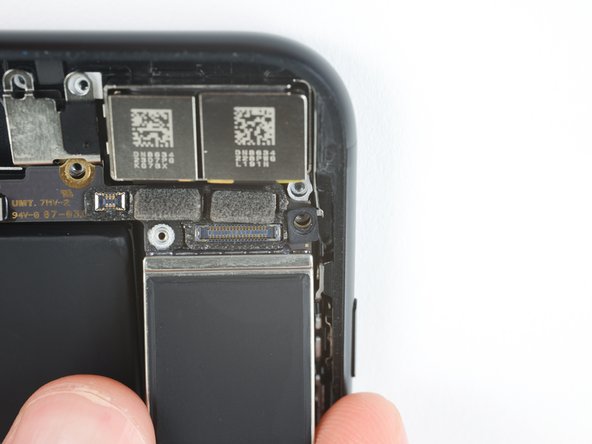
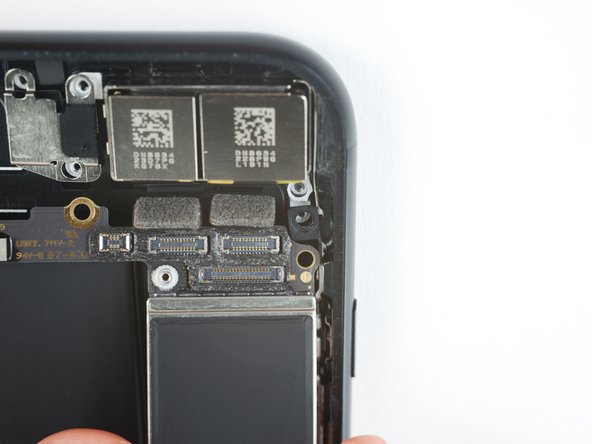
Disconnect the two remaining ribbon cables from the logic board:
-
Disconnect the upper cable connector by prying from the top
-
Disconnect the Lightning port connector by prying along the outer edge
-
-
Deze stap is niet vertaald. Help het te vertalen
-
Remove the seven screws securing the logic board:
-
One 1.3 mm Phillips screw
-
Two 2.1 mm standoff screws
-
One 2.0 mm standoff screw with a large head
-
One 2.0 mm standoff screw with a small head
-
Two 2.2 mm standoff screws
-
-
Deze stap is niet vertaald. Help het te vertalen
-
Use the point of a spudger to push the SIM card eject plunger out of the logic board's way.
-
-
Deze stap is niet vertaald. Help het te vertalen
-
Use the point of a spudger to carefully de-route the two coaxial cables from the small metal clip holding them to the logic board.
-
-
Deze stap is niet vertaald. Help het te vertalen
-
Lift the logic board from the bottom edges and slide it toward the bottom of the iPhone to remove it.
-
-
-
Verwijder de volgende twee Phillips schroeven die de barometrische ventilatieopening aan de achterste behuizing bevestigen:
-
Eén 2.9 mm lange schroef
-
Eén 2.1 mm lange schroef
-
-
Deze stap is niet vertaald. Help het te vertalen
-
Pry up the Taptic Engine's ribbon cable connector to disconnect it.
-
-
Deze stap is niet vertaald. Help het te vertalen
-
Remove the three 1.5 mm Phillips screws securing the Taptic Engine to the rear case.
-
-
Deze stap is niet vertaald. Help het te vertalen
-
Carefully de-route the two coaxial cables from the metal bracket holding them to the side of the speaker.
-
-
Deze stap is niet vertaald. Help het te vertalen
-
Remove the five Phillips screws securing the speaker:
-
Three 1.3 mm screws
-
One 2.3 mm screw
-
One 3.3 mm screw
-
-
Deze stap is niet vertaald. Help het te vertalen
-
Remove the 2.9 mm Phillips screw at the top left of the Lightning port.
-
-
Deze stap is niet vertaald. Help het te vertalen
-
Remove the spring contact underneath the screw you just removed.
-
-
Deze stap is niet vertaald. Help het te vertalen
-
Remove the following three Phillips screws securing the Lightning connector:
-
Two 1.7 mm screws
-
One 2.8 mm screw
-
-
Deze stap is niet vertaald. Help het te vertalen
-
Remove the two 1.2 mm Phillips screws securing the Lightning port to the bottom edge of the iPhone.
-
-
Deze stap is niet vertaald. Help het te vertalen
-
Use the sharp edge of an iFixit Opening Tool to pry the two microphones free from the adhesive securing them in place.
-
-
Deze stap is niet vertaald. Help het te vertalen
-
Slide an opening pick or thin pry tool underneath the top portion of the Lightning connector assembly flex cable, and begin separating it from the rear case.
-
-
Deze stap is niet vertaald. Help het te vertalen
-
Continue separating the upper portion of the flex cable, being careful not to damage any other components along the way.
-
-
Deze stap is niet vertaald. Help het te vertalen
-
Carefully slide your pick from the corner of the battery to the corner of the iPhone to separate the portion of the flex cable adhered to the outer frame.
-
-
Deze stap is niet vertaald. Help het te vertalen
-
Slide your pick across the width of the iPhone to separate all the remaining strands of the flex cable from the rear case.
-
-
Deze stap is niet vertaald. Help het te vertalen
-
Remove the Lightning connector assembly.
-
Use a plastic tool to scour any bits of adhesive residue from the rear case.
-
You can clean any remaining residue from the surface with isopropyl alcohol (90% concentration or greater) and a lint-free cloth. Wipe in one direction only, not back and forth.
-
Make sure the Lightning connector assembly is correctly positioned so that the two white dots on the iPhone's rear case show through the two circular cutouts in the Lightning flex cable. If they don't, the flex cable will remain misaligned and you won't be able to reconnect it to its socket on the logic board.
-


Annuleren: ik heb deze handleiding niet afgemaakt.
193 andere personen hebben deze handleiding voltooid.


41 opmerkingen
NOTE TO ALL: When you put the port back in, LINE UP THE HOLES ON THE FRAME. If you don’t line up the holes perfectly on the cable (even if it’s off by a millimeter), the cable will NOT extend and plug into the logic board. It has to be perfect. You’re welcome :)
I have this issue but cant seem to get it to set properly? any ideas the po seems like it's in fine but wont connect to logic board
I feel like this is the most important piece of information on this entire guide. I drove myself mad disassembling and reassembling multiple iPhone 7/8 Plus devices with this exact issue.
Conrad -
So i did this and now my home button does not work. Any suggestions?
So far as I can tell, the only part of this procedure that affects the home button is when it’s disconnected from the board in step 14. I’d probably double-check those connectors to make sure they’re seated properly for a start. Check the sockets for dust/debris or pin damage. Inspect the cables for damage. While you’re troubleshooting, remember to always disconnect the battery first and reconnect it last. Good luck!