Deze versie kan foutieve bewerkingen bevatten. Schakel over naar de recentste gecontroleerde momentopname.
Wat je nodig hebt
-
-
Schakel je iPhone uit voordat je met de demontage begint.
-
Verwijder de twee 3.4 mm pentalobe schroeven aan de onderkant van de iPhone.
-
-
-
Plaats op 3 mm van de punt van je plectrum een markering met een stift.
-
-
-
Trek de blauwe hendel naar achteren zodat de anti-klem vrij kan bewegen. (Op deze manier deactiveer je de openingsstand van de anti-klem.)
-
Schuif de armen over de linker- of rechterzijde van je iPhone.
-
Plaats de zuignappen dichtbij de onderkant van de telefoon—één op de voorkant en één aan de achterkant.
-
Druk beide zuignappen aan, om zuigkracht uit te oefenen op de gewenste plek.
-
-
-
Trek het blauwe handvat naar voren om de armen van de anti-klem te vergrendelen.
-
Draai het handvat 360 graden met de klok mee of tot de zuignappen uit beginnen te rekken.
-
Zorg dat de zuignappen op één lijn met elkaar zitten voordat je begint met het openen van het toestel. Als je ziet dat de zuignappen niet meer op één lijn zitten, maak je ze los en breng je ze weer op de juiste positie aan.
-
-
-
Verwarm een iOpener en plaats deze tussen de armen van de anti-klem op je telefoon.
-
Vouw de iOpener zodat deze op de onderkant van de iPhone komt te liggen.
-
Geef de lijm een minuutje de tijd om los te komen zodat de anti-klem een opening kan creëren.
-
Steek een plectrum in de opening onder het scherm.
-
Sla de volgende drie stappen over.
-
-
-
Het verwarmen van de onderkant van de iPhone helpt de lijm, die het scherm op z'n plek houdt, te verzachten, wat het makkelijker maakt om de telefoon te openen.
-
Gebruik een föhn of een warmtepistool, of prepareer een iOpener en leg deze op de onderkant van de iPhone gedurende ongeveer 90 seconden om zo de lijm die eronder zit te verzachten.
-
-
-
Druk een zuignap op de onderste helft van het voorste paneel, net boven de thuisknop.
-
-
-
-
Verwijder de volgende vier tri-point Y000 schroeven die het plaatje op de onderste schermkabel aan het logic board bevestigen:
-
Drie 1.2 mm schroeven
-
Eén 2.6 mm schroef
-
-
-
Gebruik het platte einde van een spudger of je nagel om de twee onderste schermaansluitingen los te koppelen door deze in een rechte beweging uit het contact op het logic board omhoog te duwen.
-
-
Deze stap is niet vertaald. Help het te vertalen
-
Remove the five Phillips screws securing the earpiece speaker bracket:
-
Two 1.8 mm screws
-
One 2.3 mm screw
-
One 2.4 mm screw
-
One 2.8 mm screw
-
-
Deze stap is niet vertaald. Help het te vertalen
-
Use the flat end of a spudger to lift the front-facing camera from its housing.
-
Gently bend the camera ribbon cable to the side to clear the way to the earpiece speaker underneath.
-
-
Deze stap is niet vertaald. Help het te vertalen
-
Gently fold the camera and attached ribbon cable toward the bottom of the iPhone to allow access to the components underneath.
-
-
Deze stap is niet vertaald. Help het te vertalen
-
Slide a spudger under the ambient light sensor flex cable, and lift the sensor out of its housing.
-
-
Deze stap is niet vertaald. Help het te vertalen
-
Slide the tip of a spudger underneath the proximity sensor flex cable, and lift the sensor out of its housing.
-
-
Deze stap is niet vertaald. Help het te vertalen
-
Insert the sharp edge of an iFixit opening tool underneath the camera assembly's flex cable, on the opposite side from the front-facing camera.
-
Pry up to separate the edge of the flex cable from the back of the display.
-
-
Deze stap is niet vertaald. Help het te vertalen
-
Insert the point of a spudger underneath the same portion of the flex cable that you separated in the previous step.
-
Continue separating the remainder of the flex cable, pushing the spudger toward the row of circular gold earpiece speaker contacts.
-
-
Deze stap is niet vertaald. Help het te vertalen
-
Continue using your spudger to carefully separate the last of the flex cable from the back of the display.
-
-
Deze stap is niet vertaald. Help het te vertalen
-
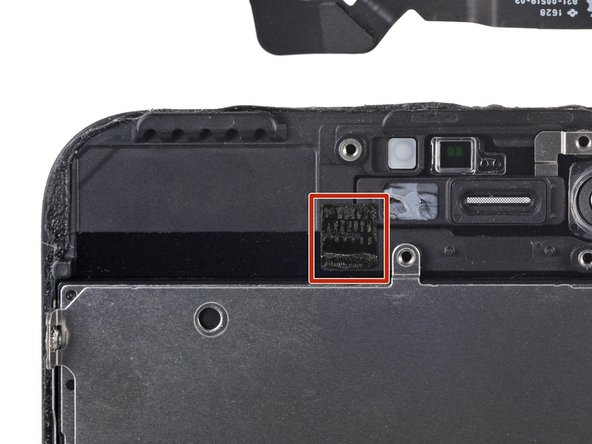
Remove the front camera and sensor cable assembly.
-
A piece of black double-sided insulating tape lies between the display and three rows of copper contacts on the back of the camera/sensor cable. It may remain stuck to the display, or it may come off with the cable.
-


Annuleren: ik heb deze handleiding niet afgemaakt.
113 andere personen hebben deze handleiding voltooid.


17 opmerkingen
Do I have to do this if i buy a new phone screen or do they usually come with one?
If this Speaker is Not Working or it has any Noise Issues, Apple will Replace whole Front Display Section. Under their Policy, they won’t repair it. Neither Fully Replace your iPhone, only Front Panel Replacement.
macktm -
Does 7 and 7plus has the same camera/sensor strip?
No, it’s a bit different.
The spacing between the metal dots for the earspeaker isn’t there on the 7+ model, but is on the 7.
Anybody got a solution to earpiece not working after ribbon swap?
Seems to be mega common with this repair. I’ve heard a few ideas but nothing concrete. More advice about this issue would be greatly appreciated by me and a bunch of people.