Inleiding
Use this guide to replace the LCD on an iPad 5.
Be very careful when you isolate the battery using a battery blocker. The battery contacts are easily damaged, resulting in irreversible damage to the logic board. If you choose to complete the guide without isolating the battery, avoid using metal tools except when completely necessary (like when removing screws) to prevent shorting the battery and damaging sensitive circuit components.
Wat je nodig hebt
-
-
Heat an iOpener and apply it to the left edge of the device for two minutes.
-
-
-
While you're waiting for the adhesive to loosen, note the following areas that are sensitive to prying:
-
Front camera
-
Antennas
-
Display cables
-
-
Gereedschap gebruikt in deze stap:Clampy - Anti-Clamp$24.95
-
Pull the blue handle backwards to unlock the Anti-Clamp's arms.
-
Place an object under your iPad so it rests level between the suction cups.
-
Position the suction cups near the middle of the left edge—one on the top, and one on the bottom.
-
Hold the bottom of the Anti-Clamp steady and firmly press down on the top cup to apply suction.
-
-
-
Wait one minute to give the adhesive a chance to release and present an opening gap.
-
If your screen isn't getting hot enough, you can use a hair dryer to heat along the left edge of the iPad.
-
Insert an opening pick under the digitizer when the Anti-Clamp creates a large enough gap.
-
Skip the next step.
-
-
-
Once the screen is warm to touch, apply a suction handle to the left edge of the screen and as close to the edge as possible.
-
Lift the screen with the suction handle to create a small gap between the digitizer and the frame.
-
Insert an opening pick into the gap between the digitizer and the frame.
I had a screen that was lightly cracked, and when I pulled up on the glass it cracked even further and made a mess of my removal. So, I would recommend taping cracks even if you can get suction so that you don’t induce even more cracks.
I actually had a really badly cracked digitizer. Using the suction cup did nothing but shatter the digitizer more. I intentionally drove a flat head screw driver into the digitizer to reveal the recess in the body where they are showing the opening-pick. Working around the edge, the glass shattered. You still need to be careful at all of spots noted in step 2.
Do not go under the digitizer more than the 1 mm along the sides or 3-4 mm at the corners as shown in step 29 using the flat grey ring around the edge for a reference. Direct all of your tool force into the body to prevent slipping into critical parts.
The antennas at either side of the home button were the trickiest part as they were thin and slightly attached to the digitizer. I would recommend using a plastic tool for these parts if you are having to 'scrape' the glass off of the tabs of the antenna.
-
-
-
Insert a second opening pick into the gap you just created.
-
Slide the pick toward the bottom-left corner of the device to separate the adhesive.
-
Leave the pick in the bottom-left corner to prevent the adhesive from re-sealing.
-
-
-
Heat an iOpener and apply it to the top edge of the device for two minutes.
-
-
-
Rotate the pick around the top-left corner of the device to separate the adhesive.
-
-
-
Slide the opening pick along the top edge of the device, stopping just before you reach the front camera.
-
-
-
-
Heat an iOpener and apply it to the right edge of the device for two minutes.
-
-
-
Rotate the pick around the top-right corner of the device to separate the adhesive.
-
-
-
Insert a new opening pick and slide it to the middle of the iPad's right edge.
There are sensitive display/digitizer cables no less than five inches from the bottom edge of the iPad. Insert the pick further down than this, or deeper than 1mm beyond this point and you risk irreparably damaging these cables.
Three inches is much too far down this side of the iPad to use picks.
-
-
-
Heat an iOpener and apply it to the bottom edge of the device for two minutes.
-
-
-
Slide the bottom-left pick to the bottom-left corner to separate the adhesive.
-
Leave the pick in the bottom-left corner before moving to the next step.
-
-
-
Insert a new opening pick into the gap you just created on the bottom edge of the iPad.
-
Slide the pick over the antenna, stopping just before the home button.
-
Leave the pick to the left of the home button before continuing.
-
-
-
Heat an iOpener and apply it to the right edge of the device for two minutes.
-
-
-
While supporting the digitizer, slide an opening pick between the two display cables to separate the last of the adhesive.
-
-
-
Once all of the adhesive has been separated, open the digitizer like a book and rest it parallel to the iPad.
While reassembling, REALLY make sure the display cables and the home button cable won't be folded / bent while closing the digitizer. I'm not exactly sure what I did, but I broke the home button and touch ID since I bent the home button cable to the point that it broke. These ribbon cables are SUPER fragile.
-
-
-
Remove the following Phillips screws securing the LCD.
-
Three 4.0 mm screws
-
One 4.8 mm screw
Use the provided replace screen case's square compartments to place your screws into as you remove them. Really helpful and you likely won't mess up.
I tape a stripe of double sided tape on my workbench. You can place the screws on the tape on the location where the screw would be if it was in the screen assembly. In this step, your screws would be in the four corners of the tape stripe, with the longest screw (4,8mm) in the upper left corner. The other screws from the next steps can also be placed on the tape this way.
**I believe you mean the “top Right corner” Is where the longer screw goes.. not left.
! went to Office World bought 4 packs of bluetac stuck them on a sheet of paper to give approximately size and shape of iPad put it in a flat cardboard box
Where can I buy these screws please ?
-
-
-
Use the flat end of a spudger to pry the LCD out of its recess just enough to grab it with your fingers.
-
Flip the iPad LCD like a page in a book, lifting near the camera and turning it over the home button end of the rear case.
-
Lay the LCD on its face to allow access to the display cables.
Got a cracked screen from toddler stepping on the iPad. My repair went well, everything worked. Except I scratched the LCD. It seems to scratch easily.
At this step, be careful when folding over the screen, as it may scratch on the aluminum frame (third picture). When they say “soft lint free surface” that is needed, specifically where the LCD meets the frame. Place a thin cloth like sunglass cleaning cloth over the edge of the frame.
Thank you, very much, for this tip.
At this step, possibly depending on date of manufacture, there may be black silicone present on/around the four screws that mount the display. It needs to be carefully scraped away and the two screw mount holes at the top of the screen pried up and away from the chassis. Between the chassis and the plastic portion of the mounting frame, there is a slim sheet of metal. Be sure to pry this off WITH the mounting frame. It is part of it. DO NOT try to separate it.
-
-
Gereedschap gebruikt in deze stap:Battery Blocker$3.99
-
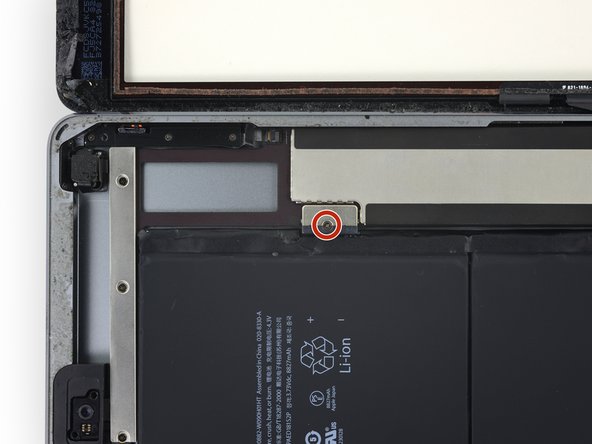
Remove the single 2.3 mm Phillips screw securing the battery connector to the logic board.
-
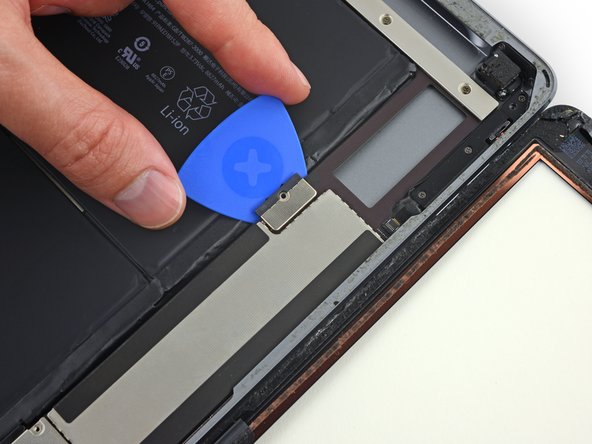
Slide the battery blocker underneath the battery connector area of the logic board, and leave it in place while you work.
Not having the isolation pick, I used 2 thin guitar picks instead, which did the job fine.
I couldn't disconnect the battery connector - I applied some force, nothing happened and I was afraid of applying too much force - so I just left it connected and I was very careful not to short out any terminals with metal tools. I completed the repair without any other issues and the iPad now seems to be working fine.
Mine was missing. Made one with scissors but still didn't do the trick. I just worked with the batteries still plugged in.
Couldn’t get the battery terminal disconnected so I continued with repair. I didn’t short anything but now it won’t do anything. It worked before, just a cracked glass to replace. Any solutions?
Why do you say you didn’t short anything? Your result would seem to suggest otherwise
I don’t know if it applies to the iPad Air, but I saw elsewhere in my researches in reference to a iPad mini (or was it an iPod mini?) that disconnecting the LCD and/or digitizer with the battery still connected will blow a “fuse” for the backlight. Might yours still be working, just with no screen illumination whatsoever? Dunno. Just a thought.
It apparently can be repaired, but is no longer a DIY job.
Tim -
try lifting the board and not blocking the connector. If you block the connector there are pins that could be damaged.
A replacement of the battery connector is required if pins are bent should you get power on or charge issue after battery disconnection. This can be replaced with the right tools and low melt solder to remove the connector and replace.
Best method to disconnect battery is to carefully lift the logic board near the battery connector enough to slip a piece of thin plastic or paper between the batter connector and the logic board battery connector and pins.
Failing to isolate battery so can result in blown back light or touch filters or diodes in backlight circuit.
At the very least run down the battery flat prior to repair but you are really best to isolate battery.
From a repair point of view. This connector is a royal pain. For assembly it's great, well, nearly great.
This connector is SOLDERED to the motherboard side. Never lever this on the motherboard side, I will call it the right hand side. It will break leaving it's soldered pins behind. Yes I did it.
The pins, on the battery side of this connector, just rest on the batteries plated pads. They are kept under tension by the screw. It should be noted though that removal of the screw will not disconnect the connector pins from the battery pads. Natural tension is still present.
I suggest strongly that you take a look at the battery connector online to see the nature of the pins and you will see that some are quite delicate.
The tools purpose is to raise the battery side of the connector ; the left side, so there is some clearance between the pins and the batteries pads. If you have seen a picture of this connector then you will realise the potential of damage to this connector and will have a better idea of what to do.
Contd.
Lifting the connector and simultaneously sliding a thin piece of card or plastic under the pins should be done carefully. In fact, to minimise damage I just slid it under ONE of the main battery pins, plus or minus, which are in the middle and quite robust compared with the tiddlers on the side of the connector.
The second point, the battery and the motherboard have protection circuitry. When I broke my connector the battery dropped to 0.5V at the terminals. Connecting the charger, when all the connections were sound and not shorted raised it from the dead back to over 3.2V
I replaced the battery, and got things hooked backup. For the test, the screen came on, digitizer seemed to be functioning fine. But I couldn’t get it to charge. I used the i-fixit battery blocker by using my spooger to put a little up pressure on the board, and then sliding the blocker in. I don’t think I damaged the pins, but its possible. This is a friends ipad, and its obviously been dropped a few times. I started eye balling the charging port, it LOOKS ok, but looks can be deceiving. When plugged in, even trying different cables, the ipad is not showing the charging symbol. Some of the comments here seem to imply, if I damaged the battery connection pins, I would still get a charging symbol. My question is, if I damaged those battery connector pins, would the ipad show the charging icon or not? Should I be looking at replacing the charging port?
-
-
-
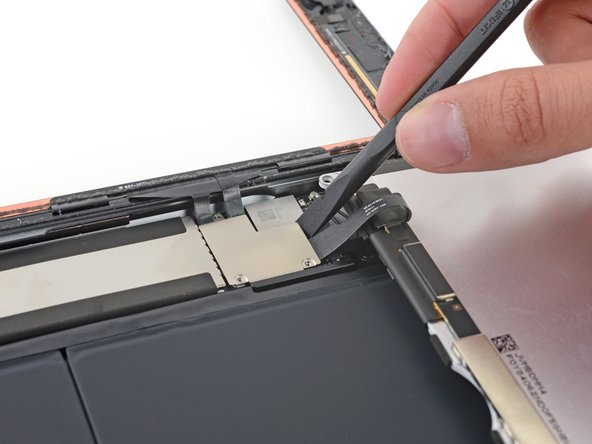
Remove the three 1.4 mm Phillips screws from the display cable bracket.
Be careful when re-installing screws on reassembly. I mistakenly put the longer screw from the battery connector in the outboard hole, and wound up twisting off the lug that is only lightly soldered to the metal below. Still have 2 screws and system seems to work fine.
-
-
-
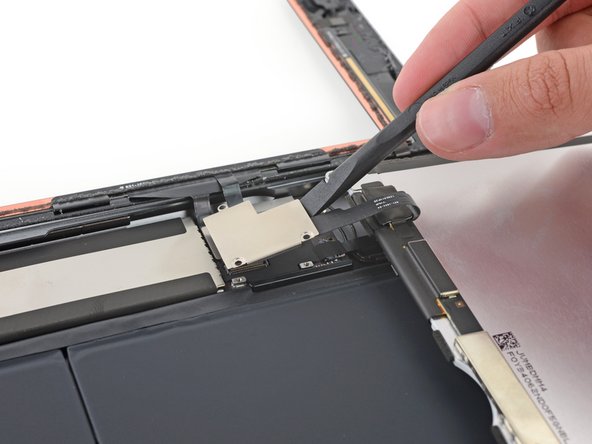
Use the flat end of a spudger to gently pry the display cable bracket straight up from the logic board.
bough my digitizer from ebay and have everything done up to this step. The screwdriver the kit came with said to be a #000 but it stripped the screw on the plate... I have tried rubber bands, tape and paper to no avail...anyone got an idea on how to remove the screw. Also I am currently studying in St. Kitts and they lack some products found in the US.
I'm sure you've moved past this by now, but I've had some success with stripped screws using a comparable, if slightly larger flathead screwdriver. The screwdrivers that come in those kits tend to suck quite a lot... iFixit actually has a guide for stripped screws: Hoe verwijder je een doorgedraaide schroef?
-
-
-
Remove the LCD.
Andddddd continue this iFix folks! It's not a matter of working backwards. Most people must have cracked screens and end up having to rip the screen off and won't have a chance to inspect connections.
He is far from complete…..if lcd is being replaced its probably because top screen is busted too. He didn’t show anything about how to remove the cables for that.
There is a separate guide for replacing the outer glass ;)
-
To reassemble your device, follow these instructions in reverse order.
To reassemble your device, follow these instructions in reverse order.
Annuleren: ik heb deze handleiding niet afgemaakt.
21 andere personen hebben deze handleiding voltooid.


