Inleiding
Gebruik deze handleiding om de harde schijf van je iMac te vervangen. Het vervangen van de harde schijf vereist dat je het scherm verwijdert en de linkerspeaker verplaatst.
Deze handleiding omvat ook instructies voor het upgraden van je harde schijf naar een SSD. De instructies laten je zien hoe je de temperatuursensor van de SSD plaatst zodat de ventilatoren van de iMac op de juiste snelheid zullen draaien.
Koppel alle kabels van de Mac los en houd de aan-uitknop van de iMac 10 seconden ingedrukt om alle condensatoren van de stroomvoorziening te ontladen alvorens je met deze procedure begint.
Ga erg voorzichtig te werk en voorkom dat je de uiteinden van de condensatoren of een soldeerverbinding aan de achterkant van de stroomvoorziening aanraakt.
Wat je nodig hebt
-
-
Nu het scharnier vrij kan beweging, zal het lastig zijn om aan de Mac te werken. Daarom hebben we de reparatiewig voor de iMac ontworpen, zodat je Mac blijft staan en je er gemakkelijk aan kunt werken.
-
Als je de reparatiewig gebruikt, kun je deze instructies volgen voor het in elkaar zetten en plaatsen van de wig.
-
-
-
Steek een openingstool in de naad aan de linkerzijde van het scherm, naast de aan-uitknop. Steek de iMac-openingstool in de naad tussen het glazen paneel en de achterste behuizing.
-
-
-
Gebruik je tool als een pizzames: rol je tool door de naad en zorg dat de lijm in het midden doorgesneden wordt.
-
Duw je tool langs de linkerkant van het scherm omhoog.
-
-
-
Duw je wiel rondom de linker bovenhoek van het scherm.
-
-
-
Leg je iMac met het scherm omhoog op je werkoppervlak.
-
Steek je plastic kaart in de rechter bovenhoek van het scherm tussen het scherm en het frame.
-
-
-
-
Nu de kaarten in de opening zitten zoals op de afbeelding te zien is, draai je beide kaarten tegelijkertijd een stukje om om de opening tussen het scherm en de behuizing groter te maken.
-
Als er delen van het scherm niet omhoog willen komen, stop je met het draaien van de kaarten en gebruik je een van de twee kaarten om de lijm op de desbetreffende plek door te snijden.
-
Til de bovenkant van het scherm langzaam maar zeker van het frame omhoog.
-
-
-
Gebruik een hand om het scherm omhoog te houden en gebruik je andere hand om de voedingskabel van het scherm los te koppelen.
Der Stecker muss seitlich wie die meisten anderen Stecker in diesem Modell komprimiert werden, um ihn aus der Buchse auf dem Logicboard zu ziehen. Die Zugrichtung ist parallel zum Logicboard in Richtung Oberkante des iMac. Ziehen ohne seitliches Zusammendrücken der Backen am Stecker könnte den Stecker oder die Buchse beschädigen.
These instructions are unclear. They imply the cable can just be pulled out but this step had me stuck for a bit. Searching the webs, I discovered that there are little tabs on either side of the connector. I used my prod tool and poked one side and the connector came out a little. I poked the other side the connector came out without a fight.
As others have mentioned later on, it is not necessary to fully remove the screen or disconnect these cables. I managed with just the screen held wedged open with a small cardboard box.
-
-
-
Til het scherm omhoog tot deze bijna verticaal staat.
After rocking the display back and forth a bit, I found it helpful to use my iMac opening tool to gently slide ever so slightly underneath the bottom of the glass to cut the adhesive. This was with the display lowered back into it its normal position. I just worked about 1 millimetre deep at a time and eventually cut through the ~8” adhesive strip at the bottom centre.
It's possible to skip this step and go to step 24, leaving the display attached. You'll want to open the display just enough to replace the drive, with the machine upright and supported so the display doesn't swivel (I fold up a small pillow and wedge it in there). This way you don't have to worry about damaging the display when removing it, or aligning it when replacing it (which can be difficult to do solo as it's big and heavy).
Using a T8 with a short handle is helpful here, and make sure it's well magnetized so you don't drop the screws for the hard drive (just leave the other ones in the speakers).
-
-
-
Pak de kleine lip aan het einde van een van de kleefstrips aan de onderkant van het scherm vast en trek de lip richting de bovenkant van de iMac om de strip te verwijderen.
-
Doe dit ook bij de andere kleefstrip en verwijder ook deze strip.
-
-
-
Til het scherm van het frame omhoog en verwijder het uit de behuizing van de iMac. Leg het scherm met het scherm naar beneden op een vlak en zacht oppervlak.
-
Het kan, als er nog wat lijmresten aan de onderkant van het scherm zitten, handig zijn om eerst een zijkant van het scherm omhoog te tillen.
-
-
-
Gebruik een T10-schroevendraaier(bitje) om de twee 10 mm lange schroeven, waarmee de linkerspeaker bevestigd is, te verwijderen.
-
-
-
Trek de SATA-kabel in een rechte beweging uit de harde schijf omhoog om deze los te koppelen.
-
-
-
Gebruik een T8-schroevendraaier(bitje) om de twee 7.3 mm lange schroeven, waarmee de linkerbeugel van de harde schijf aan de achterste behuizing is bevestigd, te verwijderen.
-
-
-
Verwijder de vier 8.1 mm lange T8-schroefgaten van de harde schijf en zet ze over naar de nieuwe harde schijf- of SSD-behuizing.
-
-
-
Breng de aansluitingen van de SSD op een lijn met de contacten in de metalen behuizing.
-
Druk de schijf in de contacten in de metalen behuizing totdat de SSD stevig vastzit.
what if I’m installing a hard drive?
Didn’t bother with the SSD caddy. Some 3M sticky pads did the trick!
Been using them for years...works great.
Two thoughts on SSD replacement/upgrade:
1) It would help if some references were made to help us determine what we need in terms form factors. I’ve never used an SSD and see a 2.5” one that would work, but I don’t know if 2.5” SSDs are different (in form factor) from 2.5” HDs. A lot of us are still learning about SSDs and isn’t that what this site is about? (Learning new things about hardware and using hardware?)
2) I’m not clear if I definitely need a new temperature sensor if I put in an SSD or if
Can I buy the kit without the SSD. I'm thinking of replacing my 3TB hard drive with a 4TB SSD.
Also, would you happen to know what the maximum hard drive dimension that can fit inside of this iMac? I may try a 14TB hard drive instead.
A 14Tb HDD does not represent any problem. But I will care about rising temperature. Must attach a heat sensor. If rise to high, it will suddenly shutdown to protect it.
-
-
-
Sluit de bijgevoegde sensor-enabled combinatiekabel in de poort in de behuizing.
Is the thermal sensor needed? I fitted a replacement SSD and it’s all back together and the iMac’s fans are fine. They don’t go into full max speed mode.
If you have a problem with the fans, you can always use Macs Fan Control (free) to set the speed. The sensor is not needed.
-
-
-
Verwijder de witte folie van de kleine printplaat van de temperatuursensor om de plakstrip bloot te leggen.
-
Druk de printplaat op een blootliggend, metalen oppervlak van de SSD, dicht bij de SATA-aansluiting.
-
Vouw de overige draden zo dat ze niet in de weg liggen bij het bevestigen van de behuizing.
Great pics ! Is that “temp sensor board” is already on my HDD IMAC ?? Or must I buy one ?
Don’t bother with the thermal sensor. I didn’t fit one and the iMac is working fine and no fans are kicking in.
Instructions say to attach sensor to the SSD, but all pictures show it being attached to the SSD carrier. This may not represent accurate SSD temp as much of the carrier dissipates the heat absorbed from the SSD
Confirmed, no need for the extra temp sensor on Mid-2015 iMac. (EMC 2806, Mid-2015 27" iMac). Just changed the old 1TB HDD to SSD, no extra fan RPM after power on.
-
-
-
Bevestig de beugels die je van de behuizing van de oude harde schijf hebt verwijderd op de nieuwe behuizing.
i don't have a combo cable.i also didn't have asata drive. just a blade ssd. i don't see wwhere i could add a cable
-
-
-
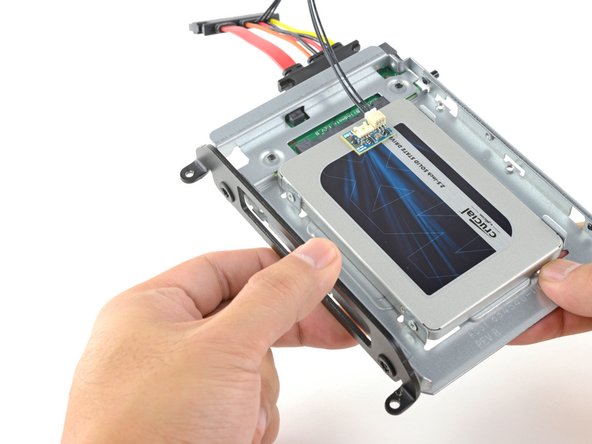
Schuif de behuizing van de SSD in de ruimte waar voorheen je harde schijf zat.
-
Leg de kabels zo dat ze niet in de weg zitten van andere onderdelen.
The SATA cable on my Late 2012 was not long enough to comfortably attach to the end of the temperature sensor array after it was plugged into the new SSD. I had to fold the array and slide it under the SSD and housing. There was much resistance to the folding so I took it slowly to let the wires adjust gradually to the fold so they would not break.
Unfortunately, the adapter that comes with it isn't long enough to avoid pushing against the screen in the front. One week after upgrading to SSD my screen fell off shattering and breaking the power connector on the systems board. A new screen is ordered but I'm hoping the power connector isn't damaged beyond repair. I'm going to try to adhere the HD adapter to the back inside of the case with 3m adhesive to avoid pressure against the screen.
As a newbie, the only other upgrade I have done is to replace my iPhone 7 battery. I had trouble on reassembly.
This is a great upgrade guide, but it would be important to me to see the reassembly instructions including the cautions.
For example, I had issues with reattaching the plugs in the phone. I could see having an issue with them here, as well as repositioning the display back into the cabinet.
I do PCB board repair work and repair pinball machines. But I won’t try this.
Try 3m double sided tape from Amazon, it available in 3mm width which is ideal for iMac screen. It has a very thin foam and is much better quality than the cheap Chinese kits available on Amazon. You will have to trim it to size with a sharp craft blade as you fit. Don’t risk your screen falling off from using cheap tape in the so called fitting kits!
In my Late 2012 27" iMac I Scotch-taped the SATA connector to the case to stop it from pushing against the screen after reassembly.
Only 39 steps!
Is it possible to clone the internal disk and have the imac boot off the external SSD?
The extension cable is too long. I folded it over carefully & stuck it down to the case using a double sided sticky pad. Photo here
-


Vergelijk je nieuwe onderdeel met het origineel om te zien of je meer onderdelen mee over moet zetten om het nieuwe onderdeel compleet te maken. Controleer ook of je beschermfolie moet verwijderen alvorens je je nieuwe onderdeel kunt plaatsen.
Volg bovenstaande instructies in omgekeerde volgorde om je toestel weer in elkaar te zetten.
Breng je e-afval naar een door R2 of e-Stewards gecertificeerd recycle-station.
Ging je reparatie niet helemaal volgens plan? Bezoek dan ons antwoordenforum voor hulp bij het oplossen van je probleem.
Annuleren: ik heb deze handleiding niet afgemaakt.
47 andere personen hebben deze handleiding voltooid.
Met dank aan deze vertalers:
100%

Thomas Keulemans helpt ons de wereld te herstellen! Wil je bijdragen?
Begin met vertalen ›

10 opmerkingen
What’s the difference with this guide? iMac Intel 27" Retina 5K-scherm Vervanging van de harde schijf
Hello, I have an iMac (Retina 5K, 27-inch, 2017) and I would like to change my hard disk, which is a 3.5GHz 1TB Fusion Unit, for an SSD disk, would you recommend doing it? And if so, what reference or brand do you recommend to do it?
I can confirm the OWC thermal sensor cable is not needed for HDD to SSD upgrade. I successfully upgraded my 2017 5k iMac fusion drive’s HDD to WD blue 2TB SATA3 ssd without it and the fans speeds don’t ramp up at all. Anyhow thanks for your guides Ifixit on how to DIY. I successfully upgraded my 128gb NVME to a 1TB NVME and to a SATA3 ssd for storage. Transfer speeds are insane and my boot up time now only takes 12 seconds compared to 32 seconds previously. I also upgraded my cpu from the i5-7600k to the i7-7700k. My 2017 5k iMac is blazing fast now. Thanks again ifixit.
Successfully upgraded to a 2TB SSD from the 2TB Fusion drive. As soon as I turned on Bootcamp, the Fusion drive went nuts for a few weeks I think because it prioritized the Windows side onto the SSD and the Mac side onto the spinning drive. It eventually corrected itself but it was a helluva time. And it was time for a fresh hard drive anyway. $500 is much cheaper than a new iMac. Highly recommend this one. This was way easier than my upgrades to the 2009 and to a Mac Mini.
Excellent instructions. The process is straightforward - the only tricky bit is reinstalling the screen accurately. There seems to be some conflicting views on the internet about the best way to do it and which adhesive strips to use - the 2012-2015 strips now seem to be supplied for later models, and they worked fine on my 2017 iMac.
My advice is just to take take it all very steadily and always read one stage ahead before you start on your next stage just to know where you are going next. I installed a 2TB Crucial SSD and the results are very good.
ive been looking for info on the blade drive as wiping a newly installed SSD and installing OS works, but what is best practice for this? what do we use the blade for after, is it just wiped and left redundant? - as for the temp control, just install Macs Fan Control.
i did this but then my imac showed a folder with a question mark on it
Great guide! Amazing work here.
Noch nie zuvor hatte ich so eine professionelle Anleitung gelesen.
EINFACH SUPER
What’s the point of this? You run the wheel around the outside, and then you lay it down anyway to pull the glass and do the rest. The wedge is not needed.
ebay - Antwoord
I have a story to tell about this teardown. It all went wonderfully well until after I completed the process and attempted to format my new SSD drive only to discovery that the capacity of the drive was 256GB… not the 2TB I was sure I had ordered. iFixit was very supportive and helpful in sending me a new set of sticky tape strips and and RMA to return the SSD and some of the other parts.
I finally had received my new set of strips and the 2TB SSD…. I figured, piece of cake… I already know how to do this… but I watched the video again and started following the teardown…
…apparently the new sticky tape strips was way more powerful that the original tape and while using the pizza cutter tool and not advancing much, I proceeded to use one of the iFixit credit card style wedges…. I now have 2 pretty severe cracks on the glass of my display, which as clearly explained by @mayer can only be replaced by an entire display… which runs at about $500. Cosmetically it looks horrible, but it works… for now.
Erich Hentschel - Antwoord