Ga door naar hoofdinhoud
Roccat Vulcan II Mini Air Battery Replacement

Roccat Vulcan II Mini Air Battery Replacement

Colby Paradiso

Colby Paradiso en een andere bijdrager

Voor het laatst geüpdatet op December 31, 2024

15 - 25 minuten
Gemiddeld
Heeft betere plaatjes nodig
Ontbrekende stappen
Behoeft meer afbeeldingen
Betere introductie

Follow this guide to replace the battery in your Roccat Vulcan II Mini Air keyboard.

Wat je nodig hebt

Gereedschap

Toon meer…

  1. Roccat Vulcan II Mini Air Battery Replacement, Backplate: stap 1, afbeelding 1 van 3 Roccat Vulcan II Mini Air Battery Replacement, Backplate: stap 1, afbeelding 2 van 3 Roccat Vulcan II Mini Air Battery Replacement, Backplate: stap 1, afbeelding 3 van 3
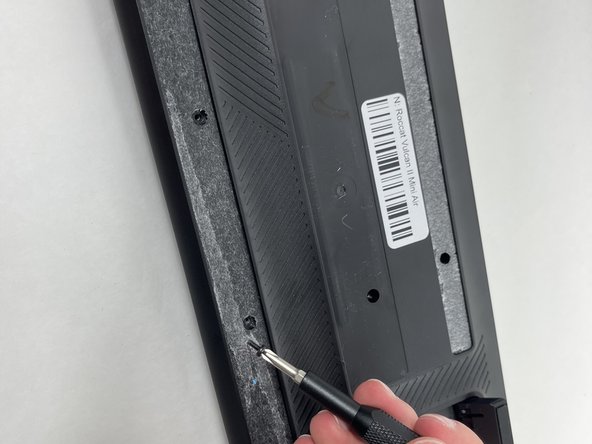
    • Flip your keyboard over so the bottom is facing up.

    • Before you begin, gently peel the sticker in the center and rubber strip that runs along the bottom and top to expose all the screws.

    • Be sure to save the rubber screw covers for reinstallation when you're finished.

    • Use a Phillips #0 screwdriver to remove all of the screws from the back plate.

    • Keep the screws for the replacement.

  2. Roccat Vulcan II Mini Air Battery Replacement: stap 2, afbeelding 1 van 3 Roccat Vulcan II Mini Air Battery Replacement: stap 2, afbeelding 2 van 3 Roccat Vulcan II Mini Air Battery Replacement: stap 2, afbeelding 3 van 3
    • With the screws removed the backplate will be loose and can be removed. Be careful, as it is still attached to the switch plate with ribbon cables so don't pull it.

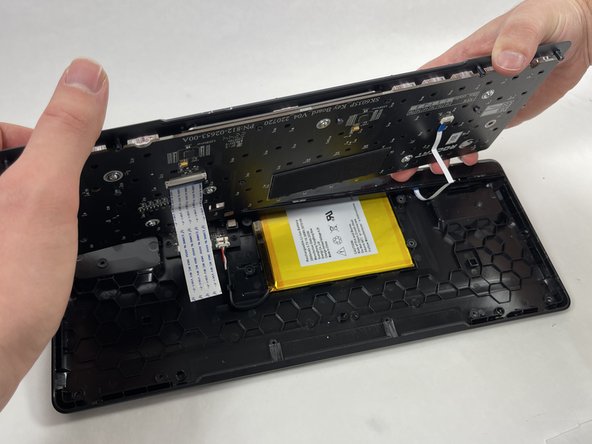
    • Gently lift the switch plate from the backplate, setting them next to each other with the ribbon cables facing upwards.

    • Use a spudger or a clean fingernail to flip up the locking flaps of the two ZIF connectors using the widest tool possible to avoid damaging the delicate hinge pins.

    • This is the unlocked position.

    • Use tweezers or your fingers to gently pull the cable out of its socket by the pull tab.

    • You could damage the cable by gripping it directly.

  3. Roccat Vulcan II Mini Air Battery Replacement, Battery: stap 3, afbeelding 1 van 2 Roccat Vulcan II Mini Air Battery Replacement, Battery: stap 3, afbeelding 2 van 2
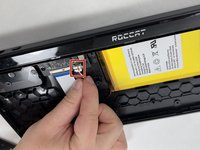
    • Push on alternating sides of the connector, like small sliding connectors to unplug the battery cable from the PCB.

    • If that doesn't work, use a pair of tweezers to firmly grip the sides of the connector and pull straight away from the socket. Hold the tweezers closer to the connector to get a better grip.

    • If you're having trouble, try rocking the connector side-to-side to loosen it.

    • You can insert the arms of a pair of sharp tweezers into the cutouts and gently push the connector out of its socket.

    • To reconnect the cable, insert the connector into its socket and push on the edges until it's fully seated.

    • Remove the battery from the laptop.

Conclusie

To reassemble your device, follow these instructions in reverse order. Take your e-waste to an R2 or e-Stewards certified recycler.

Colby Paradiso

Lid sinds: 10/24/24

145 Reputatie

2 handleidingen geschreven

Team

UMass Dartmouth, Team 3-3, Santin Fall 2024 Lid van UMass Dartmouth, Team 3-3, Santin Fall 2024

UMASSD-SANTIN-F24S3G3

4 Leden

4 handleidingen geschreven

0 opmerkingen

Voeg opmerking toe

Weergavestatistieken:

Afgelopen 24 uren: 0

Afgelopen 7 dagen: 15

Afgelopen 30 dagen: 32

Altijd: 69