Deze vertaling is door een computer gegenereerd en is nog niet door iemand nagekeken. Spreek je deze taal? Bekijk het hier.
Inleiding
Als je problemen hebt met je OnePlus 6 die de lading niet vasthoudt of niet inschakelt, gebruik dan deze handleiding om de batterij van je telefoon te vervangen.
De batterij van een telefoon zorgt voor de stroomtoevoer en een goede batterij is essentieel voor een lange levensduur van je telefoon.
Van tijd tot tijd kan de batterijduur van een telefoon, zelfs bij de OnePlus 6, na verloop van tijd afnemen en voor frustratie zorgen. Deze problemen kunnen voortkomen uit verschillende zaken, zoals het overbelasten van de telefoon met te veel draaiende apps of simpelweg een defecte en versleten batterij. Zorg ervoor dat je de OnePlus 6 Probleemoplossing-pagina bekijkt om te zien of er een eenvoudige oplossing is voordat je actie onderneemt om iets te vervangen. Als niets werkt, zal dit stapsgewijze proces je begeleiden bij het vervangen van je oude batterij door een nieuwe, zodat je OnePlus 6 weer als nieuw werkt.
De eerste stap in deze vervangingshandleiding is het verwijderen van het achterpaneel van de telefoon. Het achterpaneel is gemaakt van glas, dus wees voorzichtig dat je het niet laat versplinteren. Let ook op een opgezwollen batterij, aangezien dit een brand- en explosiegevaar kan vormen.
Zorg ervoor dat je alle stroombronnen loskoppelt en de telefoon uitschakelt voordat je aan het vervangingsproces begint.
Wat je nodig hebt
-
-
-
Zet het heteluchtpistool op een lage stand en verwarm voorzichtig de gebogen randen aan de achterkant van de telefoon.
-
Wig de opening plectrums tussen het voor- en achterpaneel en schuif ze rondom de omtrek om de lijm die de achterbehuizing op zijn plek houdt los te maken.
-
Herhaal dit totdat het achterpaneel volledig losgekomen is.
 Vraag FixBot
-
-
-
Til het achterpaneel voorzichtig op en zorg ervoor dat je de lintkabel van de vingerafdruksensor niet beschadigt.
-
-
-
Gereedschap gebruikt in deze stap:Tweezers$4.99
-
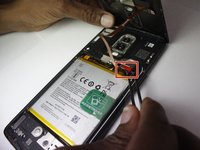
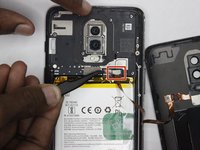
Gebruik een pincet om voorzichtig aan de rode treklip te trekken en de kabel van het apparaat los te koppelen.
-
Verwijder het achterpaneel volledig van het apparaat.
-
-
-
-
-
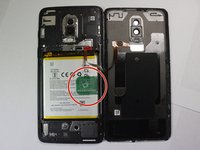
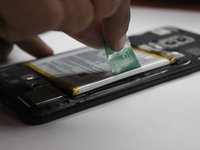
Pak de groene treklip vast die aan de accu vastzit en trek de accu recht omhoog en eruit.
-
-




Volg deze instructies in omgekeerde volgorde om je apparaat weer in elkaar te zetten.
Voor optimale prestaties na het voltooien van deze handleiding, moet je je nieuw geïnstalleerde batterij kalibreren.
Breng je e-afval naar een R2- of e-Stewards-gecertificeerde recycler.
Annuleren: ik heb deze handleiding niet afgemaakt.
17 andere personen hebben deze handleiding voltooid.

Team

Clemson, Team 4-3, Hunter Fall 2021 Lid van Clemson, Team 4-3, Hunter Fall 2021
CLEM-HUNTER-F21S4G3
5 Leden
96 handleidingen geschreven
6Gids Commentaar
How do I glue the phone back together when I am done? Do I need to add more glue? Do I just heat it with the heat gun again and squeeze it together?
I agree, this is unclear.
The "Parts" section at the top includes "Precut adhesive card", but when you click on that item, it gives a whole bunch of different size options for rolls of tape (8mm, 5mm, 1mm, etc.) and it's unclear which size to get. Does anyone have details of this?
Great tutorial, battery is fixed thank you ! If you prefer videos, this one is a good complement https://www.youtube.com/watch?v=OBN7Tc7J...
Battery good so far, instructions clear enough! I turned the phone on immediately after replacing the battery to make sure everything worked. This was to avoid putting the phone back together only to find it wouldn't turn on, and then having to dismantle it again.
One thing you may want to pay attention to is not to separate the screen (front) layer from the phone, rather than the back side, which is what I did on my first try.
I opted not to get adhesive strips and I simply applied thinly cut electrical tape around the phone's edges, on the outside, to keep it together after fixing. Not terribly aesthetic but does the job well enough, especially if you use a book-style phone case like me.
Pretty doable fix for a first-timer, especially when using the fixit tools (picks, spudgers etc). Happy with the results. Thank you for the guide!
Additional tips (1/2):
1. When buying tools, consider buying a suction handle. This was useful to use on the heated back cover to open up a gap to insert the opening picks into.
2. Consider removing the SIM tray before heating the back cover.
3. When heating the glass back cover, consider wearing some resistant gloves when heating the glass back cover. The glass can get a little got and I was only using a hair dryer on the highest setting, rather than a heat gun.
4. When you have managed to wedge your first opening pick underneath the back cover, take another pick and drag it along the nearest part of the gap to open up the gap further before setting that pick into position. Repeat as you go around the entire edge of the phone. However, BE CAREFUL to not push the opening pick too deep, especially around where the volume buttons are, as the fingerprint sensor cable is located close the edge of the phone.
