
Olympus C-765 Lens Replacement
Inleiding
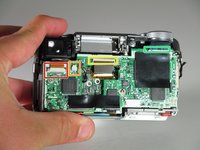
Ga naar stap 1Have you cracked the lens on your camera, or has it gotten really dirty? Follow this guide to repair the lens on your Olympus C-765 digital camera.
Looking through a dirty or cracked camera lens is frustrating and makes it difficult to see the subject of focus. Even a few tiny specks can have an effect on the photo you are taking.
Part of this guide has you remove the motherboard from the camera. This requires the skill of desoldering to remove the motherboard connections.
Before beginning, make sure to power off your camera completely, remove the battery, and disconnect from any external power source.
Wat je nodig hebt


-
-
Use a Phillips #00 screwdriver to remove the single 4mm screw located directly to the right of the viewfinder on the back of the camera.
-
Remove the two 2mm screws from the left side panel.
-
Remove the single 3mm screw from the right side panel.
-
Remove the five 3mm screws from the bottom of the camera.
-
-
-
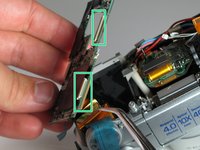
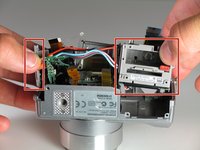
Remove the ribbon cable directly below the viewfinder.
-
Detach the white plastic clip from its socket with a pair of tweezers.
-
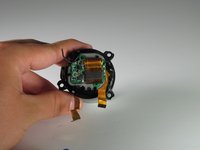
Disconnect the ribbon cable from the center of the board, near the central hole.
-
Disconnect the three ribbon cables from the top right of the motherboard, near the selector wheel. One is on the top of the board, and the other two are on the underside.
-
-
-
-
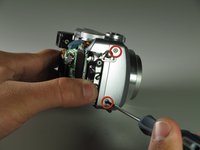
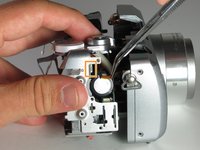
Unscrew the two 3mm screws from the right side of the casing.
-
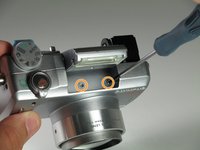
Pop the flash up to get access to the two body screws underneath.
-
Undo the two 3mm screws.
-


To reassemble your device, follow these instructions in reverse order.
To reassemble your device, follow these instructions in reverse order.
Annuleren: ik heb deze handleiding niet afgemaakt.
Één andere persoon heeft deze handleiding voltooid.
Team

Cal Poly, Team 12-33, Maness Spring 2011 Lid van Cal Poly, Team 12-33, Maness Spring 2011
CPSU-MANESS-S11S12G33
3 Leden
7 handleidingen geschreven