Inleiding
Gebruik deze handleiding om de linker- en rechterluidspreker van een Nintendo Switch gameconsole te verwijderen.
Wat je nodig hebt
-
-
Druk de kleine ronde knop aan de achterkant van de Joy Con-controller in en houd deze ingedrukt.
-
Schuif je controller, terwijl je de knop nog steeds ingedrukt houdt, omhoog.
-
-
-
Blijf de Joy-Con omhoog schuiven totdat deze volledig van de console verwijderd is.
-
-
-
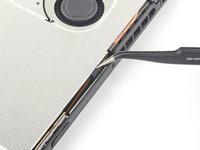
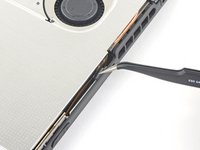
Gebruik een Y00-schroevendraaier of -bitje om de vier 6.3 mm lange schroeven die het achterste paneel bevestigen los te schroeven.
I think my screws are stripped, any way to get them out?
I hear that using a rubber band can help? Not 100% sure on that though.
Pifase -
My top 2 screws are stripped, one into triangle, the other circle, rather than triangle spokes.
This happened when I replaced the micro-sd card slot, which turned out to have replaced the broken one with another one that turns out to be broken. I need to fix the fact that when I reapplied the back cover, the vent was misaligned.
I had huge problems removing the bottom two screws. I continued with the next steps and lifted the plastic shell as much as possible while using the screwdriver and it became an ease.
y0 works best. Press HARD at beginning then ease off to finish.
I haven't tried neither solutions that I am gonna propose here but
1. Poor some Isopropyl Alcohol, one small drop will do, get a piece of cotton (not any clothing) and dip it in the Isopropyl Alcohol, apply and then try to get a grip with tweezers and turn it out
OR (I do not reccomend it since it can cause huge damage if done wrong)
2. Grab a small drill and drill through the screw. Keep in mind; the screw is very small.
If you do one of these and it goes wrong, I am not responsible for that.
-
-
-
Gebruik een JIS 000- of een officiële iFixit PH 000-schroevendraaier of -bitje om de volgende schroeven te verwijderen waarmee het achterpaneel is bevestigd:
-
Eén 2.5 mm lange schroef aan de bovenkant van het toestel.
-
Twee 2.5 mm lange schroeven aan de onderkant van het toestel.
Hey guys, I tried removing the upper screw and it won't go out(neither will it go in) any tips how to fix this?
Thanks
The screw boss might be stripped out. Has the device been taken apart before? If you can unscrew it a little bit to get the screw to peek out, maybe try and grab it with some pliers as a last-ditch effort.
I have the same problem. The JIS 000 tool works great on the joy con rails per step 5 but refuses to turn the bottom two 2.5 mm screws as in step 4. These bottom screws are noticeably smaller than the screws as in step 5. The JIS 000 does not get down into these screws. Hopefully they haven’t been stripped by the wrong tool. So is there a JIS tool that is smaller than 000? I’m stuck at this point…
We used the JIS 3.0mm screwdriver for both top and bottom screws and it worked
Fun fact: these screw into little plastic tabs that stick out of the rear panel. Apparently those tabs are fragile and easy to just break off…
If the screw is turning but not coming out, the plastic tab that it screws into is probably damaged or broken. You’ll need to try to pry the screw out with tweezers as you unscrew it. It is not the end of the world if you can’t screw these back in during reassembly.
this screws are way too fragile and way too small so be careful when taking them off dont use much force and unscrew also one of them fell somewhere and spent 30 mins searching for it
PH000 will work if you don’t have JIS000. The large IFIXIT kit has both and I lost JIS000. Just be very careful as you can strip the heads when removing or inserting easier.
One thing that worked pretty well for me with the screws not coming out is slightly prying on the back cover to put them under some tension
I just came here to also confirm and say thanks to Florian for the tip. This saved me a lot of time and frustration.
Quick note, these screws are not magnetic. A magnetic screwdriver will hold onto any of the others safely, but you need to be careful not to drop these ones in particular.
These would just keep rotating and not come out. What worked was, as Florian Kraupa suggested, i slid a plastic pick just between the 2 shells near the screws to prise it open slightly, then unscrewed and out they came. They're the smallest screws I've ever almost not seen before, so be careful with them.
Der Tausch von Akku (separate Anleitung) und Lüfter ging einfach vonstatten. Die Anleitung ist echt gut und leicht verständlich. Man sollte aber gewohnt sein, mit extrem kleinen Anschlüssen, Schrauben und Platinen zu arbeiten, da alles da drin recht klein ausgelegt ist und keine Toleranz für grobschlächtiges Arbeiten erlaubt! Meine Switch ist nun wieder wie neu :) - Danke iFixit!
The swapping of battery (separate instruction) and fan was fairly manageable. The instructions are easy to understand. One should be used to handle with extremely finnicky connectors, screws and circuits as the components are really small and do not allow any tolerance for rough handling at all! My Switch is good as new again :) - Thank you iFixit!
My original switch bought on launch day does not have any of these screws. I'm guessing they fell out since the plastic tabs they attach to are broken. FYI, in case anyone else does not have these screws...
-
-
-
Gebruik een JIS 000- of een officiële iFixit PH 000-schroevendraaier of -bitje om de twee 3.8 mm lange middelste schroeven aan de zijkanten van het toestel (een aan beide zijden) te verwijderen.
I tried my JIS 000 on Step 5 and was unable to get the screw to budge. It’s partner from the other side came right out with no trouble. Don’t really want to narf up the screw, so I bailed out. Anyone else have this issue?
Could just be torqued down a bit more! I’d recommend making sure the driver bit seats nicely into the screw, apply some downward pressure, and slowly twist to try and back it out. Good luck!
Yeah I’m having this exact issue. Screw stripped and now I’m stuck. Wish I hadn’t even started.
What worked for me here was a Phillips 000, not a JIS 000
My kit only has two screwdriver heads! The package was open when I received it!
I had this issue as well. Screw was irreparably stripped. If you can get every other screw out, just keep applying pressure with a flat head screw driver right above the stripped screw and try to break the plastic piece holding onto the screw. It's a very minor invisible bit of damage that will allow you to continue the repair.
after getting all the other screws off I just hinged the back part away and it snapped off neatly where the rusted screw is. not the best solution but it worked.
Steve T -
One of my screws was SUPER attached too, but after following a bit noticed the one other in the left that got out nicely, had the plastic tab broken already! So I went ahead and broke the other tab too. So the two side screws are now holding nothing. But I think it will work thanks to the other 4 or 5 screws. Too bad!
-
-
-
-
Gebruik je vinger om de standaard aan de achterkant van het apparaat omhoog te klappen.
-
-
-
Open de klep van de gamekaart-cartridge.
-
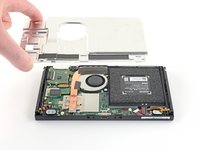
Til het achterpaneel vanaf de onderkant van het apparaat omhoog en verwijder het.
How to remove micro SD port?
Pull straight up, press back into place when closing back up.
This step is missing in this guide. Here are the steps from another guide:
Step 9) Nintendo Switch Right Joy Con Sensor Rail Replacement
Step 10) Nintendo Switch Right Joy Con Sensor Rail Replacement
When I lifted up the back cover, it kind of stuck near the headphone port (even with cartridge slot open). But it wasn't a screw or anything and I kind of carefully pulled and wiggled and the cover came off ok
+1, there is definitely an extra clip there on my day 1 switch
I wasn't so careful here and found out during reassembly that I accidentally broke off the clip with the screw hole on the top of the back cover (the clip fell off the device when I turned it over), so I can't put the top screw back in, but oh well at least the back cover is still affixed to the device otherwise
If you're having trouble getting the back cover to fit during reassembly, check to make sure you don't have an SD card inserted in the slot. It will get in the way.
If you're like me, you might have inserted the SD card to verify your SD reader was working again after doing step 9 reassembly. If so, remove it before proceeding.
-
-
-
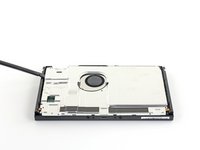
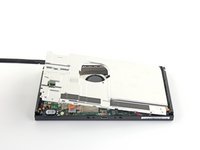
Gebruik een JIS 000- of een officiële iFixit PH 000-schroevendraaier om de zes 3 mm lange schroeven, die het warmteschild aan het toestel bevestigen, te verwijderen.
Some models have a small board in the lower left beneath the kickstand which accepts SD cards. This will have to be carefully removed with its connections popped out, then replaced after.
Yeah, that “small board” is the microSD Card reader chip, which was covered literally one step ago. All models have a microSD Card reader, that’s how game data is stored…
nin10doh -
My switch had loctite (or similar) on the bottom right screw (farthest right), ended up striping it and having to use a Dremel to cut a slot in the screw to get it out. I've heard that heat (solder gun) can be used to loosen loctite, hindsight. Only screw I found with loctite.
-
-
Gereedschap gebruikt in deze stap:Tweezers$4.99
-
Gebruik je vingers of een pincet om het stuk schuim aan de bovenkant van het toestel, bij de ventilatie-uitlaat, los te trekken.
My Switch (bought about two weeks after launch) seems to be missing this foam piece… Was it added later, similar to the foam piece in the left joy-con (to improve connectivity)?
It’s possible it was added to newer units! Nintendo slightly updated the internals of the Switch not too long ago.
My launch Switch also does not have this piece of foam, so it was most likely added later.
Also did not see this in my launch switch.
Me three, no foam.
-
-
-
Steek een spudger onder het warmteschild, dat zich langs de zijkant van het toestel bevindt.
-
Wrik het warmteschild omhoog en verwijder het uit het toestel.
-
Je kunt de koelpasta hergebruiken mits je voorzichtig te werk gaat. Zorg dat de pasta schoon blijft en zorg dat het na het weer terugplaatsen goed contact maakt met zowel het koellichaam als het warmteschild.
-
Als je de koelpasta moet vervangen, kun je deze handleiding gebruiken om de oude pasta te verwijderen en deze te vervangen door een geschikte pasta, zoals de K5 Pro-koelpasta.
How do you know if the thermal paste needs to be replaced?
Once you remove a heatsink you must always replace thermal paste even if you had just applied it ( or add a little more) . The reason is that once heat sink is fitted, paste splits around because of pressure and only needed amount will remain. If you remove the heatsink then some paste will move so when installed again there will be spots without paste. Hope this is clear enough. In any case cost of paste is very small compared to work time and value of your equipment…..
MacTek -
When your switch starts to lag and drop FPS, if you play breath of the wild and it starts to slow down in heavy areas like the forest where you get the master sword, can i use artic mx 4 insted of the pink compound?
I’d like to know as well if a cpu thermal compound like arctic mx-4 can be used to replace the pink compound
No you shouldn't . It will spill around because it is not viscous enough and then there will be no heat transfer. As suggested by author K5 PRO is the most appropriate compound for such cases.
MacTek -
Arctic is generally only supposed to be used on bigger heat sinks like a personal computer. Its not nearly as thick or gummy compared to K5 PRO, and you should always use something that’s thicker for smaller project like a Switch/phone/tablet.
Why was this not included in the tools/equipment list? Getting to this step and now I will have to reverse and wait for yet another order to arrive. ? Very frustrated
Hi Amanda,
Thanks for bringing this up. Sorry! We inadvertently left that part out during the guide refresh. I’ll add the necessary info into the step.
I agree with Amanda, hopefully I don't lose any parts before I can get the paste. This seems like it should almost be included in this kit from what I've read about this repair. Mine certainly needs to be replaced. I feel like at the very least, this should be at the top of the guide and part order page in bold, red, all cap lettering.
Side note this is the only "issue" I've had of the 4 purchases I've made with ifixit. I recommend you guys every chance I get. I really enjoy doing these repairs with my son.
does ifixit not have an appropriate thermal paste for this step?
there is only arctic silver 5 in the kit and i would guess that that should not be used in this case.
if true, the kit is incompleteSince I couldn't find decently priced K5 I used a 0.5mm thick thermal pad and that seems to have done the trick quite well.
The Amazon link goes to a kit with 6 tubes of K5 Pro. Surely I don’t need 6 tubes… is this kit sufficient? https://a.co/d/5aU8kB7
When replacing the thermal paste, is it possible just to clean the old thermal off the back plate and top of the copper heatsink and just re-apply those areas only, without removing that copper heatsink?
-
-
-
Trek de rechter luidsprekeraansluiting in een rechte beweging uit het contact op het moederbord.
-


Om je toestel weer in elkaar te zetten, volg je deze instructies in omgekeerde volgorde.
Om je toestel weer in elkaar te zetten, volg je deze instructies in omgekeerde volgorde.
Annuleren: ik heb deze handleiding niet afgemaakt.
19 andere personen hebben deze handleiding voltooid.
Met dank aan deze vertalers:
0%

Thomas Keulemans helpt ons de wereld te herstellen! Wil je bijdragen?
Begin met vertalen ›

6 opmerkingen
Will typical PC thermal paste work? I have a lot of that lying around and I don’t want extra cost (already spending the price of the speakers for the tools alone).
Has anyone tried to change the speakers for better ones? And how would that be done?
I just completed this as my first repair to anything, and it was surprisingly simple & easy! I was worried about the connections not working, but everything worked like a charm!
What do you do if the white connector on the motherboard, where you would connect the speaker, has snapped off? Is there any way to reconnect it?
It sounds like the part that you use to connect the speakers to the motherboard has seperated. This would require microsautering, which is very complicated and difficult to do. I would take it to someone with microsautering experience, or just not use that speaker if it doesn’t bother you. Unfortunately, there isn’t much else you can do about it.
Hope this helped.
Ember -
Does anyone know the name (part number) of the white connector on the motherboard ? I need to replace mine and I am unable to figure out the connector type.. any help would be greatly appreciated !
sp raju -
Kann ich diese Anleitung auch für die OLED anwenden? Habe im INet sonst leider nichts brauchbares gefunden.
Ina Barz - Antwoord
backup all your sd card data i had to format mine after this tutorial and lost all my game data
JustForThisComment?ComeOn - Antwoord
do not watch the video! i broke the metal shielding on my switch because they didn't mention a screw!!!
Macro Man - Antwoord