
Nintendo 2DS Motherboard Replacement
Inleiding
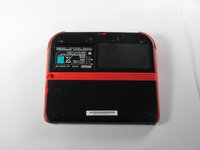
Ga naar stap 1The motherboard houses all the internal circuitry of the Nintendo 2DS, and the utmost caution must be taken when disassembling it. Be certain not to strip any screws, as that damage my be impossible to fix.
Wat je nodig hebt
Gereedschap

-
-
Remove the ten Phillips screws attaching the rear panel.
Can't take off the screw top left next to the battery. What type of screwdriver do I use and where can I find some?
I used a husky with changeable heads, you could probably find one on amazon
The screws are 6.2mm long
god I thought it was because I was repairing a sibling's ds that had something spilled on it (idk maybe that they didn't clean it good when it happened) but continued to struggle even with screws that looked fine... wish I had checked the comments sooner :/ Please like the above, update this guide! It sucks knowing that someone like me is also gonna probably miss this. I didn't get super far but well. I already stripped down some which sucks either way. Ironically, I noticed that using a size slightly smaller gets the job done better. Ironic in that you'd normally avoid that because it's more likely to strip with small bits scrapping the inside. But if you are real careful it can hang on and twist. I'd recommend just getting the JIS but maybe this might work for some- I also want to emphasize SLIGHTLY smaller phillips.
-
-
-
-
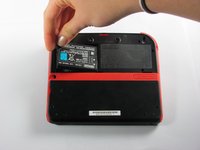
Carefully pull the rear panel straight up from the device.
-
-
-
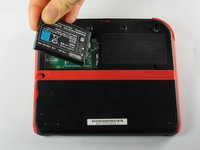
Use your fingernail or the flat end of a spudger to flip up the connector securing the ribbon cable to the motherboard
-
Remove the cable from the connector
You can also detach the cable from the motherboard safely by flipping up the connector on the motherboard. Just don't forget to reattach. Some will find this tedious but may save time if you know what you're doing with said connectors.
I agree, this is what the guide i followed said to do and since I was disconnecting all the other ribbon cables it made perfect sense to do it that way.
Lin -
pay attention: my 2ds dropped it's lens covers at this step
Likewise, I used a tiny drop of glue to put the lens back in place. Take care not to dirty the lens.
The picture you have there has the camera lens ribbon installed upside down. The ribbon needs to be pointing down when you re-attach it not up.
Agreed, ribbon cable looks upside down in picture
-
-
-
Hold the side panels of the device's case with your fingers and pull outward to remove them.
-
There are three ribbon cables which have already been unplugged in this picture, disconnect these before disassembling the device further.
When reattaching during reassembly, take great care to ensure volume slider piece is correctly aligned with potentiometer tab on motherboard, otherwise volume control cannot be changed.
The are two small metal pins in the bottom corners of the case, take care not to misplace them.
The (3?) small ribbon cables on the bottom of the motherboard appear to already have been unplugged in this step. unplug them while unplugging the two large screen ribbon cables in step 10
What are the three ribbon cable at the bottom are supposed to be. Pls
-
-
-
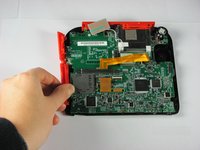
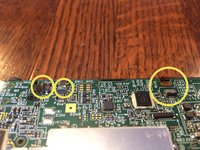
Remove the 12 brass-colored Phillips screws securing the main board.
-
-
-
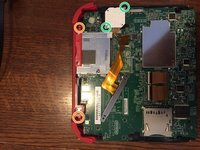
There are two additional screws located on the top rail. Remove these to fully remove the buttons and top rail.
-
There are two screws holding down the joystick base that must be removed. (Be careful of the ribbon cable—it stays connected!)
-
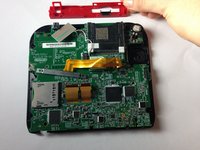
Hold the top panel with your fingers and pull away from the device to remove it.
When reassembling, take care to ensure all buttons, and rubber button pads are located correctly BEFORE securing the motherboard.
Please double check what Elliot said. From experience: DON'T FORGET THE [SLEEP] SLIDER
-
-
-
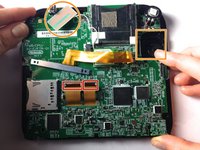
Detach the 2 ribbon cables by lifting the black flip connectors that hold them.
-
Lift out the rectangular board seated in the face and lift out the white square which is the joystick motor (takes a little effort). Both stay attached to the motherboard.
-
On some models, you'll need to remove three more tiny ribbon cables at the bottom of the screen. They are secured by flip up connectors. BE GENTLE!
-
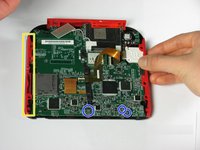
Holding the motherboard on either side, lift to remove it.
Don't forget to disconnect the two tiny ribbon cables on the bottom of the motherboard that attach to the microphone and home button.
What happens if I can't get the ribbons to reattach? Is the board broke irreparably?
What about the top 2 wires
Briana the 3 wires on bottom of board are covered under screen 2 step 10.
y e e t y e e t m y d u d e s ! ! ! ! ! ! ! ! ! !!n ! ! ! ! ! ! ! ! ! !
The motherboard of my 2017(I think) 2DS is definitely laid out differently than in this guide, be careful.
Cosa succede se i connettori dei 3 piccoli cavi piatti si dovessero rompere??
How do I flip up the two ribbons ( need help desperately)
-


To reassemble your device, follow these instructions in reverse order.
To reassemble your device, follow these instructions in reverse order.
Annuleren: ik heb deze handleiding niet afgemaakt.
33 andere personen hebben deze handleiding voltooid.
Team

Cal Poly, Team 70-1, Forte Winter 2015 Lid van Cal Poly, Team 70-1, Forte Winter 2015
CPSU-FORTE-W15S70G1
4 Leden
35 handleidingen geschreven
13 opmerkingen
o meu 2ds esta com um defeito que, quando eu aperto o botão de power ele liga e apos alguns segundo desliga e faz um pequeno barulho.
I have a question. After I replaced the mother board I have been having issues with it freezing after a couple mins running. Do you know why
I have a similar problem. After I replaced mine it will not open any app, and it does not show the status bar. Does anyone know why?
Now that I've removed the motherboard, how do I fix it? The instructible is great as far as it goes, but it doesn't go far enough
Fix what? You need to be more specific. I have to purchase a screen from China in order to fix mine.
I have a quarter inch metal pin left over. Don’t see it in any tutorials. Anyone know where it’s from?
I have the same thing, It came out when I was removing the back panel. I believe it was located towards the bottom of the panel. I’m scouring forums to see where it goes. Found this on Youtube! https://www.youtube.com/watch?v=qjoPIt5K... looks like it is just a reinforcement pin for a lanyard in the bottom corners.
Kwag -
where do i buy a motherboaRD
Depends on the country where you live. In Europe, some countries have apps (flesh market) where you will find used motherboards of Nintendo. (Wallapop, Vinted...)
For the rest of the world, you can try a l i e x p r e s s . c o m or similar.