Ga door naar hoofdinhoud
Logitech MX Master Side Feet Removal

Logitech MX Master Side Feet Removal

Clay Eickemeyer

Clay Eickemeyer en 2 andere bijdragers

Voor het laatst geüpdatet op November 18, 2024

Geen schatting
Eenvoudig
Alleen vereisten
Deze handleiding is alleen bedoeld als vereiste voor andere handleidingen. Het staat niet op zichzelf.

This guide demonstrates how to remove the side (left and right) mouse feet to access the lower panel screws in your Logitech MX Master mouse.

Wat je nodig hebt

iFixit krijgt commissie als je dingen koopt via deze links.
  1. Logitech MX Master Side Feet Removal, Soften the mouse feet adhesive: stap 1, afbeelding 1 van 2 Logitech MX Master Side Feet Removal, Soften the mouse feet adhesive: stap 1, afbeelding 2 van 2
    • Flip the mouse's power switch into the OFF position, unplug any cables, and flip it over so the feet are facing up.

    • The unique shape of some mice can prevent them from laying flat. If you need to, lay your mouse on a soft towel to prevent wobble.

    • If you're planning to reuse your existing mouse feet, note that the adhesive needs to be thoroughly heated for them to be cleanly removed.

    • Apply a heated iOpener to the left and right mouse feet for about one minute each.

    • Alternatively, you can use a hair dryer to soften the mouse feet adhesive.

    • When using a hair dryer, don't heat the feet for more than a couple seconds at a time—anything hotter than just warm to the touch risks melting or warping the plastic lower case.

    • The information sticker adhesive may soften during this step, but you don't need to remove it.

  2. Logitech MX Master Side Feet Removal, Separate the left foot adhesive: stap 2, afbeelding 1 van 3 Logitech MX Master Side Feet Removal, Separate the left foot adhesive: stap 2, afbeelding 2 van 3 Logitech MX Master Side Feet Removal, Separate the left foot adhesive: stap 2, afbeelding 3 van 3
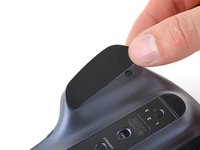
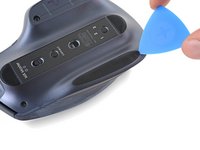
    • Insert an opening pick between the left foot and the lower case.

    • Go slowly, and make sure the pick slides underneath both the foot and its adhesive pad. These layers separate easily.

    • If you plan on reusing your mouse feet, be careful not to crease them or separate them from their adhesive pads.

    • Slide your pick under the foot to separate its adhesive until you can grab it with your fingers.

  3. Logitech MX Master Side Feet Removal, Remove the left mouse foot: stap 3, afbeelding 1 van 2 Logitech MX Master Side Feet Removal, Remove the left mouse foot: stap 3, afbeelding 2 van 2
    • Peel up and remove the left mouse foot.

  4. Logitech MX Master Side Feet Removal, Remove the right mouse foot: stap 4, afbeelding 1 van 3 Logitech MX Master Side Feet Removal, Remove the right mouse foot: stap 4, afbeelding 2 van 3 Logitech MX Master Side Feet Removal, Remove the right mouse foot: stap 4, afbeelding 3 van 3
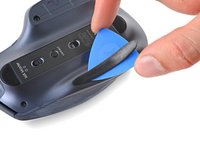
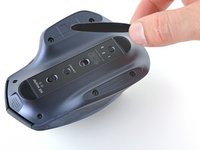
    • Insert and slide your opening pick under the right foot to separate its adhesive.

    • Remove the right mouse foot.

Conclusie

To reassemble your device, follow these instructions in reverse order.

Clay Eickemeyer

Lid sinds: 09/19/22

81.350 Reputatie

455 handleidingen geschreven

Team

Guide Team Lid van Guide Team

Staff

9 Leden

11.365 handleidingen geschreven

0 opmerkingen

Voeg opmerking toe

Weergavestatistieken:

Afgelopen 24 uren: 0

Afgelopen 7 dagen: 3

Afgelopen 30 dagen: 11

Altijd: 69