Ga door naar hoofdinhoud
LG V50 ThinQ Battery Replacement

LG V50 ThinQ Battery Replacement

Tanmay Sonawane

Tanmay Sonawane en 3 andere bijdragers

Voor het laatst geüpdatet op December 28, 2023

15 - 30 minuten
Gemiddeld

The phone battery may be old, the CPU may be overloaded, the battery is no longer holding charge, and/or the device operating temperature is too hot. Try closing out unused apps, maintaining a safe operating temperature, and enabling power saver mode.

Before using this guide, make sure to review the LG V50 ThinQ troubleshooting page to ensure there are no other options to save your battery.

If the battery needs to be replaced, this guide will help you replace the battery for your LG V50 ThinQ android phone. Make sure the device is powered off before replacing the battery.

Wat je nodig hebt

Onderdelen

Gereedschap

Toon meer…

iFixit krijgt commissie als je dingen koopt via deze links.
  1. LG V50 ThinQ Battery Replacement, Battery: stap 1, afbeelding 1 van 3 LG V50 ThinQ Battery Replacement, Battery: stap 1, afbeelding 2 van 3 LG V50 ThinQ Battery Replacement, Battery: stap 1, afbeelding 3 van 3
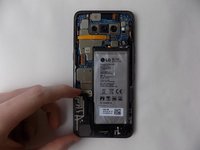
    • Flip the phone over, so that the back of the phone is facing you.

    • Using an opening pick, pry open the back cover of the phone by moving the opening pick along all sides to reveal the internal components.

  2. LG V50 ThinQ Battery Replacement: stap 2, afbeelding 1 van 3 LG V50 ThinQ Battery Replacement: stap 2, afbeelding 2 van 3 LG V50 ThinQ Battery Replacement: stap 2, afbeelding 3 van 3
    • Remove all twelve 1 mm Phillips #000 screws.

    • Remember to keep the screws in a safe place for reassembly later!

  3. LG V50 ThinQ Battery Replacement: stap 3, afbeelding 1 van 3 LG V50 ThinQ Battery Replacement: stap 3, afbeelding 2 van 3 LG V50 ThinQ Battery Replacement: stap 3, afbeelding 3 van 3
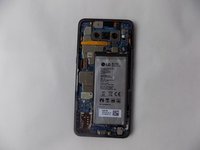
    • Remove the two brackets.

  4. LG V50 ThinQ Battery Replacement: stap 4, afbeelding 1 van 2 LG V50 ThinQ Battery Replacement: stap 4, afbeelding 2 van 2
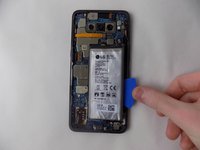
    • DO NOT attempt to remove the phone battery with a metallic/sharp prying object.

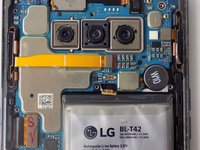
    • Disconnect the battery from the phone by removing the battery connection from the connector port.

    • Remove the battery by prying the underside of the battery and pulling upwards with the opening pick (shown in image 2).

    • Do not be too rough with the battery, as it is easy to dent/break into.

    • Now, place the new battery inside the slot, firmly pressing it into the space against the copper-colored heatsink on the bottom.

Conclusie

To reassemble your device, follow these instructions in reverse order.

3 andere personen hebben deze handleiding voltooid.

Tanmay Sonawane

Lid sinds: 10/30/23

262 Reputatie

2 handleidingen geschreven

Team

UMass Dartmouth, Team 2-3, Gulbrandsen Fall 2023 Lid van UMass Dartmouth, Team 2-3, Gulbrandsen Fall 2023

UMASSD-GULBRANDSEN-F23S2G3

4 Leden

5 handleidingen geschreven

0 opmerkingen

Voeg opmerking toe

Weergavestatistieken:

Afgelopen 24 uren: 2

Afgelopen 7 dagen: 16

Afgelopen 30 dagen: 85

Altijd: 1,382