
Dell XPS 15 9530 SSD Replacement
Inleiding
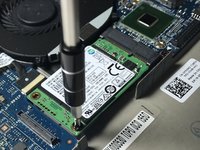
Ga naar stap 1Removal of the solid state drive will be covered in this guide. To successfully remove the battery, a #0 Phillips screwdriver, and T5 Torx screwdriver are needed. Be careful disconnecting cables as to not break them or their connectors.
Wat je nodig hebt
Gereedschap


-
-
-
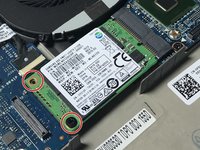
Pull lift tabs and remove the plastic that covers the hard drive to expose the hard drive.
-


To reassemble your device, follow these instructions in reverse order.
To reassemble your device, follow these instructions in reverse order.
Annuleren: ik heb deze handleiding niet afgemaakt.
2 andere personen hebben deze handleiding voltooid.
Team

Oregon Institute of Technology, Team S1-G3, Lancaster Spring 2019 Lid van Oregon Institute of Technology, Team S1-G3, Lancaster Spring 2019
OIT-LANCASTER-S19S1G3
3 Leden
13 handleidingen geschreven
2Gids Commentaar
This guide is outdated for recent models of the XPS 15 9530. Unfortunately the iFixit page for this computer doesn't distinguish between model years back to 2013 (!).
On the + side, there are now 2 M.2 SSD slots, but on the - side, opening the case is a little trickier. To add a 2nd SSD, you probably also want to find a right-side (or slot 2) heatsink. Those for the 9500, 9510, and 9520 will work (e.g. part 04TW9C 4TW9C 3JJDG 03JJDG).
Luckily, the service manual from Dell is surprisingly helpful. It says for instance, "Starting from the bottom-left corner, use a plastic scribe to pry the base cover in the direction of the arrows to release the base cover from the palm-rest and keyboard assembly."
I would do a guide, but wasn't ready to when I did this. Case is sturdy enough, but this is just tricky enough that I don't want to open it again since it's a relatively new computer. But I point you to the service manual which is fairly thorough and also wrought with cautions about static electricity!
(out of space!)
Let me also just note that as of 2023 this model takes a 2280 form factor M.2 SSD, which is longer than what is depicted in this guide. According to the Micron website only single-sided versions of this will fit -- which appears to be true, at least if you use a heatsink. These are however as of now available in capacities up to 4 GB, so 4 x 4 = 8 which is quite a lot.
Be careful opening the case, which fights back though is fairly sturdy. And from the service manual:
"CAUTION: The base cover is preassembled with the audio-daughter board. The pins at the bottom of the base cover are fragile. These pins ground the antennas and audio-daughter board. Place the base cover on a clean surface to avoid damage to the pins."