Ga door naar hoofdinhoud

Dell Inspiron 13-7352 System Board Replacement

Wat je nodig hebt

  1. Dell Inspiron 13-7352 System Board Replacement, Battery: stap 1, afbeelding 1 van 3 Dell Inspiron 13-7352 System Board Replacement, Battery: stap 1, afbeelding 2 van 3 Dell Inspiron 13-7352 System Board Replacement, Battery: stap 1, afbeelding 3 van 3
    • Before you begin, be sure to turn off your laptop and unplug it from the outlet.

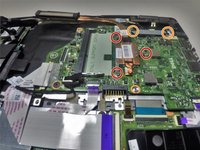
    • Use a Phillips screwdriver to remove the ten 7.5mm screws that securing the back panel.

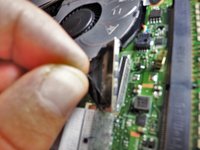
    • Use the plastic opening tool to pry up and loosen the back panel.

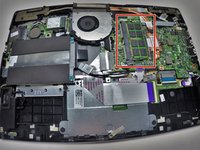
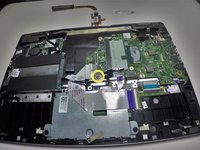
    • Remove the back panel.

  2. Dell Inspiron 13-7352 System Board Replacement: stap 2, afbeelding 1 van 2 Dell Inspiron 13-7352 System Board Replacement: stap 2, afbeelding 2 van 2
    • Use a Phillips screwdriver to remove the two 3 mm screws securing the battery.

    • Unclip the hard drive wire from the battery.

  3. Dell Inspiron 13-7352 System Board Replacement: stap 3, afbeelding 1 van 1
    • Gently remove the battery from the rest of the device.

  4. Voorzichtig: stappen 4-5 komen van een handleiding die in bewerking is.

    Dell Inspiron 13-7352 System Board Replacement, Memory Module (RAM): stap 4, afbeelding 1 van 3 Dell Inspiron 13-7352 System Board Replacement, Memory Module (RAM): stap 4, afbeelding 2 van 3 Dell Inspiron 13-7352 System Board Replacement, Memory Module (RAM): stap 4, afbeelding 3 van 3
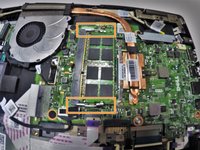
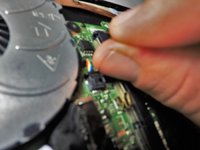
    • Locate your memory module (RAM).

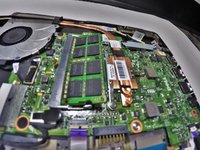
    • Release the clips from the Memory Module by gently pushing down. This should cause the Memory Module to pop up and separate from the device base.

  5. Dell Inspiron 13-7352 System Board Replacement: stap 5, afbeelding 1 van 1
    • Pull the Memory Module from its slot by grasping each side with thumb and middle or index finger to pull from the rest of the device.

  6. Dell Inspiron 13-7352 System Board Replacement, System Board: stap 6, afbeelding 1 van 3 Dell Inspiron 13-7352 System Board Replacement, System Board: stap 6, afbeelding 2 van 3 Dell Inspiron 13-7352 System Board Replacement, System Board: stap 6, afbeelding 3 van 3
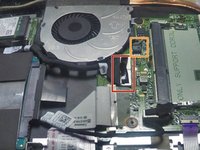
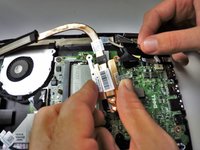
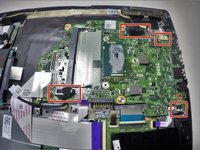
    • Remove cord that runs from system board to the I/O board.

    • Remove connecting wire that runs from fan to system board.

  7. Dell Inspiron 13-7352 System Board Replacement: stap 7, afbeelding 1 van 1
    • Remove the 3mm and 4mm screws using the Phillips #0 head for both that hold down the fan

  8. Dell Inspiron 13-7352 System Board Replacement: stap 8, afbeelding 1 van 1
    • Lift the fan from the system board by using your thumb and index or middle finger to gently pull away from the rest of the device.

  9. Dell Inspiron 13-7352 System Board Replacement: stap 9, afbeelding 1 van 3 Dell Inspiron 13-7352 System Board Replacement: stap 9, afbeelding 2 van 3 Dell Inspiron 13-7352 System Board Replacement: stap 9, afbeelding 3 van 3
    • Remove the three 4mm screws with the Phillips #0 holding down the heat sink.

    • Remove the two 4mm screws with the Phillips #0 holding down the metal bracket.

    • Unscrew the single 3mm screw using the Phillips #0 head securing the system board.

  10. Dell Inspiron 13-7352 System Board Replacement: stap 10, afbeelding 1 van 2 Dell Inspiron 13-7352 System Board Replacement: stap 10, afbeelding 2 van 2
    • Remove the wire connections attached to the system board.

    • Remove the tape wires from the system board.

  11. Dell Inspiron 13-7352 System Board Replacement: stap 11, afbeelding 1 van 1
    • Carefully remove the system board from the base by grasping with thumb and index or middle finger and pulling away from the rest of the device.

Conclusie

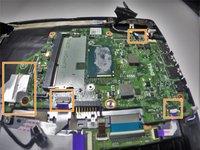
To reassemble your device, follow these instructions in reverse order.

2 andere personen hebben deze handleiding voltooid.

Chris Monte

Lid sinds: 09/30/15

393 Reputatie

2 handleidingen geschreven

Team

0 opmerkingen

Voeg opmerking toe

Weergavestatistieken:

Afgelopen 24 uren: 0

Afgelopen 7 dagen: 3

Afgelopen 30 dagen: 3

Altijd: 1,809