Ga door naar hoofdinhoud
Black and Decker TR1278B Circuit Board Replacement

Black and Decker TR1278B Circuit Board Replacement

Brea-Monique

Brea-Monique en 3 andere bijdragers

Voor het laatst geüpdatet op May 24, 2017

Geen schatting
Moeilijk
Actiemomenten
Behoeft meer afbeeldingen

This guide provides instructions for the replacement of your Black and Decker TR1278B toaster circuit board.

Wat je nodig hebt

Gereedschap

Toon meer…

iFixit krijgt commissie als je dingen koopt via deze links.
  1. Black and Decker TR1278B Circuit Board Replacement, Top Cover: stap 1, afbeelding 1 van 1
    • Unplug the toaster before disassembly.

    • Remove the carriage lever by pulling it away from the toaster.

  2. Black and Decker TR1278B Circuit Board Replacement: stap 2, afbeelding 1 van 1
    • Toaster will be turned upside down. Clear crumb tray or work over a paper towel.

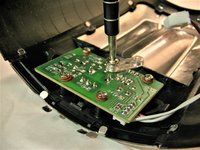
    • Turn the toaster upside down.

    • Unscrew all four 4mm screws on the bottom using a Phillip's head #2 (PH2) screwdriver.

    • Or a slightly different model has six screws that require an allen wrench (hex key). Ones that have a ball end will not work. I had to use one that had more of a Star of David, pointy pattern to it.

  3. Black and Decker TR1278B Circuit Board Replacement: stap 3, afbeelding 1 van 1
    • Detach the bottom from the front cover using the plastic opening tool.

  4. Black and Decker TR1278B Circuit Board Replacement: stap 4, afbeelding 1 van 1
    • Turn the toaster right side up.

    • Support the bottom. The ribbon cable that connects the toaster to the front cover can be damaged.

    • Lift the front cover.

    • Lift carefully. Again the ribbon cable can be damaged.

  5. Black and Decker TR1278B Circuit Board Replacement: stap 5, afbeelding 1 van 1
    • Detach the bundled cable connector from the toaster by carefully pulling it away from the circuit board.

  6. Black and Decker TR1278B Circuit Board Replacement, Circuit Board: stap 6, afbeelding 1 van 1
    • Locate the circuit board inside front cover.

  7. Black and Decker TR1278B Circuit Board Replacement: stap 7, afbeelding 1 van 2 Black and Decker TR1278B Circuit Board Replacement: stap 7, afbeelding 2 van 2
    • Use a Phillips head #2 screwdriver to unscrew all five screws that attach the circuit board to the top cover.

    • Remove the circuit board.

    • Inspect the circuit board for any burnt or otherwise damaged components.

    • Use a soldering kit to unsolder the damaged component.

    • Once the damaged component has been unsoldered from the circuit board, remove (and replace) it.

    • iFixit Soldering Guide.

Conclusie

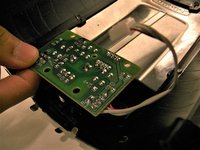
To reassemble your device, follow these instructions in reverse order.

Brea-Monique

Lid sinds: 02/15/17

399 Reputatie

3 handleidingen geschreven

Team

USF Tampa, Team 8-1, Eyestone Spring 2017 Lid van USF Tampa, Team 8-1, Eyestone Spring 2017

USFT-EYESTONE-S17S8G1

3 Leden

5 handleidingen geschreven

Één opmerking

These instructions are wrong. The screw and clear plastic piece seen in step 7 doesn't go there it actually secures the power wire at the base of the toaster and technically isn't needed. The 5th hole is for the plastic catch of the heat selector knob.

Mr. S - Antwoord

Voeg opmerking toe

Weergavestatistieken:

Afgelopen 24 uren: 0

Afgelopen 7 dagen: 2

Afgelopen 30 dagen: 8

Altijd: 1,164