
Asus X555LA-SI305041 Hard Drive Replacement
Inleiding
Ga naar stap 1If your computer is starting to slow down, freeze frequently, or display the blue screen of death then your hard drive may be failing. If your hard drive hasn't completely crashed yet then be sure to backup your precious data BEFORE replacing your hard drive.
Wat je nodig hebt
Reparatiesets
Deze sets bevatten alle onderdelen en tools om deze handleiding te voltooien.


Onderdelen


Gereedschap


Toon meer…
-
-
Remove the following Phillips #0 screws from the lower case:
-
Six 9 mm screws
-
Four 11 mm screws
-
-
-
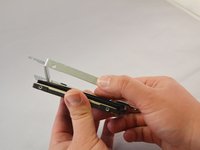
Use the plastic opening tool to separate the top cover from the laptop.
-
Start by prying on the front of the laptop.
-
Continue prying around the cover and end just under the screen to release the front cover.
On my X555LA there seems to be a center snap or two that won't release. Edges are all free on all sides, but somewhere in the middle it's tied down with no give.
It finally came loose, after one of two center snaps broke. It seems you are supposed to push the bezel slightly back towards screen as you start to lift it. Lift it too much at first, and they catch vigorously.
tmaccabe -
Yes I encountered this problem as well, there are 2 very annoying clips at the center of the keyboard, a little force will be required to release them.
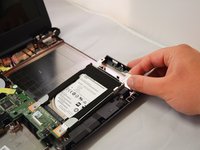
Actually, after this step there’s a shortcut: go to step 7 (skip 3-6), don’t disconnect the ribbon cable, just peel it off the HDD carefully, move the board aside. Go to step 8, instead of “lifting” slide HDD out. Skip step 9.
Saves at least 10 minutes and avoids disconnecting cables that don’t need to be disconnected.
-
-
-
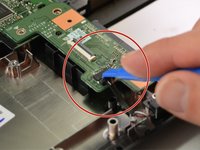
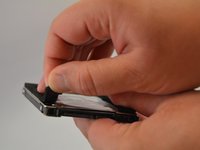
To release the ZIF latch, flip up the small white tab.
-
Pull the white ribbon cable out of the socket to disconnect it.
-
-
-
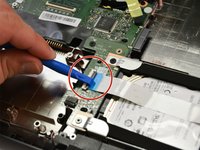
To release the ZIF latch on the keyboard cable, flip the grey rotating tab up.
-
Gently pull the black and blue ribbon cable out of its connector.
Beim wieder Zusammenbauen bekomme ich die Lasche nicht wieder verankert, sie hat keinen Halt.. wird sie eingeklemmt oder funktioniert das irgendwie anders? Danke!
this step can be omitted: you can remove the disk even without disconnecting the black and blue ribbon cable out of its connector.
This step can be omitted if you can prop the keyboard up and get access to the disk screws with a screwdriver, not entirely easy.
It’s probably best to release the ribbon cables. Flip up the narrow grey clamps, up beyond the vertical, and slip the cables out.
To put them back in, keep the clamp strips up, then push the flat cables in. They go in 4 or 5 mm. Then rotate the clamp strips back down. Give a gentle tug on the cables to make sure they’re firmly held.
-
-
-
-
You can now fully remove the keyboard and front panel to gain access to the inside of the laptop.
front panel and keyboard is saprate item ?
or
single item
prise this keyboard
is pune india avalable
send cell no
And how do you replace the actual keyboard - that's the key point missing here!
The keyboard and palm rest seem to need to be replaced as a single item. What about the mouse pad - this is a separate item, held on by three screws, which may well need to be swapped from the old keyboard and palm rest combination. However no mention is made of that here - why not? I thought IFixit was normally meant to be good with this sort of thing.
P.S. I bought a combined item (don’t even think about trying to do the keyboard alone). The mousepad does potentially need to be separated from the old keyboard rest and transferred to the new item. There are 3 screws to be undone - though these can be fiddly and stiff. Anyhow, mine was successfully replaced using this approach, including swapping the mousepad over as described.
Nice that you posted a few pics, but you need at least a dozen more to really show people how to open this laptop. Getting outthe motherboard is not recommended for rookies!
-
-
-
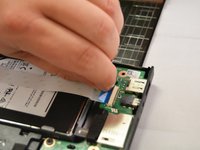
Release the ribbon cables using the plastic opening tool to flip the gray tab on the white connector.
-
Gently slide ribbon cable out while gray tab is flipped up.
-
If glued, go ahead and peel ribbon from hard drive.
do u have a spare ribbon cable? i badly need it tnx
or where to buy it?
what do you call that ribbon? please i need to find something like that, or where can i buy it? i,m from Philippines
Also this step can be omitted: you can remove the disk even without disconnecting the ribbon cable out of its connector; you just have to unscrew the controller either from one side or from the other
-
-
-
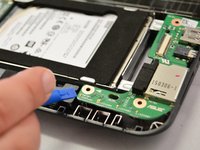
Disconnect power connector with a plastic opening tool.
-
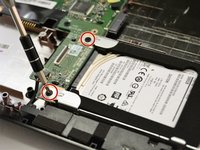
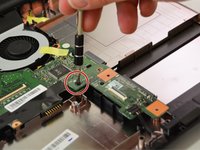
Unscrew one black 5mm screw from hard drive controller PCB using a #0 Phillips screwdriver.
-
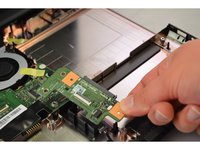
Remove hard drive controller.
Why is it necessary to remove the HDD controller? this step seems useless to me when exchanging only the HDD.
can the hard drive controller be changed someway?? without using salvage parts from the same model??? the laptop im fixing seems to be having an issue with this particular part (the laptop bsod something like dlfs.sys ). so, the hdd has been changed with a brand new seagate sshd. the problem still persist. what to do now????? the warranty is over now so that not even an option, although this has been brought to an authorized asus service center(bcoz there are no asus centers in my country wtf), they told me that the problem is really on the hdd. but i doubt it
Did you ever figure this out? I have an X555LN that won’t recognize the hard drive and boots right to the BIOS, but the hard drive is fine in a USB enclosure. Friend said the laptop blue screened and then wouldn’t turn on. Thinking we might have similar problems!
kazoodac -
I also have a problem with the hard drive controller. My laptop only boots up when the power connector(shown above in the 1st step) is unplugged, odd.
Also this step can be omitted: you can remove the disk even without disconnecting the red and white cable out of its connector; you just have to unscrew the controller either from one side or from the other
-


To reassemble your device, follow these instructions in reverse order.
To reassemble your device, follow these instructions in reverse order.
Annuleren: ik heb deze handleiding niet afgemaakt.
36 andere personen hebben deze handleiding voltooid.
Team

Eastern Washington University, Team 1-1, Matresse Fall 2015 Lid van Eastern Washington University, Team 1-1, Matresse Fall 2015
EWU-MATRESSE-F15S1G1
4 Leden
13 handleidingen geschreven
14 opmerkingen
hi. i have the same laptop. the laptop bsod on me after i used it for a good 6 months. suddenly, when i start the laptop, it always boots me to the bios, the hard drive is change because i thought it is the problem (i just followed the solutions online which is a lot regarding the issue). my suspection is the hard drive connector to the motherboard pcb. is there any way i can replace with or where can i buy replacements for this same part? please help i really need the laptop for my school needs, and sorry for the bad english
I had the same problem. Sorry but its also too expensive to repair and the repair doesnt solve problem %100
AYG -
Im having the same issue. My HDD fails to start when my hand is over the hdd connector (just slight pressure). Any solutions?
ieg -
This is caused by the connection socket on the PCB between the little PCB that plugs into the HDD and the motherboard. Turns out that the great amount of flex in the (crappy) plastic body of these laptops causes too much strain on the socket (opening and closing the screen) and eventually the connector breaks. I had to order a replacement PCB on Ali-express.
Ettienne -
Great guide, thanks a lot. One thing to note, I found it wasn't necessary to remove the whole hard drive controller just to replace the HD. I was able to just remove the audio port board and then slide the drive away from the controller.
Thanks again!
This was a great guide, thanks! However being an experienced technician, it didn’t take but about 5-7 min. to get the hard drive out to where I could test, and verify that it had crashed.
I just wanted to ask how will this help? Not to be rude but this just seems to take the hard drive out leaving the computer completely useless. How does this repair the computer?
How does this repair the computer?
Reverse the steps, but replace the old hard drive with the new hard drive.
Excellent instructions. Though, in my case i found step 9 unnecessary; screwed new drive into enclosure and it slid right into place, easy squeezee.
Screw Layout
On my laptop, Asus X555U, underneath it has 4 different types of screw: M2.5 x 8mm (2 of these), M2 x 9mm (4 of these), M2 x 12mm (4 of these) and last but not least, the single screw for the memory door is M2 x 5mm.
The memory door is the one not around the edge. (M2x5mm)
The two smaller, stubbier screws go in the corners on the screen hinge side of the laptop. (M2.5x8mm)
The four 9mm long screws go along the front edge of the laptop - if the left or right click on the trackpad stops working then unscrew a little until it works again. (M2x9mm)
The 4 longest screws go in the remaining places - along the sides and in the middle at the back.(M2x12mm)
I have a jpg of this if anyone needs it.
This has been collated from information on here, details on how-fixit.com, from taking the screws out of my latop after it had been repaired and returned and another post that I can no longer find!! I hope you find this useful.
I have not managed to find all of this information collated anywhere else on the internet!
the steps in which you are asked to disconnect cables are totally useless and, as shown by some requests for help, even dangerous
Note that once disassembly is complete, the new drive can be tested by plugging in an external mouse and keyboard. The laptop boots and runs fine (but be careful of the exposed cooling fan).
The drive can be tested just plugged into the SATA port
With the drive in the caddy and the USB/sound/SD card daughterboard in place, you can also test those before completing re-assembly.
Screws are 9mm instead of 90mm.
Also the 2 screws in the back corner (screen attachement side) have a slighlty bigger diameter (9mm in length as well) so they are not to be mixed with others 9mm lenght screws.
Laurent Potterat - Antwoord
thank you, thank you for your comment. It's the only place on the entire www that makes that clarification.
river2438 -
are these screw sizes accurate. im looking for 9mm and 11mm screws for the asus x555la laptop also whats the M size of the screw ? cant seem to find the right screws online.
Matthew Bennett - Antwoord
https://www.how-fixit.com/laptop-repair-...
says remove 10 screws (SCREW M2.5*8L, SCREW M2*12L, SCREW M2*9L) on the bottom case.
It looks like there was an image of which was which but it’s not showing for me!!
A base screw pack for Asus x555l laptop on eBay says: The pack contains 2x8mm 4x12mm 4x9mm !!
davidafloat - Antwoord
Just wondering where is 11mm located? Is it on the middle? And the rest of 9mm are on the corners?
rudolphbarcellano - Antwoord