Inleiding
Gebruik deze handleiding om een versleten batterij in je Apple Watch Series 2 te vervangen.
Note: neem de juiste voorzorgsmaatregelen in het geval dat je batterij gezwollen is.
Wat je nodig hebt
Video overzicht
-
-
Voordat je met een reparatie begint, haal je je horloge uit de oplader en zet 'm uit.
-
-
-
Bereid een iOpener voor (of pak een föhn or warmtepistool) en verwarm daarmee het gezicht van de horloge totdat het net te warm is om aan te raken.
-
Laat de iOpener minstens een minuut op de horloge liggen om het scherm volledig op te warmen en daarmee de lijm te verzachten die het scherm aan de behuizing bevestigt.
I have heated up the iOpener to 165 degrees and left it on for more than a minute. No way I can lift the screen off with the exact knife. Tried different angles in various places, but no go. I also used a hair dryer un til the watch screen was too hot to touch and even tried a very hard cutting tool blade and also no go. Could n ever get the blade under the face I applied enough force where I could see that the blade left small marks, not very big, but could never get anything to move or lift. What am I doing wrong? I spent 47 years at a global computer company and I am used to taking apart small things and applying force when required. I don’t know what I am doing wrong. Please help me.
Getting the initial gap is not easy. Maybe a playing card could work its way in the tiny gap and cut some adhesive. After that there might be some success with an exacto knife. Or you want to try a piece of aluminum foil (folded for more rigidity) for cutting the adhesive. Be aware of the force touch gasket and that it might get damaged during that procedure.
I finally used a hot air gun set to 150 deg. C heating up the edges by slowly spinning the watch around before the technique worked. Difficult is the level noted and it’s correct. Finally worked and watch perfectly functioning.
I used a heat gun, too. I was worried after reading comments that it would burn up the LCD, so I heated it a little bit at a time, rotating it like you did, and checking to see if I could get my knife under it. I must have hit one of the buttons because it did turn on, but that did reassure me that the display was okay.
It's open. Now that the watch and I have had a few minutes to cool down, I'm ready for the next step. Not as difficult as I thought it could be. Tomorrow, I'll be replacing the battery in an iPod Touch 6th Gen.
bester -
I had to heat the iOpener 2 times and leave it on top of the watch for 10 minutes.
-
-
The Watch 3 stainless Steel has an additional Frame. Where do i have To Open it?
I wore thick gardening gloves just to be safe 😅 and it took a while but the screen did come off.
-
-
Plaats een kant van een aflopend mes in de enge ruimte tussen het scherm en de buitenste behuizing. Begin aan de korte kant van het scherm, het dichtst bij de digital crown.
-
Druk je mes stevig en recht omlaag in de enge ruimte.
-
Als je mes er eenmaal in zit, kun je het mes lichtjes kantelen om zo het scherm rustig omhoog te krijgen.
It’s difficult to grip case in a way that keeps fingers safe from the blade but doesn’t hit the side buttons and turn the device on!
If it’s a struggle to get the display to release, warm case for a few more minutes.
I have tried so may times to get the display to release but nothing works. Should have bought a new watch LOL. Kept the iOpener on 2 times for 10 minutes and it still won't open. There must be a better way.
Hi Susan,
if you're struggling to get the adhesive loose enough a hair dryer, heat gun, or hot plate may also be used, but be careful not to overheat the device. The edge should feel slightly too hot to the touch.
-
-
-
-
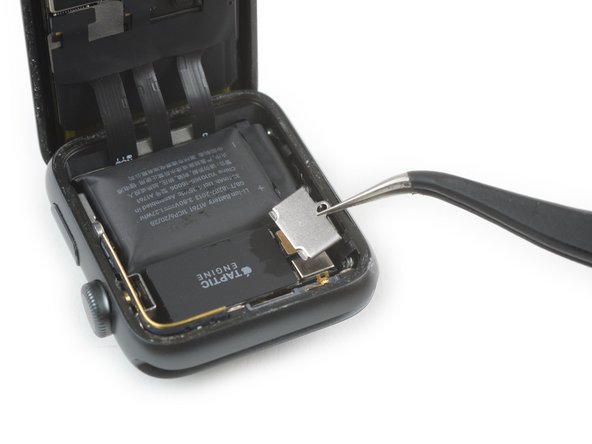
Gebruik een Y000 schroevendraaier om de Tri-point schroef, die het metalen beschermpaneeltje op de batterijaansluiting bevestigt, los te maken.
-
Verwijder het paneeltje.
-
-
-
Met de batterijaansluiting uit de weg, kun je de punt van een wriktool onder de plaat van de batterijaansluiting steken, welke onderdeel is van de batterij.
-
Lift de plaat van de batterijaansluiting rustig omhoog en uit de uitsparing.
-
-
-
Gebruik een schaar om een van je openingsplectrums te knippen totdat deze even breed is als je batterij. Probeer te voorkomen dat er scherpe hoeken aan blijven zitten.
-
Schuif de gemodificeerde plectrum tussen de batterij en de behuizing aan de overkant van de digital crown.
-
Gebruik een constante druk om de batterij langzaam maar zeker los te krijgen van de lijm die het aan het system board bevestigt.
Der Akku Wechsel ist absolut unproblematisch danke für die super Anleitung.
-
-
-
Verwijder de batterij.
-
Indien nodig kun je proberen de oude plakstrip her te gebruiken om je nieuwe batterij te bevestigen. Als alternatief kun je ook een klein stukje dubbelzijdige tape, zoals Tesa 61395, of een vloeibare lijm, zoals E6000, gebruiken.
If the protective plastic over the adhesive removes the adhesive from the battery, reattach the plastic to the battery. Carefully fold the tab of the plastic back on itself, and look for an edge to the adhesive. Using the blade, CAREFULLY scrape the plastic until you see the edge of the adhesive pull away from the plastic. Tap the edge onto the battery surface, and slowly remove the plastic, ensuring it doesn’t continue to pull at the adhesive.
I heated up the unit to 160F checking with my infrared temp sensor gun. I could not for the life of me get the lens to separate.
only succeeded in marking up the edge of the metal. from the rose finish. i tried with the knife flat and angles into the seam between the lens and case. If i try force it more I'll prolly slit my fingers or crack the lens. I give up. time to buy a new watch.
BTW the new battery i got and the adhesive seal - it/gasket has 3M 300LSE on one side and a aquamarine cover on the other with traces of a corner lift tab. which side goes down on the case housing.
-


Ga, als je je nieuwe batterij geïnstalleerd hebt, verder vanaf stap 10 van de handleiding voor de Force Touch pakking om je horloge weer dicht te maken en je reparatie te completeren.
Ga, als je je nieuwe batterij geïnstalleerd hebt, verder vanaf stap 10 van de handleiding voor de Force Touch pakking om je horloge weer dicht te maken en je reparatie te completeren.
Annuleren: ik heb deze handleiding niet afgemaakt.
72 andere personen hebben deze handleiding voltooid.
Met dank aan deze vertalers:
100%

Thomas Keulemans helpt ons de wereld te herstellen! Wil je bijdragen?
Begin met vertalen ›

Team

19 opmerkingen
Ordered the kit and replaced the battery, no dice! I believe the components in my watch failed victim to thermal breakdown since the battery got so hot. After the battery replacement my watch acted the same. It got real hot again, so I am not sure what is actually wrong with the watch. I think it is time for a new one.
These directions were easy to follow. The screwdriver in the kit didn’t work at all. luckily I have a good kit with the right tip. If you are confident and able, this procedure should take about 2 hours. Thank you IFIXIT for providing this product an the easy to follow instructions.
Success! Following this guide and the gasket replacement guide saved having to buy a new watch. Like Thomas mentions in his review, the screwdriver was difficult to use. I eventually got it to turn the tiny screw by holding the watch from the bottom rather than just pressing down with the driver from the top.
A question: should I reset my watch after replacing the battery? Or will whatever throttling WatchOS put in place reverse itself?
Yay it worked! Was supposed to wait for my boyfriend to do it but got impatient and gave it a go.. easy peasy even with my baby having a hissy fit inbetween ?
Thanks ! It worked perfectly in 30 minutes !
This guide made the repair quite simple. Opening the watch proved to be quite straightforward once it got started. The biggest challenge was actually getting the Force Touch gasket connector aligned and reinserted, but even that wasn’t tough. I’m not sure why this repair is classified as very difficult, unless it’s to discourage people who find everything to be difficult.
I did find that I had to force restart the watch twice after replacing the battery to take care of some strange problems with sluggishness, but after that was taken care of it fixed so many problems and the watch now runs all day without seemingly random shutdowns. Previously if the battery said less than 50% I knew it would probably shut down with a workout. Now it runs like new.
The hardest part was separating the screen, I had to heat the iOpener tool 2 times and leave it on top of the watch for 10 minutes, wait until the watch was almost too hot to touch and ONLY then did the screen came off.
I agree with Axel, the toughest part was getting the display off. I left the watch on my 3D printer heat bed, set at 80℃, for about 15 minutes. After that the watch was so hot that I had to use a glove on my left hand to hold the watch down. Also, the curved blade is extremely important.
How hot is too hot? At what temperature will the display be damaged?
As long as you can touch it, your display should be fine. You might avoid anything beyond the ~95°C (~200°F) threshold for an extended time (~5min). But that’s just a rough ballpark. As in life, if anything smells funny, you might not want to continue ;)
Success! The kit came with everything I needed and than some. Getting the screen off took some doing as my watch is pretty beaten up and dented in on the sides. Take your time, its not worth breaking it or cutting yourself. I ended up getting it open without slicing the force touch gasket, which was nice. Everything after that was a cakewalk, except for reconnecting the battery to the mainboard. The cables are stiff and very very small, so getting everything lined up was tricky. Don't force them! Overall though it could have been much worse. The watch booted back up without an issue and seems to be holding a charge.
All but the tweezers in the kit are useless. The opener heating pad will never get the glue hot enough for you to be able to separate the screen from the case. You will need a heat gun or hair dryer. Also, nobody's going to mention that the instructional video completely jumps over how to re-install the battery?
My heating pad worked perfectly! Heated it up in microwave then followed directions and the display came up as the directions indicated. I thought the kit was good but not sure why after replacing the battery it’s now not charging AT ALL
I bought the kit because the existing battery wasn’t lasting over about 5 hours. The replacement seemed to go real well but the new battery won’t take a charge. It had a small amount of power stored and the watch said it was charging but it never did. Now that it’s totally drained all I see is the Apple logo when trying to charge. I’ve left it on the charger for 24 hours and still nothing? Anyone have any ideas?
I'm having a similar issue. It just displays the Apple logo.
10mn pour changer la batterie de ma montre en suivant le tuto pas a pas. Aucun soucis . Juste parfait !
Followed the instructions. The watch turns on, but just displays the Apple logo and gets no further. Oh well.
[Update]: After a few hours of leaving it alone, it finally booted. It's been working for 12 hours and is even taking a charge.
Well that was no fun. Heated up, and display shattered right away after trying to get the knife in,,,,
Apple watch series 2 was displaying the 'red snake of death'. Ordered the battery replacement kit from iFixit, followed the instructions closely and watched the video. Removing the display was much more difficult that it looked, but the rest of the replacement was fairly straightforward. Unfortunately, after leaving on the charger overnight, my apple watch 2 now does nothing at all. No apple logo, no snakes of death, not haptic vibrations. Nothing.
Thoughts? Suggestions? Is there a way to test the battery with a voltage meeting without disturbing the battery jacket?
Verify your model. The back of the Cellular model just says GPS, so be sure to check the groves where the watch band goes to determine you model. I made the mistake of just reading the back of the device and since I’d been gifted the device didn’t know it was cellular. Cellular has a different type of touch force gasket, different screen, and different battery connections.
Ryan Holt - Antwoord
From what I just read on Apple, the only differences in watch series 3 is 38mm and 42mm.
mcr4u2 -
As a consumer all you need to know are 38mm and 42mm
Michael Adoga - Antwoord
The back will say GPS LTE if it’s the cellular version. If it doesn’t say LTE it is only the GPS version. The displays are different whether or not it is LTE(cellular).
themepark - Antwoord
This alternative method only reboots the watch.
Gregg Stanley - Antwoord