Ga door naar hoofdinhoud

Acer Aspire V5-591G-75KE Disassembly

Wat je nodig hebt

  1. Acer Aspire V5-591G-75KE Disassembly, Acer Aspire V5-591G-75KE Disassembly: stap 1, afbeelding 1 van 3 Acer Aspire V5-591G-75KE Disassembly, Acer Aspire V5-591G-75KE Disassembly: stap 1, afbeelding 2 van 3 Acer Aspire V5-591G-75KE Disassembly, Acer Aspire V5-591G-75KE Disassembly: stap 1, afbeelding 3 van 3
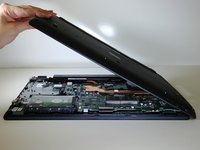
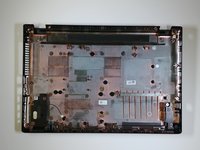
    • Close down the display and flip the device upside down.

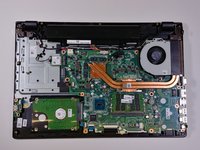
    • Use a Phillips #1 screwdriver to remove 18 black 10mm Phillips Head screws in order to loosen up the protective bottom casing.

  2. Acer Aspire V5-591G-75KE Disassembly: stap 2, afbeelding 1 van 2 Acer Aspire V5-591G-75KE Disassembly: stap 2, afbeelding 2 van 2
    • With the screws removed, flip the device right-side up and open up the display.

    • Run a plastic spudger tool along the seam of the face-plate in order to loosen up the protective bottom casing.

    • Popping sounds are normal, but forceful prying can damage delicate components. Be especially careful near the USB and HDMI ports.

  3. Acer Aspire V5-591G-75KE Disassembly: stap 3, afbeelding 1 van 2 Acer Aspire V5-591G-75KE Disassembly: stap 3, afbeelding 2 van 2
    • Close the display down once more, and flip the laptop upside down, with the hinge facing away from you.

    • Do not yank the bottom casing off. There is a small speaker wire that connects it to the motherboard.

    • Taking note of the small speaker wire, gently lift only the left side of the bottom casing.

  4. Acer Aspire V5-591G-75KE Disassembly: stap 4, afbeelding 1 van 3 Acer Aspire V5-591G-75KE Disassembly: stap 4, afbeelding 2 van 3 Acer Aspire V5-591G-75KE Disassembly: stap 4, afbeelding 3 van 3
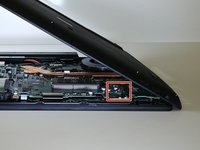
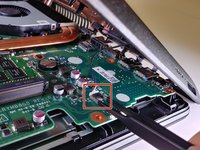
    • Using a pair of blunt tweezers, push on the tabs of the small white connector to separate it from the motherboard.

    • The entire bottom casing should lift with no resistance. If there is too much resistance, verify you removed all the screws, and run the plastic spudger tool around the face-plate again.

Conclusie

To reassemble your device, follow these instructions in reverse order.

Één andere persoon heeft deze handleiding voltooid.

Tasier Hagler

Lid sinds: 10/18/17

428 Reputatie

4 handleidingen geschreven

Team

UW Tacoma, Team S3-G5, Liner Fall 2017 Lid van UW Tacoma, Team S3-G5, Liner Fall 2017

UWT-LINER-F17S3G5

4 Leden

18 handleidingen geschreven

0 opmerkingen

Voeg opmerking toe

Weergavestatistieken:

Afgelopen 24 uren: 0

Afgelopen 7 dagen: 2

Afgelopen 30 dagen: 22

Altijd: 3,998