
Acer Aspire V5-131-2680 Battery Replacement
Inleiding
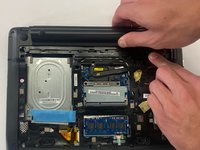
Ga naar stap 1If your Acer Aspire V5 is not charging due to a faulty or dead battery, use this guide to replace your battery. Check for signs of a faulty battery which may include dents, corrosion along the sides, or bloating. Your battery provides power to your laptop, enabling the device to work without a power cord. However, eventually, you will need to charge the battery, making it essential to replace dead or faulty batteries as soon as possible.
Before using this guide, inspect that the battery is correctly placed in the battery slot or attempt a power reset. You can refer to our troubleshooting guide with instructions on how to perform a power reset under "Laptop Not Starting Up."
If you have identified that you have a dead or faulty battery, please proceed with the instructions in this guide. You will need an opening tool to complete this process.
Before beginning, make sure to close, power off your laptop completely, and disconnect from any external power source.
Wat je nodig hebt
Gereedschap


To reassemble your device, follow these instructions in reverse order.
To reassemble your device, follow these instructions in reverse order.
Team

CSU Los Angeles, Team 6-1, Adachi Fall 2022 Lid van CSU Los Angeles, Team 6-1, Adachi Fall 2022
CSULA-ADACHI-F22S6G1
4 Leden
6 handleidingen geschreven