Ga door naar hoofdinhoud
Word lid van de reparatiegemeenschap - Account aanmaken
Pwnagotchi Teardown

Pwnagotchi Teardown

Pookie

Pookie en een andere bijdrager

Voor het laatst geüpdatet op 28 feb. 2023

3 - 5 minuten
Eenvoudig
Door de gemeenschap gemaakte handleiding

This is a teardown showing how a Pwnagotchi works.For this guide, I am doing a teardown of my Pwnagotchi build

Every Pwnagotchi is different in some way, except most will have an E-Ink display such as a Waveshare and the Raspberry Pi Zero. Some Pwnagotchi units can run on different Raspberry Pi units or computers that work like the Raspberry pi!

Wat je nodig hebt

Onderdelen

Toon meer…

  1. Pwnagotchi Teardown, Pwnagotchi Teardown: stap 1, afbeelding 1 van 1
    • Before removing the casing from the Pwnagotchi, there are two LED's with different functions

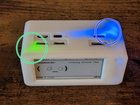
    • The green LED is the Rasperry Pi Zero's data indicator. This will flash as the SD card is being read/written to

    • You have the option to disable the LED if you connect to your Pwnagotchi and change it in the settings

    • The Blue LED is from the embedded battery in the Pwnagtochi casing. This LED only turns on when the battery is being used

  2. Pwnagotchi Teardown, Removing the Outer Case: stap 2, afbeelding 1 van 1
    • This step is Optional if you have a Pwnagotchi without a case.

    • If possible, remove the outer casing of your Pwnagotchi. For this guide, our case has a removeable top and bottom so we can access the screen and battery

  3. Pwnagotchi Teardown: stap 3, afbeelding 1 van 2 Pwnagotchi Teardown: stap 3, afbeelding 2 van 2
    • With the Top cover removed, we can see that the Pwnagotchi has a Waveshare E-Ink Display.

    • This area is covered by the 3D printed case to protect the display ribbon and electronics

    • The GIPO Ports all go inside the raspberry Pi Zero, you will not need the white, 8-pin header (It can be removed if you want to have a slimmer pwnagotchi)

    • This Pwnagotchi utilizes the V2 Display because of the better refresh rate. There is less ghosting on the display compares to the V1

  4. Pwnagotchi Teardown: stap 4, afbeelding 1 van 1
    • Removing the bottom case, there is a 3.7 Volt Lithium-Ion Battery powering the device with 1200mAh

    • When building the Pwnagotchi, you can use a battery (shown in the picture) or an external power source, such as an external battery pack

  5. Pwnagotchi Teardown: stap 5, afbeelding 1 van 1
    • Upon removing the E-Ink Display, there is a Raspberry Pi Zero WH that runs the Operating System for the Pwnagotchi

    • The SD card runs the OS behind the Scenes, and for this case, is protected from accidently slipping out or being removed

  6. Pwnagotchi Teardown: stap 6, afbeelding 1 van 1
    • To access the battery, we will be removing (4) of the M3 screws holding the Pi down with a Phillips head screwdriver

  7. Pwnagotchi Teardown: stap 7, afbeelding 1 van 1
    • Once the screws are removed, separate the Pi and the PiSugar Battery

    • These Pins connect to the Pi and provide power for the Device

  8. Pwnagotchi Teardown: stap 8, afbeelding 1 van 1
    • The battery is connected to the board via magnet and can be separated from the board to get a better look at the workings

    • Be careful when separating the magnets as there are two power wires connecting the wire and the board

  9. Pwnagotchi Teardown: stap 9, afbeelding 1 van 1
    • There are different connectors for this build, to better understand them, this is what they are used for:

    • Connectors/Ports on the raspberry pi zero

    • Mini HDMI Port

    • USB OTG (On-The-Go) Port

    • Power Port (Rated around 5-5.25V)

    • Ports/Connectors on the battery

    • Battery Power port

    • Battery Power Switch

  10. Pwnagotchi Teardown: stap 10, afbeelding 1 van 1
    • This is the Pwnagotchi completely taken apart

Conclusie

To reassemble your device, follow these instructions in reverse order.

Bereid je voor op toekomstige reparaties

Winkelen

Pookie

Lid sinds: 01/11/18

2.972 Reputatie

2 handleidingen geschreven

Team

Japanese Translators Lid van Japanese Translators

Community

6 Leden

8 handleidingen geschreven

0Gids Commentaar

Voeg opmerking toe

Weergavestatistieken:

Afgelopen 24 uren: 2

Afgelopen 7 dagen: 12

Afgelopen 30 dagen: 67

Altijd: 2,244