Deze versie kan foutieve bewerkingen bevatten. Schakel over naar de recentste gecontroleerde momentopname.
Wat je nodig hebt
-
-
Schakel je iPhone uit voordat je begint deze uit elkaar te halen.
-
Verwijder de twee 3.4 mm lange Pentalobe schroeven aan beide kanten van de Lightning-poort.
-
-
-
Trek de blauwe hendel naar achteren zodat de anti-klem vrij kan bewegen. (Op deze manier deactiveer je de openingsstand van de anti-klem.)
-
Schuif de armen over de linker- of rechterzijde van je iPhone.
-
Plaats de zuignappen dichtbij de onderkant van de telefoon—één op de voorkant en één aan de achterkant.
-
Druk beide zuignappen aan, om zuigkracht uit te oefenen op de gewenste plek.
-
-
-
Trek het blauwe handvat naar voren om de armen van de anti-klem te vergrendelen.
-
Draai het handvat 360 graden met de klok mee of tot de zuignappen uit beginnen te rekken.
-
Zodra de anti-klem een opening heeft weten te creëren die groot genoeg is, steek je een openingsplectrum in de opening.
-
Sla de volgende drie stappen over.
-
-
-
Het is een optie om de onderkant van de iPhone gedurende een minuut te verwarmen met het gebruik van een iOpener of een föhn.
-
-
-
Pak de schermmodule voorzichtig vast en til deze op om de telefoon te openen. Gebruik de klemmen aan de bovenkant van het scherm als een scharnier om de telefoon te openen.
-
Open het scherm totdat deze ongeveer een hoek van 90º beschrijft en laat het scherm vervolgens leunen op een voorwerp, zodat je aan de telefoon kunt werken.
-
Je kunt bijvoorbeeld een elastiek gebruiken om de schermmodule te verbinden aan een voorwerp, waardoor deze rechtop blijft staan. Dit voorkomt ook dat je de kabels onbedoeld en te veel belast.
-
-
-
Verwijder de twee Phillips schroeven die het plaatje op de batterijaansluiting aan het logic board bevestigen, met de volgende lengtes:
-
Eén 2.9 mm lange schroef
-
Eén 2.3 mm lange schroef
-
-
-
Verwijder de volgende Phillips schroeven:
-
Drie 1.3 mm lange schroeven
-
Eén 1.6 mm lange schroef
-
Eén 3.0 mm lange schroef
-
-
-
Deze stap is niet vertaald. Help het te vertalen
-
Peel up any tape covering the iSight camera bracket screws.
-
-
Deze stap is niet vertaald. Help het te vertalen
-
Remove the following Phillips screws over the camera bracket:
-
One 1.9 mm screw
-
One 2.4 mm screw
-
-
Deze stap is niet vertaald. Help het te vertalen
-
Disconnect the iSight camera connector from its socket on the logic board.
-
-
Deze stap is niet vertaald. Help het te vertalen
-
Insert the flat end of the spudger between the iSight camera and rear casing.
-
Gently pry the camera out from its housing.
-
-
Deze stap is niet vertaald. Help het te vertalen
-
Insert a SIM eject tool into the hole in the SIM tray.
-
Press to eject the SIM tray.
-
-
Deze stap is niet vertaald. Help het te vertalen
-
Remove the single 1.4 mm Phillips screw holding the NFC bracket in place.
-
-
Deze stap is niet vertaald. Help het te vertalen
-
Remove the two 2.7 mm Phillips screws securing the audio control cable bracket to the logic board.
-
-
Deze stap is niet vertaald. Help het te vertalen
-
Disconnect the audio control cable by prying its connector straight up from its socket on the logic board.
-
-
Deze stap is niet vertaald. Help het te vertalen
-
Disconnect the cellular antenna cable by prying its connector straight up from its respective socket on the logic board.
-
-
Deze stap is niet vertaald. Help het te vertalen
-
Disconnect the Wi-Fi diversity antenna cable by prying its connector up from the logic board.
-
-
Deze stap is niet vertaald. Help het te vertalen
-
Disconnect the power button flex cable from its socket on the logic board.
-
-
Deze stap is niet vertaald. Help het te vertalen
-
Disconnect the antenna cable by prying it up from the logic board.
-
-
Deze stap is niet vertaald. Help het te vertalen
-
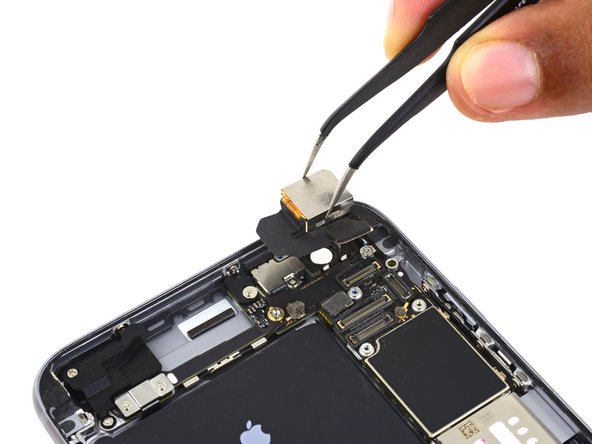
Use the flat end of a spudger to disconnect the Lightning connector flex cable from the logic board.
-
-
Deze stap is niet vertaald. Help het te vertalen
-
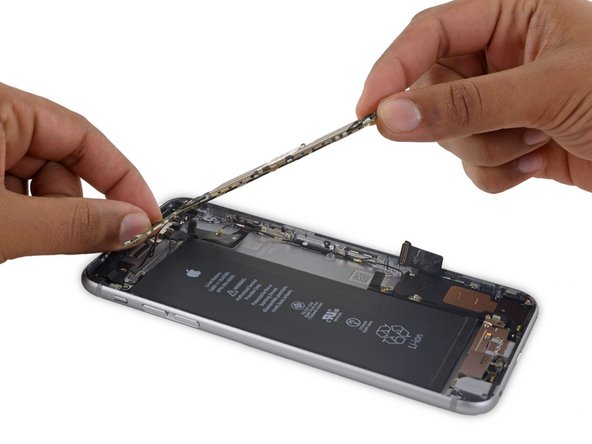
Deroute the antenna cable from the two clips on the right edge of the logic board.
-
-
Deze stap is niet vertaald. Help het te vertalen
-
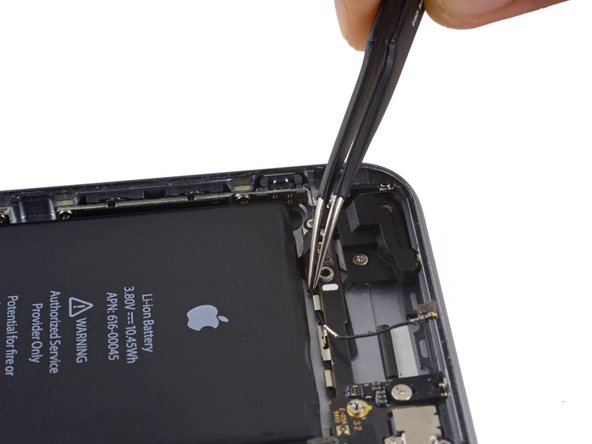
Remove the following screws:
-
One 1.3 mm Phillips screw
-
One 2.6 mm Phillips screw
-
One 2.2 mm standoff screw
-
-
Deze stap is niet vertaald. Help het te vertalen
-
Deroute the upper left cellular antenna cable from the first logic board clip by nudging it out from under the clip, towards the battery.
-
-
Deze stap is niet vertaald. Help het te vertalen
-
Continue derouting the cellular antenna cable from the second and third logic board clips.
-
Use the pointed tip of a spudger to gently pry the cellular antenna cable from the middle logic board clip.
-
-
Deze stap is niet vertaald. Help het te vertalen
-
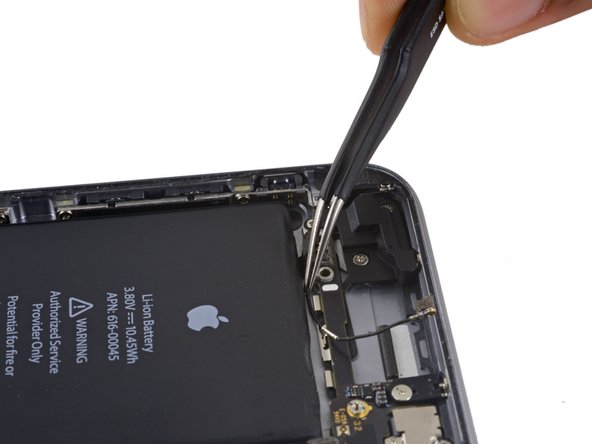
Remove the final 2.0 mm Phillips screw directly below the SIM card reader.
-
-
Deze stap is niet vertaald. Help het te vertalen
-
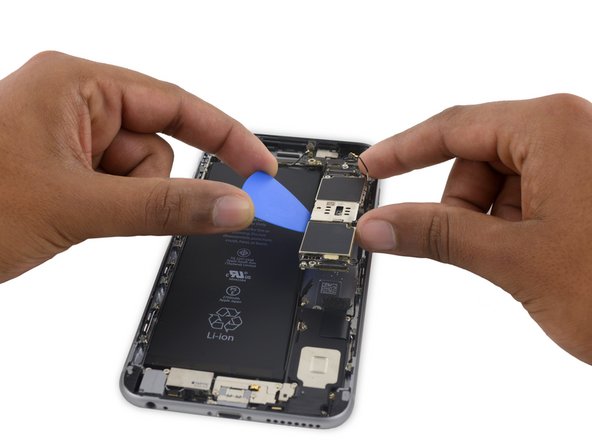
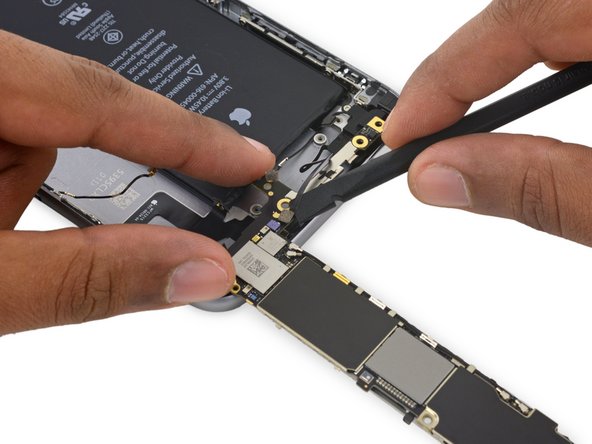
Carefully raise—but do not remove—the logic board, lifting it from the bottom edge nearest the Lightning connector.
-
-
Deze stap is niet vertaald. Help het te vertalen
-
Tip the logic board up to a vertical position to expose the single antenna connector on the underside, near the top edge of the board.
-
-
Deze stap is niet vertaald. Help het te vertalen
-
Gently lay the logic board upside-down, with the top portion resting against the rear case of the iPhone.
-
Use the flat end of the spudger to disconnect the Wi-Fi/Bluetooth antenna cable from its socket on the back of the logic board.
-
-
Deze stap is niet vertaald. Help het te vertalen
-
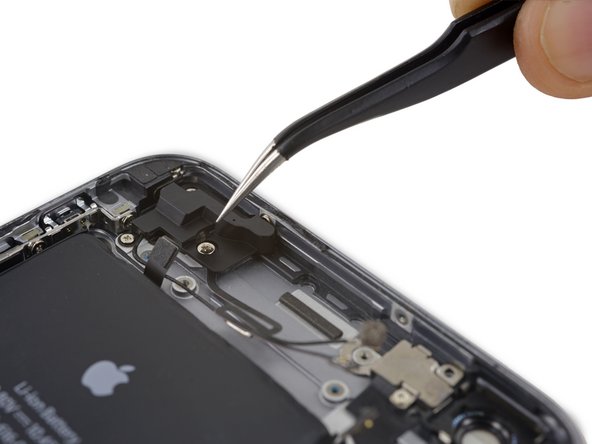
Remove the sticker over the third screw holding the cellular antenna in place.
-
-
Deze stap is niet vertaald. Help het te vertalen
-
Remove the following three Phillips screws holding the cellular antenna in place:
-
One 2.7 mm screw
-
One 1.7 mm screw
-
One 1.3 mm screw
-
-
Deze stap is niet vertaald. Help het te vertalen
-
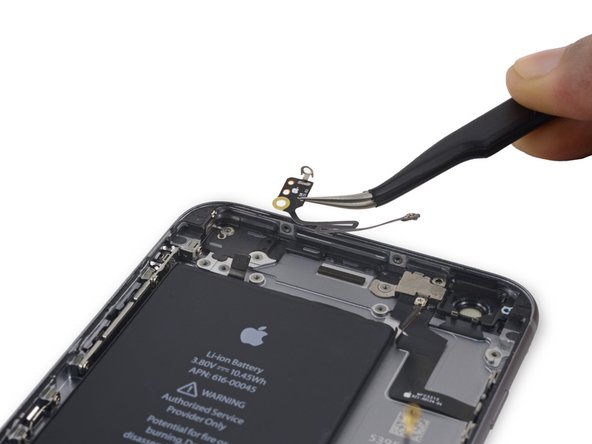
Remove the single 1.3 mm Phillips screw securing the antenna to the rear case.
-


Annuleren: ik heb deze handleiding niet afgemaakt.
33 andere personen hebben deze handleiding voltooid.

15 opmerkingen
Omg
That was an intense read.
in iphone 6s 4.7" wifi antenna is the same and is in the same place?
Didn't you forget to mention first step to remove the two little screws by the power connector? First time doing this and I ended up breaking the metal threaded tabs that the screws go into :(
I guess I should have realized it would have screws somewhere and also researched some more before attempting the repair.
Oh well, looks like I will need to get some teflon tape or something to hold things together.
Exactly! I also broke them, but fortunately I was also replacing the LCD Screen/Digitizer.
Hi, is this repair guide (and the antenna you sell) also valid for the non functioning bluetooth of an Iphone 6S ?