Deze versie kan foutieve bewerkingen bevatten. Schakel over naar de recentste gecontroleerde momentopname.
Wat je nodig hebt
-
-
Schakel je iPhone uit voordat je begint deze uit elkaar te halen.
-
Verwijder de twee 3.4 mm lange P2 Pentalobe schroeven aan de onderkant van de iPhone, naast de Lightning-connector.
-
-
-
Het is een optie om de onderkant van de iPhone gedurende een minuut te verwarmen met het gebruik van een iOpener of een föhn.
-
-
-
-
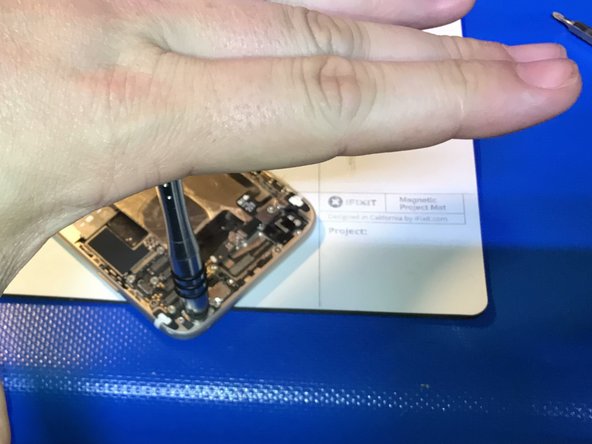
Pak de schermmodule voorzichtig vast en til deze op om de telefoon te openen. Gebruik de klemmen aan de bovenkant van het scherm als een scharnier om de telefoon te openen.
-
Open het scherm totdat deze ongeveer een hoek van 90º beschrijft en laat het scherm vervolgens leunen op een voorwerp, zodat je aan de telefoon kunt werken.
-
Je kunt bijvoorbeeld een elastiek gebruiken om de schermmodule te verbinden aan een voorwerp, waardoor deze rechtop blijft staan. Dit voorkomt ook dat je de kabels onbedoeld en te veel belast.
-
-
-
Verwijder de twee Phillips schroeven die het plaatje op de batterijaansluiting bevestigen, met de volgende lengtes:
-
Eén 2.9 mm lange schroef
-
Eén 2.2 mm lange schroef
-
-
-
Verwijder de volgende vier Phillips schroeven die het plaatje boven op de schermkabel bevestigen:
-
Drie 1.2 mm lange schroeven
-
Eén 2.8 mm lange schroef
-
-
Deze stap is niet vertaald. Help het te vertalen
-
Use the flat end of a spudger to disconnect the rear camera from its socket on the logic board.
-
-
Deze stap is niet vertaald. Help het te vertalen
-
Remove the following two Phillips screws over the rear camera bracket:
-
One 1.6 mm screw
-
One 2.0 mm screw
-
-
Deze stap is niet vertaald. Help het te vertalen
-
Insert a spudger to the side of the camera, between the rear case and the camera module.
-
Gently pry up on the camera to nudge it out from its housing.
-
-
Deze stap is niet vertaald. Help het te vertalen
-
Remove the glass by pushing out from the inside of the frame
-
-
Deze stap is niet vertaald. Help het te vertalen
-
Butt the lens rim up against a raised surface with the rest of the phone on the surface and the ring over air.
-
-
Deze stap is niet vertaald. Help het te vertalen
-
Use a driver without a bit to fit on the ring from the inside. It shouldn't rest on the frame around the ring at all. Gently tap down on the ring until it pops out while firmly holding the frame down.
-
-
Deze stap is niet vertaald. Help het te vertalen
-
Once ring is out of the frame, there should be no bending at all on the frame.
-
-
Deze stap is niet vertaald. Help het te vertalen
-
Insert new ring with tiny dots of super glue. Don't use too much glue and get it on the frame.
-


Annuleren: ik heb deze handleiding niet afgemaakt.
43 andere personen hebben deze handleiding voltooid.

5 opmerkingen
sometimes it becomes a pain to remove old ring, some devices has rolled ring so it much harder to remove carefully
I bent the frame and distorted the back panel where it started to come out trying to “pop-out” the lens ring. The lens ring was attached to an inner piece that holds the camera by a metal piece, this wasn’t described in these instructions.
Be careful of this!
You’re right! I used a previous guide that shows up until the camera is removed, then my own starts after I’ve already removed this flexible metal bracket. This bracket is used as a alignment guide and stabilizer for the camera so hard hits don’t rattle the sensitive internal magnets that stabilize the camera lenses. With a fine screwdriver, pop the 4 points that this is welded to the lens up then remove the bracket. It may get mangled a bit but it can usually be straightened back out to re-use upon camera reinstall.
The only way to get the ring out for me without damage or strain other components ,board or case was to take a 7.5mm drill and drill out the ring from the back and when the inner bracket came lose you know you are deep enough .
A little dot of CA applied with a toothpick to glue the lens inplace and a little glue on the inside to fix that bracket.
Tip: if just the lens glass piece is broken and there is no damage to the ring try to source and buy the glass lens without the ring alot easier to
repair ,you don’t have to take the screen and camera if no glass made it to the camera.
Just make sure that the ring and the rim where the glass is seated is clean and free of glass splinters and glue .
Again add a little CA with a toothpick pop in the lens and done.
Few minutes of work and no risk of breaking somthing in the proces.
first iPhone repair for me… I was trembling when I switched it back on. I was worried I didn’t put the screen and front camera connectors in place properly (it’s hard). But it went all well! Thanks for the guide, but I think it’d be really good to add the steps about the square metal thingy between the camera and the ring.