Ga door naar hoofdinhoud

iPhone 4S Earpiece Speaker Replacement

Wat je nodig hebt

  1. iPhone 4S Earpiece Speaker Replacement, Rear Panel: stap 1, afbeelding 1 van 1
    • Before you begin, discharge your iPhone battery below 25%. A charged lithium-ion battery can catch fire and/or explode if accidentally punctured.

    • Power off your iPhone before beginning disassembly.

    • Remove the two 3.6 mm Pentalobe P2 screws next to the dock connector.

    • Be sure the driver is well-seated when removing Pentalobe screws—they are easy to strip.

  2. iPhone 4S Earpiece Speaker Replacement: stap 2, afbeelding 1 van 2 iPhone 4S Earpiece Speaker Replacement: stap 2, afbeelding 2 van 2
    • Push the rear panel toward the top edge of the iPhone.

    • The panel will move about 2 mm.

  3. iPhone 4S Earpiece Speaker Replacement: stap 3, afbeelding 1 van 1
    • Pull the rear panel away from the back of the iPhone, being careful not to damage the plastic clips attached to the rear panel.

    • Remove the rear panel from the iPhone.

  4. iPhone 4S Earpiece Speaker Replacement, Battery: stap 4, afbeelding 1 van 2 iPhone 4S Earpiece Speaker Replacement, Battery: stap 4, afbeelding 2 van 2
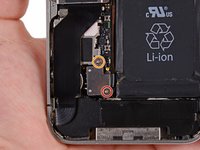
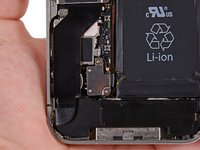
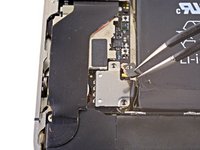
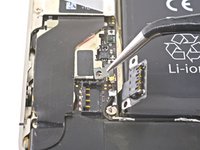
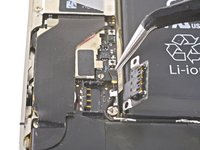
    • Remove the following screws securing the battery connector to the logic board:

    • One 1.7 mm Phillips screw

    • One 1.5 mm Phillips screw

  5. iPhone 4S Earpiece Speaker Replacement: stap 5, afbeelding 1 van 3 iPhone 4S Earpiece Speaker Replacement: stap 5, afbeelding 2 van 3 iPhone 4S Earpiece Speaker Replacement: stap 5, afbeelding 3 van 3
    • Carefully push the pressure contact away from the battery connector until it slides free from its position.

    • Remove the pressure contact.

  6. iPhone 4S Earpiece Speaker Replacement: stap 6, afbeelding 1 van 3 iPhone 4S Earpiece Speaker Replacement: stap 6, afbeelding 2 van 3 iPhone 4S Earpiece Speaker Replacement: stap 6, afbeelding 3 van 3
    • Use a plastic opening tool to gently pry up the battery connector from its socket on the logic board.

    • Place the tip of the tool between the loudspeaker enclosure and the metal cover of the connector, and lift the bottom edge of the connector first.

    • The battery connector comes off vertically from the logic board. Do not apply force sideways.

    • Be careful not to pry at the battery connector socket itself, or it may detach from the logic board. There are four very small solder points awaiting this mistake!

  7. iPhone 4S Earpiece Speaker Replacement, Reassembly tip: stap 7, afbeelding 1 van 2 iPhone 4S Earpiece Speaker Replacement, Reassembly tip: stap 7, afbeelding 2 van 2
    • During reassembly, be sure to carefully position the pressure contact back in place. It should rest on top of the Philips screw post shown, and the gold contact should point towards the battery connector.

    • Be sure to clean the pressure contact with a degreaser such as windex or isopropyl alcohol. The oils on your fingers have the potential to create wireless interference.

  8. iPhone 4S Earpiece Speaker Replacement: stap 8, afbeelding 1 van 2 iPhone 4S Earpiece Speaker Replacement: stap 8, afbeelding 2 van 2
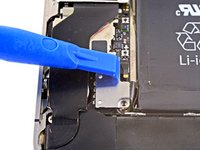
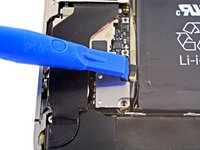
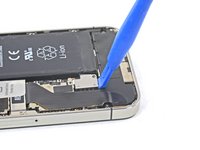
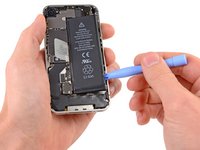
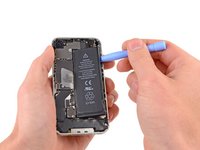
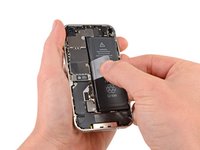
    • Insert the edge of a plastic opening tool between the battery and the outer case near the bottom of the iPhone.

    • Run the plastic opening tool along the right edge of the battery and pry up at several points to completely separate it from the adhesive securing it to the outer case.

    • If the adhesive is too strong, apply a few drops of high concentration (over 90%) isopropyl alcohol under the edge of the battery.

    • Wait about one minute for the alcohol solution to weaken the adhesive.

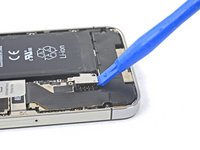
    • Use the flat end of a plastic opening tool to gently lift the battery.

    • Don't try to forcefully lever the battery out. If needed, apply a few more drops of alcohol to further weaken the adhesive. Never deform or puncture the battery with your pry tool.

    • If there's any alcohol solution remaining in the phone, carefully wipe it off or allow it to air dry before installing your new battery.

  9. iPhone 4S Earpiece Speaker Replacement: stap 9, afbeelding 1 van 2 iPhone 4S Earpiece Speaker Replacement: stap 9, afbeelding 2 van 2
    • Use the exposed clear plastic pull tab to peel the battery off the adhesive securing it to the iPhone.

    • Be careful not to pull the plastic pull tab too hard as it can be ripped off very easily.

    • Remove the battery.

    • If your replacement battery came in a plastic sleeve, remove it before installation by pulling it away from the ribbon cable.

    • If your replacement battery came with an uncreased cable, carefully crease the cable into the proper shape before installing the battery into the phone.

    • While installing the replacement battery, temporarily connect the battery connector to the phone to ensure proper alignment. Once the battery is glued in place, disconnect the battery connector.

    • Perform a hard reset after reassembly. This can prevent several issues and simplify troubleshooting.

  10. iPhone 4S Earpiece Speaker Replacement, Dock Connector Cable: stap 10, afbeelding 1 van 2 iPhone 4S Earpiece Speaker Replacement, Dock Connector Cable: stap 10, afbeelding 2 van 2
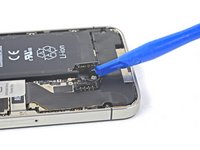
    • Remove the following screws securing the dock connector cable cover to the logic board:

    • One 1.5 mm Phillips screw

    • One 1.2 mm Phillips screw

    • Remove the metal dock connector cable cover.

  11. iPhone 4S Earpiece Speaker Replacement: stap 11, afbeelding 1 van 1
    • Use the edge of a plastic opening tool to pry the dock cable up from its socket on the logic board.

  12. iPhone 4S Earpiece Speaker Replacement: stap 12, afbeelding 1 van 1
    • Peel the dock connector cable off the adhesive securing it to the logic board and the side of the speaker enclosure.

  13. iPhone 4S Earpiece Speaker Replacement: stap 13, afbeelding 1 van 2 iPhone 4S Earpiece Speaker Replacement: stap 13, afbeelding 2 van 2
    • Use the edge of a plastic opening tool to pry the cellular antenna cable up from its socket on the logic board.

    • De-route the cellular antenna cable out from under the metal fingers attached to the logic board.

  14. iPhone 4S Earpiece Speaker Replacement, Rear Camera: stap 14, afbeelding 1 van 1
    • Be wary of the outer plastic ring located on top of the rear camera's flash assembly. It can be easily displaced if not removed during disassembly.

    • You can use tweezers, a plastic opening tool, or a spudger to remove the outer plastic ring.

  15. iPhone 4S Earpiece Speaker Replacement: stap 15, afbeelding 1 van 1
    • Remove the following four screws securing the cable cover to the logic board:

    • One 2.7 mm Phillips screw

    • One 2.6 mm Phillips screw

    • One 1.3 mm Phillips screw

    • One 1.2 mm Phillips screw

  16. iPhone 4S Earpiece Speaker Replacement: stap 16, afbeelding 1 van 2 iPhone 4S Earpiece Speaker Replacement: stap 16, afbeelding 2 van 2
    • Use the edge of a plastic opening tool to pry the cable cover tabs out of their slots cut into the EMI shield on the logic board.

    • Lift the cable cover from its edge nearest the top and remove it from the iPhone.

  17. iPhone 4S Earpiece Speaker Replacement: stap 17, afbeelding 1 van 2 iPhone 4S Earpiece Speaker Replacement: stap 17, afbeelding 2 van 2
    • Use the edge of a plastic opening tool to pry the rear camera connector up from its socket on the logic board.

    • Be careful not to break any components off the surrounding area on the logic board as you pry upwards.

    • Remove the rear camera from the iPhone.

    • There is a small rubber gasket that sits underneath the rear-facing camera. Make sure that it is properly seated before reassembly.

  18. iPhone 4S Earpiece Speaker Replacement, SIM Card: stap 18, afbeelding 1 van 2 iPhone 4S Earpiece Speaker Replacement, SIM Card: stap 18, afbeelding 2 van 2
    • Use a SIM eject tool or a paperclip to eject the SIM and its tray.

    • This may require a significant amount of force.

    • Remove the SIM and its tray.

  19. iPhone 4S Earpiece Speaker Replacement, Logic Board: stap 19, afbeelding 1 van 2 iPhone 4S Earpiece Speaker Replacement, Logic Board: stap 19, afbeelding 2 van 2
    • Remove the five cables near the top of the logic board in the following order:

    • Headphone jack/volume button cable

    • Front facing camera cable

    • Digitizer cable

    • Display data cable

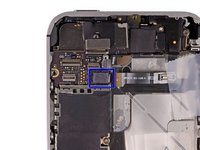
    • Power button cable (located underneath the headphone jack/volume button cable as shown in the second picture.)

    • To disconnect the cables, use the edge of a plastic opening tool to gently lift their connectors up and out of the sockets on the logic board.

    • Be careful not to break any of the small and delicate surface mount components as you disconnect the cables.

  20. iPhone 4S Earpiece Speaker Replacement: stap 20, afbeelding 1 van 1
    • Remove the 1.5 mm Phillips screw securing the grounding clip to the logic board near the headphone jack.

  21. iPhone 4S Earpiece Speaker Replacement: stap 21, afbeelding 1 van 2 iPhone 4S Earpiece Speaker Replacement: stap 21, afbeelding 2 van 2
    • Use the tip of a spudger to pry the small grounding clip up off the logic board.

    • Carefully grasp the grounding clip and remove it from the iPhone.

    • Before reassembly, be sure to clean all metal-to-metal contact points on the grounding clip (not the mating halves of connectors) with a de-greaser such as windex or isopropyl alcohol. The oils on your fingers have the potential to cause grounding issues.

  22. iPhone 4S Earpiece Speaker Replacement: stap 22, afbeelding 1 van 1
    Gereedschap gebruikt in deze stap:
    Standoff Screwdriver for iPhones
    $5.49
    Koop
    • Remove the 4.8 mm standoff screw near the headphone jack.

    • Standoff screws are best removed using a standoff screwdriver or bit.

    • In a pinch, a small flathead screwdriver will do the job—but use extra caution to ensure it doesn't slip and damage surrounding components.

  23. iPhone 4S Earpiece Speaker Replacement: stap 23, afbeelding 1 van 1
    • Use the edge of a plastic opening tool to disconnect the Wi-Fi antenna from the logic board.

  24. iPhone 4S Earpiece Speaker Replacement: stap 24, afbeelding 1 van 2 iPhone 4S Earpiece Speaker Replacement: stap 24, afbeelding 2 van 2
    • If present, peel the piece of black tape covering the hidden screw near the power button.

    • Remove the 2.6 mm Phillips screw securing the logic board near the power button.

    • (Use caution when removing this screw and removing the power contact held by it; the contact tab will come loose with the screw)

    • Notice the small rubber bumper under the screen & digitizer cables (which are detached at top above the Q-code). This bumper can fall off of the logic board when removed or get stuck to the cables and fall off later.

  25. iPhone 4S Earpiece Speaker Replacement: stap 25, afbeelding 1 van 1
    • Remove the following screws securing the logic board to the case:

    • One 2.5 mm Phillips screw near the vibrator motor

    • One 2.4 mm Phillips screw

    • One 3.6 mm standoff along the side of the logic board nearest the battery opening.

    • Use a standoff driver bit and driver handle to remove the single 3.6 mm standoff screw.

    • In a pinch, a small flathead screwdriver will do the job—but use extra caution to ensure it doesn't slip and damage surrounding components.

  26. iPhone 4S Earpiece Speaker Replacement: stap 26, afbeelding 1 van 1
    • Carefully lift the logic board from the end closest to the speaker enclosure and slide it away from the top edge of the iPhone.

    • Remove the logic board.

    • Before reassembly, be sure to clean all metal-to-metal contact points on the logic board (not the mating halves of connectors) with a de-greaser such as windex or isopropyl alcohol. The oils on your fingers have the potential to cause grounding issues.

    • There is a small rubber bumper that sits on the top edge of the logic board where the digitizer and screen cables come through the case. It protects the cables as they bend over the top of the logic board. This can either get stuck to the cables or fall off the logic board when it comes out. Look back over step 22 for more details.

  27. iPhone 4S Earpiece Speaker Replacement: stap 27, afbeelding 1 van 1
    • Be sure not to lose the small grounding finger for the rear facing camera near the power button. This finger rests on top of the PCB, screwed down, and covered with the adhesive black plastic tape.

  28. iPhone 4S Earpiece Speaker Replacement, Front Facing Camera: stap 28, afbeelding 1 van 2 iPhone 4S Earpiece Speaker Replacement, Front Facing Camera: stap 28, afbeelding 2 van 2
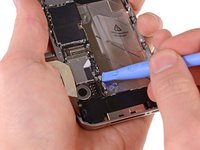
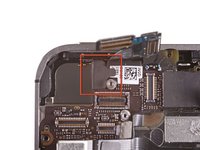
    • Use the edge of a plastic opening tool to carefully pry the metal front facing camera retainer away from the case of your iPhone.

    • Remove the front facing camera retainer.

  29. iPhone 4S Earpiece Speaker Replacement: stap 29, afbeelding 1 van 1
    • Remove the front facing camera.

  30. iPhone 4S Earpiece Speaker Replacement, Power Button: stap 30, afbeelding 1 van 2 iPhone 4S Earpiece Speaker Replacement, Power Button: stap 30, afbeelding 2 van 2
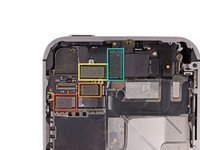
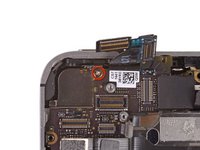
    • Remove the two 1.6 mm Phillips screws securing the power button bracket to the outer case.

    • Take extra care with the display cables, which can prevent easy access to the right-hand screw. The cables are easily damaged.

    • Slightly pull the power button bracket away from the outer case.

  31. iPhone 4S Earpiece Speaker Replacement: stap 31, afbeelding 1 van 2 iPhone 4S Earpiece Speaker Replacement: stap 31, afbeelding 2 van 2
    • Use a pair of tweezers to remove the power button from the iPhone.

    • During reassembly, take note of the correct orientation of the power button. The metal loop should be facing downwards and the outward edges should be on top.

  32. iPhone 4S Earpiece Speaker Replacement, Power and Sensor Cable Assembly: stap 32, afbeelding 1 van 2 iPhone 4S Earpiece Speaker Replacement, Power and Sensor Cable Assembly: stap 32, afbeelding 2 van 2
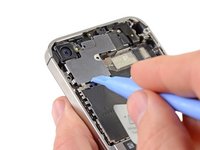
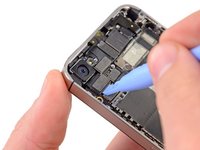
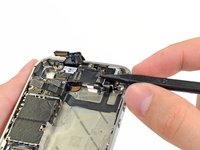
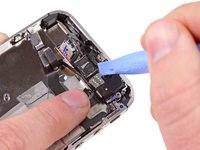
    • Use the edge of a plastic opening tool to pry the earpiece speaker off the adhesive securing it to the outer case. Note that the power button cable is glued to the the case as well, and will need to be pried up.

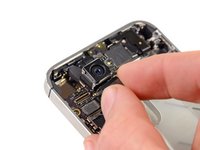
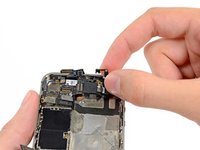
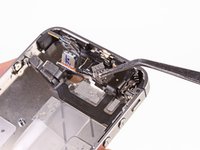
    • Use a pair of tweezers to unfold the earpiece speaker from its recess in the outer case.

    • Be careful not to tear the cable from the earpiece speaker. They are adhered together, and the cable is very delicate.

  33. iPhone 4S Earpiece Speaker Replacement: stap 33, afbeelding 1 van 2 iPhone 4S Earpiece Speaker Replacement: stap 33, afbeelding 2 van 2
    • Use the edge of plastic opening tool to gently move the top sensor assembly away from the outer case.

    • Gently pry the top sensor assembly off the outer case.

  34. iPhone 4S Earpiece Speaker Replacement: stap 34, afbeelding 1 van 3 iPhone 4S Earpiece Speaker Replacement: stap 34, afbeelding 2 van 3 iPhone 4S Earpiece Speaker Replacement: stap 34, afbeelding 3 van 3
    • Lift and remove the power and sensor cable assembly from the iPhone.

    • Be sure not to lose the small retainer clip located on the top sensor assembly.

  35. iPhone 4S Earpiece Speaker Replacement, Earpiece Speaker Assembly: stap 35, afbeelding 1 van 2 iPhone 4S Earpiece Speaker Replacement, Earpiece Speaker Assembly: stap 35, afbeelding 2 van 2
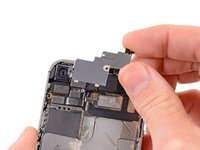
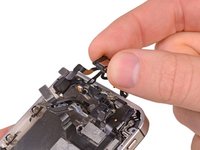
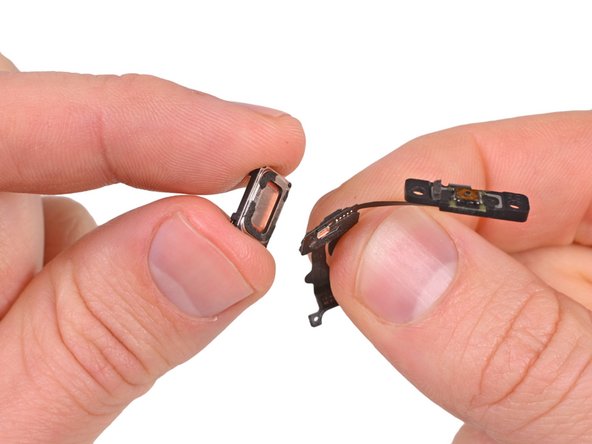
    • Use the edge of a plastic opening tool to peel the earpiece speaker off the foam adhesive securing it to the iPhone.

    • If you wish to reuse the earpiece speaker, try not to tear the foam adhesive that secures it to the iPhone's case.

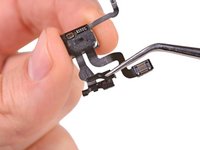
    • Remove the earpiece speaker.

  36. iPhone 4S Earpiece Speaker Replacement, Earpiece Speaker: stap 36, afbeelding 1 van 1
    • Earpiece speaker remains.

Conclusie

To reassemble your device, follow these instructions in reverse order.

245 andere personen hebben deze handleiding voltooid.

7 opmerkingen

Is the earpiece the same as for the iPhone 4?

info - Antwoord

Followed the steps and completed this guide with no problems. Very easy to follow and so happy to be able to hear my conversations now! :) thanks iFix it staff!

ifix - Antwoord

Fantastic Guide. Helped me to change speaker and Smashed lcd.

John - Antwoord

Be careful not to over-tighten the red screw in step 14, the head of the screw broke of with very little torque applied:( Apart from that minor mishap I worked though the guide in a little over 2 hours, big thanks for a fantastic guide!!!

Sandy Doull - Antwoord

Hi,

I have an iphone 4s belonging to a friend whos speaker appears to be faulty.

When making calls the recipient sounds extremely muffled to the point of being inaudible.

As a technician I have never encountered an issue before whereby replacing the speaker didnt work.

The main test i performed was to take out the motherboard and place it into the chassis of a perfectly working iphone 4s and yet the problem still persisted.

Reason for the above is because it negates the need to individually test the dock connector and other various minor parts.

My question is where on the motherboard where this problem maybe occuring?

Is it the 2 copper plates that connect the speaker part to the m/b.

Is there any other way I can troubleshoot this?

Any help would be appreciated.

tommy murphy - Antwoord

Voeg opmerking toe

Weergavestatistieken:

Afgelopen 24 uren: 1

Afgelopen 7 dagen: 7

Afgelopen 30 dagen: 57

Altijd: 220,444