Inleiding
Removing the display on a Late 2013 iMac requires cutting through the adhesive around the perimeter of the screen. After the adhesive is cut, it cannot be used to re-seal the display in place, so you'll need to apply a new set of adhesive strips.
Wat je nodig hebt
-
-
-
If you are re-using your existing display, you must also remove the old adhesive from the back of the display.
-
Peel off the adhesive strips using tweezers or your fingers. Start at the bottom and peel upward towards the top of the device.
-
After all the old adhesive is removed, carefully clean the surface with 90% (or greater) isopropyl alcohol and a lint-free cloth. Wipe in one direction, not back and forth.
The black border on the back of the screen glass appears to be painted on. When removing the foam adhesive, be careful with tools as it can scratch off the paint and that will show through when all is back together. Fingernails worked best for me; peeling the tape up slowly followed by the alcohol wipe.
Used a little dab of Goo Gone with a micro fiber cloth and a lot of elbow grease on the enclosure to remove the adhesive. As far as the glass side, mine was fairly clean so I just used some 70 % alcohol and was careful. Then went back over all areas with 70 % alcohol again. Was able to clean everything thoroughly. It’s tough but worth it for good adhesion. Thanks Darren S.
My 27" iMac was damaged in shipping and I had to replace the display. When trying to replace the display, I found that the case was bent on the top, just barely visible. Makes sense as the top right corner of the display was totally smashed... Check your display fit and alignment BEFORE placing the adhesive strips. This way you can work on straightening the frame without worrying about damaging the adhesive strips.
The case is actually soft, in that it is easily bent. Work only when relaxed and not stressed out! I used my body weight and a small piece of wood as a fulcrum to accomplish the (un)bends. If you place it on a totally flat surface you can see where it's touching and where it's high, so you know where to bent it. I had to use some pliers to get the last bit straight. I used multiple (4 - 6) layers of cardboard under the pliers to prevent scratching the aluminium. Go gently, slowly, checking for alignment / flatness many times, rather than doing too much and having to bent it back again.
-
-
-
Lay out the adhesives strips beforehand so you won't accidentally install a strip in the wrong place:
-
Strip 22 on the top left
-
Strip 23 on the top right
-
Strip 21 on the right vertical
-
Strip 25 on the bottom right, dark side facing up.
-
Strip 26 on the bottom left, dark side facing up
-
Strip 16 on the left vertical
-
-
-
Start with strip 21, which goes on the right vertical edge of the iMac frame.
-
Peel the short piece of backing off the back of the strip.
-
-
-
With the spudger still poking through the hole in the adhesive strip, push the spudger tip into the corresponding hole in the frame of the iMac.
-
Using the hole and spudger to anchor the position of the adhesive strip, line the strip up against the right edge, gently pull down against the spudger to ensure the strip is taut, and stick it onto the frame.
-
-
-
-
Work your way counter-clockwise around the perimeter of the iMac, adding three more adhesive strips in the same manner:
-
Strip 23 on the top right
-
Strip 22 on the top left
-
Strip 16 on the vertical left
-
On the iMac Intel 27" Retina 5K Display, the top-right strip's blue tabs will not line up with the top antenna in the same way as the non-5K model. This is perfectly acceptable and won't impact the performance of the strips or antenna.
-
-
-
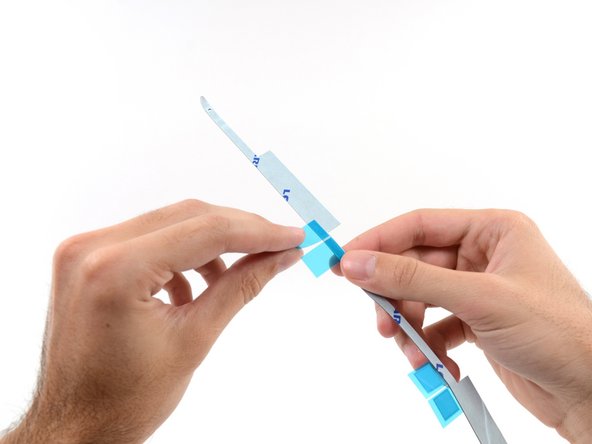
Grasp the red pull tab on strip 25 and pull to separate about 2 inches (5 cm) of white backing from the strip.
These steps instruct you to install the lower strips to the iMac frame first, as that is what Apple instructs their techs to do. If you have an iMac without a microphone hole, you can choose to install the lower strips onto the display first. Peel the blue tab instead of the red to expose the adhesive. Carefully place the adhesive along the bottom edge of the display. The L-bend on the adhesive should match the display contours.
My EMC No. 2546 did not have a microphone hole, so I was confused at first. A different instructional video (https://vimeo.com/139364064) recommends placing the strips on the display instead. I installed the strips on the frame, but I reckon installation on the display glass might have been a better option, at least with no microphone hole to contend with.
Yep, no microphone hole on the late 2012 27” iMac. I followed the video but I don’t think it made anything easier.
Maybe my mistake was putting the screen back on when the frame was lying down. I was left with a mm gap on one side due to misalignment. Stand up the mac so the screen can sit on the lip and be aligned properly.
Daniel -
-
-
-
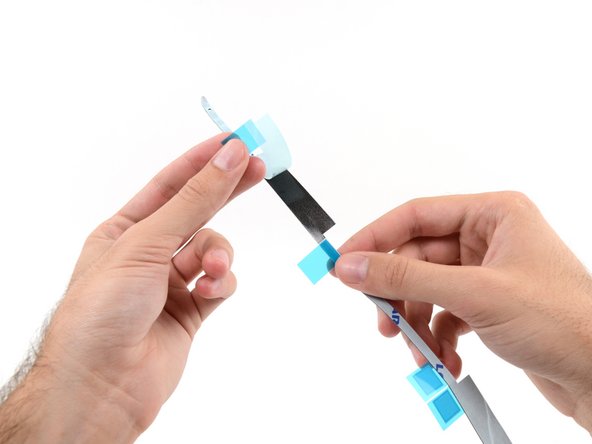
Fold the loose white backing to a right angle and pinch the crease with your fingers.
It's not the red tab. It's the bond between the white backing and the adhesive that's causing the problem. When I tried to peel the white backing off, it takes the adhesive along with it. I had to detach it with my finger nail, already risking a weaker bond between the screen and the adhesive. I thought the problem was only around the edge of the strip (where I had to pull the red tab), but the whole strip was pulling the adhesive off the clear backing as I was aligning it with the iMac. This is the second time this has happened with these strips. And now I'm concerned, since the adhesive is now slightly compressed and there's a little air gap in the middle now...
-
-
-
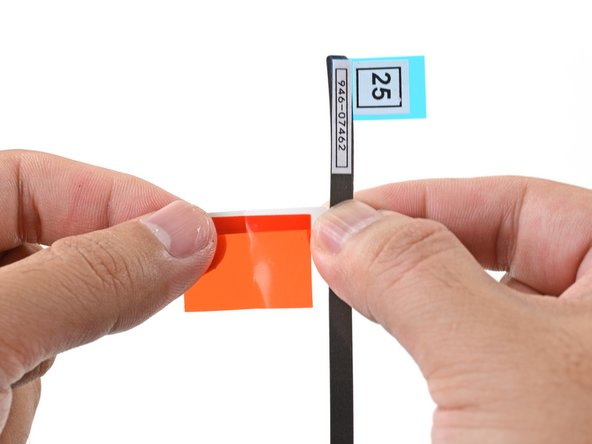
Align the adhesive strip to the bottom edge by positioning the microphone notch over the microphone hole.
-
If your iMac does not have a microphone hole, align the right end of the strip such that the L-bend sits next to the right vertical adhesive. The L-bend should not overlap the right vertical adhesive.
-
Once you have aligned the strip, carefully set the left exposed edge onto the iMac to secure the alignment.
Can anyone confirm that the mic is the middle small hole as the photo in step 14 appears to show a larger hole? I ask as I don’t have the mic kit and will have to cut the kit to suit my late 2015 iMac 27 retina. Thanks.
Good catch!! Yes, the mic hole is the small center hole. The step image is showing the wrong hole. I’ll upload the correct photo shortly.
i have a late 2015 iMac 27” 5K (iMac 17,1) and I do not have a microphone along the bottom. I am confused because other people do?
The 2017 iMacs (both 21.5 and 27" models) were the first to have the microphone at the bottom. Previous models had it at the top center with the camera.
-
-
-
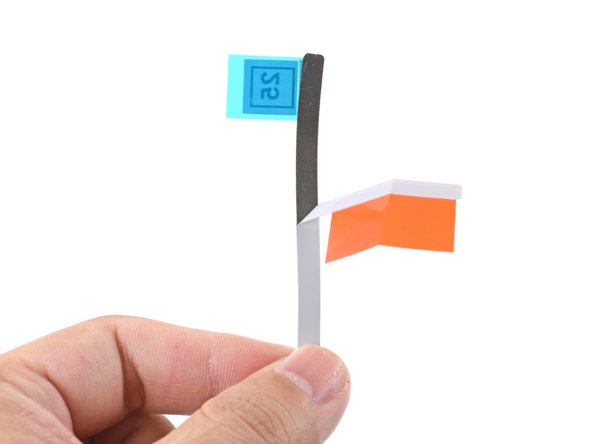
Repeat the previous steps for the bottom left adhesive strip (strip 26), aligning and placing it along the bottom left edge of the iMac.
This strip is adjacent to the power supply of the iMac. Take care not to touch any part of the power supply module during this step.
At this point, before proceeding, I would make sure the the power supply is fully de energized(no power cord) by holding down the power button for 30 seconds!
-
-
-
Gently set the display in place over the iMac and align it carefully.
-
-
-
Use painter's tape or masking tape to temporarily secure the bottom edge of the display to the iMac's enclosure.
I used 2” painter’s tape to hold the display in place, but did it a little differently. With the wedge holding the iMac at an angle, I laid the display in place and felt on the sides to make sure it was centered. Then I put small strips (4-5” long) all along the sides and top, wrapping the tape around to the back of the display to hold it in place. Then tested my repair to make sure everything worked.
I had seen some comments about problems with the strips holding in place over time, so I didn’t actually install them. Instead, I’ve left the painter’s tape on mine. I’m a week or more in, and so far there’s no sign of failure to hold. I’m going to leave it this way until I decide whether or not to replace the blade and hard drive with an SSD. I find I don’t even notice the painter’s tape as I’m using my iMac.
Paul- If you haven’t made the move to SSD yet, i suggest you replace the SATA 3.5” HDD with a 2.5” SSD, and leave the blade SSD already installed in place. You can create a new Fusion Drive with the SATA SSD & stock blade SSD. This allows you to still take advantage of the blade SSD for extra RAM.
I just did this myself on my Late 2015 iMac 5K with the 2TB Fusion Drive. I swapped the dinosaur HDD for a 4TB Samsung 870 QVO 2.5” SATA SSD and my computer feels like new! better than new!
I don’t recommend replacing the blade SSD because it’s a lot more complicated and you run a real risk of damaging the logic board.
R L -
@R L I'm 99% certain that it is not possible to fuse two SSD drives (and certainly not advised). i.e. your 2.5" SATA SSD and your stock blade SSD. I'm about to replace the failing 3TB HDD in my Late-2013 iMac 27 (stock 128gb blade SSD). My plan, assuming the blade drive even mounts, is to format it and let it mount as a separate volume. It's too small to really be of any use and my understanding is the disparate speeds may actually reduce performance overall.
I'm 99% certain that it is not possible to fuse two SSD drives (and certainly not advised).
I have fused the stock ssd drive with a samsung evo ssd drive for years with no problems in my 2012 iMac The downside is that to do so you have to boot from a recovery disk and do pretty complicated stuff with terminal to fuse both ssd drives. Once that's done you cannot touch your fusion drive with disk utility (mac will not reboot and you will have to erase both disk and start over). The easy option is just leave both drives separated, they work just like any standard ssd drive.
It seems to me that some emphasis could be added to this step. I had successfully upgraded my HDD to SDD, and I had confirmed the success of the upgrade by booting my iMac 5G 27 2017 to the Apple prompt. In this step 19, I did not use a sufficient, nor a strong enough masking tape to hold my monitor when I was attempting to remove the backing from the bottom adhesive strips in Step 23. When the tape let go, the monitor screen dropped, and unfortunately I still had the power and data cables connected. In the process the data cable and the power cable receptacle were damaged. I hope to recover by purchasing a new data cable. the power receptacle is still usable, perhaps with an adhesive tape piece over the connection. I found this procedure difficult.
-
-
-
If you've already verified that your iMac is working correctly and are ready to seal it up, skip to step 22.
-
Gently insert the display data connector into its socket on the logic board. Be sure to press it straight into the socket, and insert it completely.
-
Flip the display data connector lock down onto the socket.
-
Insert the display power connector into its socket on the logic board.
After I completed this repair I noticed that the fan was spinning all the time. What is going on?
If the fan is going constantly the thermal (temperature) sensor is likely not attached to the hard drive. It should be okay to run it like this - but it’s loud… Better to have the thermal sensor attached and configured. I bought my kit from iFixit and the sensor was wrapped in some of the paper packaging - took me a few minutes to find it.
I used my foam support wedge to hold open the glass side from the enclosure side. I placed in in the center to even out the weight. I used the longer areas of the wedge so more was in contact with the two parts. This freed up my hands to plug in both power and data cables. *Just be careful
You can also use a sw version instead of a hw thermal sensor. I found on my 27 inch iMac 2019, that the hw sensor didn’t really work for me. In fact, some of the ssd cases used in the hard drive bay are made of plastic. I found for me using Mac Fan Control by Crystal Ideal a good alternative. You can use the free version, or pay for the pro version for about 15.00 dollars to have better control of your fan speed. Of course, your mileage may vary.
-
-
-
After confirming that your iMac functions properly, disconnect the display cables and carefully lean the display forward.
-
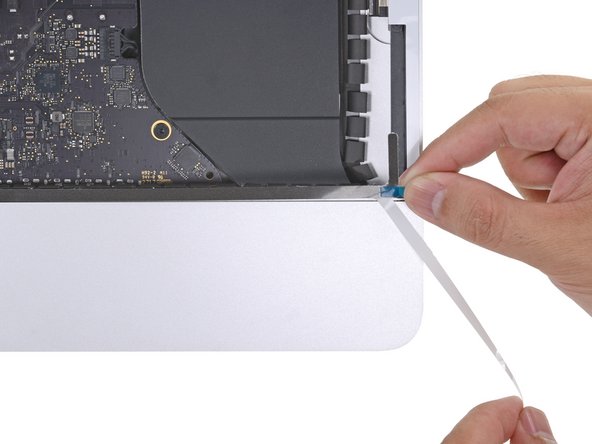
Remove the film from the two bottom strips by reaching in from above with a pair of tweezers and pulling the blue tabs straight up from the bottom edge of the display.
Here's a sure fire way to replace the LCD onto the frame. It involves using painters tape, a foam wedge and 12" Surgical Hemostat Forceps clamps. iMac is upright on a low table so I can look down into it, painters tape applied, Foam wedge keeps it at an upward tilting angle. Headlamp recommended. LCD and power display connectors have been re-attached. Carefully open the LCD from the frame, keep in mind that the 2 cables give you about 2" of space to "look down" and with your 12" locking forceps grab and lock onto the blue tabs, getting a good, firm bite and then pull upwards to detach from the bottom adhesive strips. There will be 2 of them. The pull tab may detach but not difficult to find the transparent thread to continue the pulling. When both sides have films removed, let the display rest back on the frame and plug it in. If boot screen you can then carefully again separate the LCD slightly to then easily pull off the rest of the strips. Reseal and I use 6 pressure clamps on all sides to cure.
-
-
-
Reconnect the display power and data cables for the final time.
I used my foam support wedge to hold open the glass side from the enclosure side. I placed in in the center to even out the weight. I used the longer areas of the wedge so more was in contact with the two parts. This freed up my hands to plug in both power and data cables. *Just be careful
The display I bought had some pink protective plastic film covering the camera portion of glass on the back of the display. Be sure to remove this before finally seating the display in place! Not doing so would result in improper focusing and a pink tinted picture all the time.
amazing now it won't turn on anymore. I see as green LED but that's it.
-
-
-
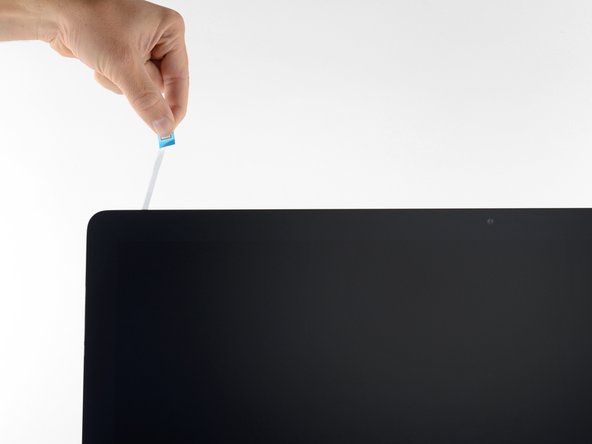
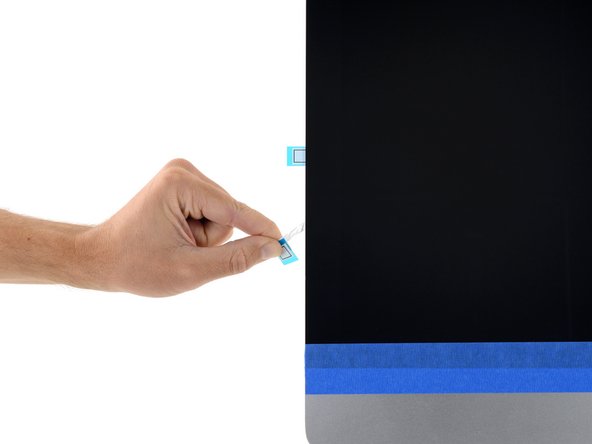
Repeat the previous steps to remove the protective films from all the remaining adhesive strips.
When pulling the adhesive strips off I had one snap in half right (just the white part revealing the adhesive) one my top right corner. I panicked because there was not adhesive there so I pulled a quick maneuver. I slipped in one of the guitar pick type triangles near the gap quickly before the adhesive has set in and was then able to slip my bent nose tweezers in and grab the white tape and peal the remaining. Whew! It worked. *Just be careful
-
-
-
To ensure a strong bond, carefully tip the iMac flat on its back (with the screen facing straight up) and press carefully but firmly around all four edges of the display.
-
Remove the tape securing the display to the rear enclosure.
Before lowering the glass display, I would recommend removing the tape from the edges, in order to check that the glass is seated flush against the bottom shelf of the frame. In my case, the glass got slightly out of alignment with all the lifting and lowering of the display, and I ended up with one corner being about 1 mm above the frame ledge. Not a huge error, but regrettable, as once you start to lower the display with all adhesive exposed, there is no turning back!
A big +1 to this. I had the same issue but was able to adjust the monitor before it was fully set. Hopefully the guide can be updated with this suggestion!
I also did 1 more power on check after removing the screen after pulling the bottom strips covers off.
Has anyone had the display fall out after a few days of use when the machine warms up and the adhesive softens?
How do we prevent that from happening?
Is it just my imagination or are the replacement adhesive strips thinner than the Apple originals? After cutting the original adhesive we are left with a thin layer on the frame AND a thin layer on the back of the front glass. To me it feels like the replacement tape is only as thick as one of these layers, so there’s less flex to take up any minor variations in level and ultimately a weaker join.
I also have no idea if the replacement adhesive retains its grab strength once the machine warms up in use.
I'm an (unauthorized) Apple computer tech and have replaced over 24 displays on 21.5 and 27" iMacs. The only time I had a display fall off was when I tried using GooGone to remove the adhesive residue. It leaves a greasy residue that is hard to remove and will prevent proper adhesion of the replacement strips. My customer found that her 27" display had fallen off TWICE (both times it miraculously ended up on their office chair with no damage). I now use 91% IPA and the flat edge of a new spudger tool to remove residue. Never had a problem since.
I've used several different makes of strips purchased via amazon and they all work fine.
I have the same problem. I followed the instructions exactly, after gluing the display I let the iMac lie on its back for 24 hours.
Then I tilted the iMac forward and after 2 days the display started to peel off.
What needs to be done so that the display does not come off? Ambient temperature? Or is it necessary to heat the display somehow after gluing the display?
Ondrej -
Corey, could I ask you a question? Have you successfully removed a display after it has been attached using the aftermarket adhesive strips? I didn't have a problem removing the original display adhesive, but when I decided to reopen my iMac to upgrade the SSD, I had a very difficult time, which ended up breaking the screen...Thanks very much
-


Annuleren: ik heb deze handleiding niet afgemaakt.
103 andere personen hebben deze handleiding voltooid.

5 opmerkingen
Is there any reason to believe that Apple would deny any warranty repairs due to these adhesive strips not being identical to Apple's? I'd like to open and clean my iMac before taking it in to have the display replaced under warranty, but the vibes I'm getting from Apple support suggest that Apple may deny me service if the adhesive strips 'show any signs of tampering', i.e., being replaced for any reason. This sounds silly to me, as it doesn't void Apple's warranty to upgrade my hard drive.
<<<crickets>>>
Unfortunately, these strips are not even close to the original ones. Has anyone tried to reopen the iMac with these strips in place? A real pain… The original one must have a sort of foam in-between so that one can cut through with the ifixit wheel or a knife. After that, it is easy to remove the adhesive swipes on both sides. Trying to reopen an iMac with the iFixit strips in place is really hard and impossible with the iFixit wheel. Sad…
True ! Same goes with OWC’s strips : no foam.
The only way to reopen the iMac should it be needed, is to use razor blades…
José -
Clear tuto, I did it on several IMac, the first time was a discovery… than it became easier on the following, as usual the best is to take your time and follow the instructions which are very clear
Is there anything better than these self-adhesive strips?
They don’t seem as thick as the original adhesive and not as strong. As the adhesive weakens when warm, I’ve had a screen come loose within a few days of use. Luckily the user was in front of it to catch it, else we could have been looking at a very expensive repair.
Cool_Breeze - Antwoord
Hello, in 99% of cases this happens because the residues of the old stripes on the display side have not been completely removed.
McFix - Antwoord
My strips are labelled 14, 15, 16, 21, 22, 23 in a kit for the late 2013 iMac. That matches neither set mentioned here. So I have 14 and 15 instead of 25 and 26. It seems a mix of the two sets described, but since either should work for the 2013 model I should be fine?
Bernd - Antwoord